The e-commerce website Flipkart is hosting Daily Trivia Quiz. Every day it brings a bunch of new questions for its users. By answering them correctly you can win exciting prizes. The questionnaire is based on questions related to general knowledge. Also, the users can win free vouchers and super coins, among other offers via the daily quiz. 3 July 2021 Flipkart Daily Trivia Quiz Answers has already gone live on its platform.
The participant should be at least 18 years old and should have a valid login ID. The Quiz is available on the mobile platform and not the web version. E-commerce conducts the quiz on daily basis and goes live at 12:00 AM IST and runs till 11:59 PM IST. The winners are announced within 15 days from the date of participation that can be viewed under the Gems/Rewards section in the app.
How to participate in the Flipkart Daily Trivia Quiz
To participate download the Flipkart app on your phone. Then open the Flipkart app then head to Game Zone. Now click on the Daily Trivia Banner or search for Daily Trivia. Enter the game and answer all 5 questions with correct answers.
3 July 2021 Flipkart Daily Trivia Quiz Answers
Question 1: Singer Sona Mohapatra married to which music Director?
Answer: Ram Sampath
Question 2:George Harrison, The English musician, was from which famous Brand?
Answer: The Beatles
Question 3: Bates Motel is the setting for most of the plot of which Alfred Hitchcock Film?
Answer: Psycho
Question 4: The iconic TV Show Buniyaad was directed by which film director alongside Joyti Sarup?
Answer: Ramesh Sippy
Question 5: Which ex-wrestling star starred as Guard Dunham is the movie The Longest Yard?
Answer: Steve Austin
3 July 2021 Amazon Quiz has now gone live. Every day the e-commerce website brings a daily quiz for its customers. The quiz begins from 12 AM to 11:59 PM. Those participating in the quiz can win exciting prizes by answering all the questions correctly. Today all the customers across the country can win Rs 15000 Amazon Pay Balance.
Amazon is back with another new daily quiz. Amazon quiz brings an opportunity for its customers to win daily prizes such as mobile phones, other gadgets including Pay Balance also. If you managed to answer all the questions correctly you can stand a chance to win Rs 15,000 Amazon Pay Balance. Check out today’s answers for the Amazon quiz.
3 July 2021 Amazon Quiz Answers
Question 1: Recently launched ‘Mayflower 400’ is the world’s first unmanned what?
The answer is- Ship
Question 2: The Bench, narrating the special relationship between father and son, is the first children’s book written by which famous personality?
The answer is- Meghan Markle
Question 3: Which country’s first Mars rover is named ‘Zhurong’?
The answer is- China
Question 4: If the Greeks called him Poseidon, what did the Romans call him?
The answer is- Neptune
Question 5: Where were the 1992 edition of these games held?
The answer is- Barcelona
For the latest gadget and tech news, and gadget reviews, follow us on Twitter, Facebook and Instagram. For newest tech & gadget videos subscribe to our YouTube Channel. You can also stay up to date using the Gadget Bridge Android App.
Indian e-commerce platform Flipkart has announced the digital platform focused on boosting local entrepreneurship. Shopsy is an app that claimed to open opportunities to enterprising Indians to start their own online business with no upfront investment. The users will be able to share catalogues of a wide selection of 15 Crore products offered by Flipkart sellers, ranging across Fashion, Beauty, Mobiles, Electronics and Home, among others with potential customers via popular social media and messaging apps. With the launch of the Shopsy app, Flipkart will take on a very popular online earning app Meesho that allows its users to earn money without any investment. Prakash Sikaria, Senior Vice President – Growth and Monetization, Flipkart, said, “Over the last many years, Flipkart has been committed to contributing towards creating direct and indirect employment opportunities across the country. Shopsy is launched to further that vision and provide additional earning opportunities for millions of enterprising Indians. Now, anyone from anywhere can start their online business with zero investment. In addition, we are opening up Flipkart’s years of e-commerce expertise for Indian entrepreneurs. Entrepreneurs now will utilize Flipkart’s catalogue, established delivery networks, and infrastructure to bring reliability and speed. These benefits will help them enhance the end consumers’ experience, which in turn help them grow their business.”One can simply register on the Shopsy app using their phone numbers and can explore a range of products from various suppliers. The users can also share catalogues with potential customers via popular social media and messaging apps. Once you place the order on behalf of customers, the product(s) get delivered to their address, and the commissions for that order get initiated to your account. As per the company, the commission percentage will vary depending on the category of products being ordered.While the budding entrepreneurs can now set up their business as long as they have access to a network of people that trust them, without the hassle of investment, inventory or logistics management. This initiative will also create a huge opportunity for innovative e-commerce models that helps these businesses become digital brands, catering to pan India customer bases.
For the latest gadget and tech news, and gadget reviews, follow us on Twitter, Facebook and Instagram. For newest tech & gadget videos subscribe to our YouTube Channel. You can also stay up to date using the Gadget Bridge Android App.
Apple has released the watchOS 8 public beta for your Apple Watch and you can be a public beta tester. All you need to do is sign up for Apple’s beta program and you can use the beta version of watchOS 8 on your Apple watch. If you have an iPhone with iOS 15 you can pair the iPhone with the Apple watch and install the public beta version. Remember: The watchOS 8 public beta can only be downloaded and installed using the iOS 15 beta. But as with every beta, there is a high risk of running into bugs and similar issues. And also once you have installed watchOS 8 you cannot roll back to the watchOS 7. So be careful and keep this in mind when you make the choice.
Read more: How to download and install watchOS 7.4 beta 5 on your Apple Watch?The watchOS 8 public beta version is now available for Apple Watch Series 3, 4, 5, 6, and SE devices. This beta version of the WatchOS 8 releasing later this year has some exciting features like respiratory sleep, tracking, new workouts mode, and multi-timer support. And also a bunch of new changes to different series of Apple watches including Photos which will have support for memories, highlights, and images that can now be shared from iMessage and mail. New AirTag tracking support labeled as FindMy. New feature to Apple Music where you can now share music on messages. And also pretty cool weather prediction notifications.
Read also: Android 12 Beta 1 now available for download: These are the compatible devices
Steps to install watchOS public beta:
Using an iPhone which has iOS 15>Search the website for Apple’s public beta website.
From the top left corner>Click two-line icon>Sign in.
Choose Downloads from the two-line icon.
Scroll down and select Install profile>Next to watchOS beta.
When Allow pops out click on it>Hit close.
Now go to settings on your device>Find Profile download.
Click install on the top right corner>Enter passcode if prompted.
Carefully read the consent agreement>Tap install two more times.
Restart your iPhone when required to make the changes complete.
Now open the Apple Watch app and go to General>Software update.
You can see watchOS 8 available>Download and install.
The software update will be downloaded to your Apple Watch from the iPhone. And in order to finish the installation, you have to make sure the Apple Watch is plugged into its charger and your iPhone has 50% or more charge with a Wi-Fi-connected. And as soon as the public beta version has completed installing you will be able to completely test the watchOS 8 public beta.
For the latest gadget and tech news, and gadget reviews, follow us on Twitter, Facebook and Instagram. For newest tech & gadget videos subscribe to our YouTube Channel. You can also stay up to date using the Gadget Bridge Android App.
In remote work life where everything revolves around connecting online, Google Meet is one of the platforms to meet our needs. Google has made the video meeting platform free with all its services. Many have shown appreciation for Google Meets and the service that it offers. Another good reason for video call users accessing the service gives options to jump from one video calling service to another. However, even Google Meet can face audio issues sometimes. Read the guide below to fix the audio issues on Google Meet.
Test your audio before joining any meeting
Before heading to any advanced setting to fix the audio problem in Google Meet. It is important to test your audio before you join or accept any video meetings.
Check if Google Meet has the selected device speakers
The audio issue can be arising from your device’s speakers settings. So you should open Google Meet and go to the settings if the right speakers of the device have been selected. Just in case the settings have not selected the device speakers the problems with the audio issue are from here. Check the steps to check the settings.
Google Hangouts MeetAnother reason for your audio not working on Google Meet might be that the audio driver has not been updated lately. The corrupt drivers on your computers must be the biggest reasons for your audio problems while using Google Meet. Follow the steps to update your audio drivers and to fix the audio issues on Google Meet.
Search for Device Manager on the search bar at the bottom left corner.
Open the Device Manager function.
Scroll down and find Sound, video, and game controller.
From the option, you will see two options: Realtek audio and Intel(R) display audio.
It is common for users to accidentally hit the mute button in the dedicated media keys row and kill the sound on their PCs. If you are wondering why there is no sound on Google Meet, it might be a good idea to check the system audio settings. Either hit the mute button on the keyboard or access the volume controls from the taskbar and make sure the device volume is at an optimum level.
Disable Bluetooth
If your PC is connected to a Bluetooth audio device, it will not relay the audio through its own speakers. This is the case when you are on a Google Meet meeting as well. It is easy to connect wireless headphones or earbuds to your PC and then forget about them. Access the Bluetooth settings from the taskbar and make sure it is not connected to any audio device.
Frequently Asked Questions (FAQs)
What is causing audio issues in Google Meet?
If your PC is not relaying the Google Meet audio it could be because of outdated audio drivers, lack of speaker access to Google Meet, or the PC being muted or connected to another audio device.
How do I update the audio drivers on my PC?
To update the audio driver on your PC, go to Control Panel>Device Manager>Sound, right-click on the audio driver and select ‘Update driver’.
These are the top 6 ways to fix any audio issues on Google Meet for PC. As a general rule of thumb, you should clear all tabs before getting on a Google Meet call. If you know of any other way to fix this problem, let us know in the comments!
We often face difficulty in managing bills and services from multiple local service providers and sometimes get frustrated because multiple bills have to be paid on different due dates. Over that, we forget to get them recharged. So to manage all these individual services the Indian telecom service provider Bharti Airtel today announced a new service for mobile called Airtel Black. This service is said to provide a collection of 2 or more Airtel services like Fiber, DTH, Mobile into one service. With this, the user is entitled to receive one single bill and don’t have to deal with multiple bills individually. Here are all the details.Airtel Black the latest program by the telecom company in which a customer can bundle 2 or more of Airtel services (Fibre, DTH, Mobile) together to become Airtel Black – which entitles the customer for one single bill. In addition to this, they will also have one Customer Care number with a dedicated team of relationship managers, and priority resolution of faults and issues. All of this also comes with the amazing value of zero-switching and installation costs coupled with free service visits for life. Airtel Black is a convenient way to manage multiple bill payment dates, navigating customer care IVRs, or interacting with separate service providers. All the customers will connect to a care representative within 60 seconds of calling. The team of experts managing the customer relationship keeps in touch with all your requirements and solves them on a priority basis. All service visits needed for your service come to you on priority, and free of charge.According to the company, Airtel Black will also help customers enjoy uninterrupted TV viewing, due to DTH being offered as a billed service. All the user needs is to pay their one bill monthly. They will have a full choice of selecting their suitable plans for each service and then bundle them together for billing. Those who are interested have to download the Airtel Thank app and choose an Airtel Black plan. They can plan by getting the existing service together into one single plan. Other than that, the customers can also visit the Airtel Store or give a missed call on 8826655555 to upgrade to Airtel Black. As per the company if a customer chooses any two or more services can avail first 30 days free on the new service added. There are fixed Airtel Black plans as well. The Rs 2099 monthly plan will offer 3 mobile connections 1 fiber and 1 DTH connection. Whereas Rs 1,598 plan will include 2 mobile connections and 1 fiber connection. The Rs 1,349 plan includes 3 mobile connections and 1 DTH connection and lastly, Rs 998 plan will consist of 2 mobile connections and 1 DTH.
For the latest gadget and tech news, and gadget reviews, follow us on Twitter, Facebook and Instagram. For newest tech & gadget videos subscribe to our YouTube Channel. You can also stay up to date using the Gadget Bridge Android App.
As the new normal life demands everything to be remote. Zoom has become the most popular video meetings and calls platform. As you might have experienced, scheduling your meetings is more frequent and necessary. But what will be the point if the audio is not audible at all. There are some ways you can fix the audio issues on Zoom meetings. Check the guide below.
Check your microphone before joining a meeting:
Zoom allows you to test your microphone before joining a meeting. Make sure you have put the settings to automatically join by computer audio. Similarly, you can test your audio speakers and also test your microphones. Here is the guide to test your audio before joining a meeting.
When you are connecting to a video meeting>A page will appear with two options: Join with Computer Audio, and Test Speakers and Microphone.
Click on Test Speakers and Microphone.
From a pop-up window, you will see the option to test your speakers>Do you want to hear a ringtone hit yes.
If you do not hear a sound, change the speakers.
Now Zoom will ask for the Speak and pause>Make sure the microphone is audible.
Another step you can do if you are facing audio issues on your Zoom meeting is by going to advanced audio settings. Basically, these advanced settings are for reducing background noise and to enhance audio. But it is also designed to fix low audio or any audio problems in Zoom. Follow below to solve the audio problem.
On the zoom screen>Click on the half arrow on mute.
Go to audio settings>Check if the Suppress background noise is in auto.
Scroll down to the bottom of the page and tap Advanced.
From the options click on the half arrow>Check if it is on auto.
The audio issue on your Zoom meeting might also be from your computer audio driver. There is a very high chance that your computer audio driver is outdated and it is not compatible with the Zoom meeting audio settings. So updating the audio driver might fix the problem with the audio issues in Zoom. Read the steps below to check the audio driver.
Right-click on the Window icon.
And select Device manager.
Click on Sound Video, and game controllers with the help of the half arrow next to it.
Again use the right-click and from the open up page>Update driver.
Now go to the zoom meeting to check for the audio after you update the audio driver.
Vivo is all set to launch a new smartphone in the market. However, the company has not confirmed but the Vivo S10 has been spotted on the Geekbench website lately. The phone is going to succeed the Vivo S9. As per the listing, the phone is tipped to come with a triple rear camera and 44W fast charging support. Additionally, it will be powered by MediaTek Dimensity 1100 SoC. The smartphone is expected to debut in China later this month. Moreover, some live images of Vivo S10 Pro have also appeared on the web suggesting 5G capability.Vivo S10 has been spotted on the Geekbench website ahead of the official launch. The listing has revealed the key details of the alleged smartphone. The upcoming smartphone by the company is said to have scored 647 points in the single-core test and 2,398 points in the multi-core.Vivo S10 has surfaced with the model number V212A. As per the listing, the handset will be equipped with ARM MT6891Z/CZA CPU which is the MediaTek Dimensity 1100 SoC. The processor will be paired with 12GB of RAM which is expected to be offered in more configurations. However the past reports suggest that the handset will be available in two variants, 8GB RAM with 4GB of virtual RAM and 12GB RAM with 4GB of virtual RAM. Coming back to the Geekbench listing Vivo S10 is slated to come with Android 11 out of the box.Previously the device was tipped to sport a triple rear camera setup highlighted with a 108-megapixel sensor which is an upgrade over its predecessor having a 64-megapixel main sensor. In addition to this, the phone will have NFC support and UFS 3.1 storage. The smartphone will run Origin OS based on Android 11 and will have support for 44W fast charging.Image Courtesy: Twitter/@TechnoAnkit1Apart from this, some live images have also surfaced on Twitter that are believed to be Vivo S10 Pro 5G. The back panel of the device shows a hue changing rear which is quite similar to Vivo V21 featuring a triple rear camera sensor housed inside a rectangular module. The front of the phone carries slim bezels on the sides and sports dual front cameras for selfies.
For the latest gadget and tech news, and gadget reviews, follow us on Twitter, Facebook and Instagram. For newest tech & gadget videos subscribe to our YouTube Channel. You can also stay up to date using the Gadget Bridge Android App.
Using the internet or mingling online should always be secure and private. Telegram has enabled the feature to hide your profile picture from others. This new Telegram’s Privacy feature has the options and customisation to choose from, which enables you to hide your profile image from other users or groups. The options are available for both Android and iOS. Here are the steps to enable it.
How to hide profile picture on Android:
With the new privacy feature, you can not only hide your profile pictures but you can also maintain your security while using the Telegram app by hiding your number. By using the controls in privacy settings you can select who you want to hide your profile pictures from by selecting the contacts or hide them from everyone. The below guide is to enable the function to hide your telegram profile picture on your Android smartphones.
Open the Telegram messaging app on your phone: Log in if you have not.
Go to the left-top corner>Click the hamburger menu.
Now tap on Settings.
Next, scroll down to Privacy and security.
From the next open-up page>Select Profile Photos.
Now from options>Choose My contacts.
To hide your profile>Never allow>Add users>Click Done.
Now you will be able to hide your profile picture.
The feature to disable your profile photos on telegram has also been enabled on iOS also. Since the interface in iOS is slightly different from Android the steps will guide to make the process easier. Follow the guide below to hide your telegram profile picture on your iOS.
Open the Telegram app and log in if you have not.
Next, go to Settings.
And click on Privacy and Security.
Navigate to profile photo.
Now from the page “Who can see me my Profile Photo”>Select My contacts.
You can also make additional settings from the Exception section: Never share with, Always share with.
You can also make use of the additional settings provided by Telegram. There are a bunch of features that you can enable to make your telegram account more private and secure. There are options for hiding your Phone number, your last seen & online status, your calls, groups & channel, and more. To enable all these settings you have to use the same steps Settings>Privacy & Security>Privacy>Phone number, Last seen, Groups & Channel. Similar to the hide your profile photo features the options for hiding your phone and last seen also has an option for nobody and my contacts.
For the latest gadget and tech news, and gadget reviews, follow us on Twitter, Facebook and Instagram. For newest tech & gadget videos subscribe to our YouTube Channel. You can also stay up to date using the Gadget Bridge Android App.
The following guide is for hiding your apps when you do not want to see them. But you also do not want to delete them or you have no need for the app but occasionally you want to access them. This situation of wanting to hide your app can arise for many reasons, follow the guide below to hide apps on your Android smartphones.
Hide your apps on your Android smartphones: Settings.
Hiding your apps can sometimes get judgy, to be frank. But what people do not know is that it is actually for security and to ensure the safety of your Android smartphones. Hiding your apps works best when you lose your phone or it is stolen. The guide below will work for most Android smartphones. Note: Android smartphones do not come with hiding your app feature. But if you disable the app from the setting the app will not appear in the App drawer, however, it would not be uninstalled from your phone also.
Open the phone settings and go to Apps by scrolling down.
Tap the app you want to hide>Click disable from the App info page.
Wait for the confirmation page to open up and click Disable.
Now you can hide your app from your app without uninstalling it.
The method is not for every Android smartphone but all Android phones, which feature a biometric security key option to secure the app can use it. This guide seems fit to mention since most Android smartphones now have the option to make your folders secure with a pin or any other form of lock. Follow the steps below to safeguard the folder with secure folders.
The first thing you should do is open the settings on your smartphones.
Browse for the Biometrics and security options and tap on them.
Now select Secure Folder>Follow all prompts.
Enter a security code>Or any other form of lock.
Now check in the App Drawer if your folder is secure, so are all your apps in the folder.
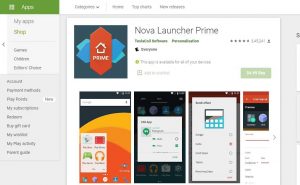
This Android launcher has been suggested by many experts including us. The app comes with plenty of features and it runs smoothly. However, you need Nova Prime to hide all your apps. The steps below are for hiding your apps in your Android smartphones.
Download the app from Google Play Store.
Before making further steps make sure you have made Nova launcher as your default launcher.
Now open the Nova launcher app>Settings on the app.
Click Apps & Widgets drawer.
Go to the head drawer>Find hide apps.
Tick the box next to the app that you want to hide.
And since the app is hidden, if you want to use the app> use the search box and type the app name in the search box and it will appear.
WhatsApp has been presented as the most trusted online messaging app. And sending photos, videos, and files has never been this easy. As many of you have faced, WhatsApp messenger apparently allows you a limited size of files that you can send. The maximum size that you send is 64 MB but what if you want to send videos files that are bigger. The following will show you some methods to send your large video files using the app.
Send large video files using Google Drive:
The first way to send your large video files on your Whatsapp is through Google Drive. Using this third-party cloud service you can send all your large files using a link. You can upload any file size on the cloud and share the link on your Whatsapp, then the receiver can download the large video files using the link. Follow the steps to send large video files using Google Drive.
The first step is to upload the large video file you want to send via Google Drive.
Once you have completed the upload>Go to the top corner and find Share.
Select Share with others>Choose anyone with the link.
And copy the link>It gets copied to the clipboard.
Now share the link on WhatsApp with anyone.
The receiver can click on the link and open the file>And Download.
Send large video files using other websites: WeTransfer
The website is another method for you to send your large files on Whatsapp. WeTransfer is a tool that lets you share files using a link with anyone. The website offers two ways of sharing, if you have the free version you can send files up to 2 GB but the paid version lets you send files up to 20 GB in size. Here is the step to share your large video files using WeTransfer.
Send the video files using Video compressor Panda:
Video compressor Panda is an app that you can download on the Google Play Store. The app will compress your video so that you can send the large video files on WhatsApp in the 64MB limit. Here is how to send using the app.
Download the app on your Android smartphone.
Open the app and select the video you want to send>Next.
Tap on Compress.
Now you can choose the options: Share directly or Save it on your device and send it.
Finally, it looks like PUBG has succeeded with Battlegrounds Mobile India, which is a dedicated and exclusive game for the Indian market. Last month Krafton released the BGMI test program. However, the beta game is available to a limited number of testers but today the much-awaited game is out of the beta phase and has been officially released for the PUBG fans in the country.The PUBG Mobile fans can now enjoy the original version of Battlegrounds Mobile India on Android devices. The new battle royal game will be available as a free-to-play experience on mobile devices. You can now download the game from the Google Play store as it is available for all now. If you have not got yourself pre-registered for the BGMI then you can simply go to the Google Play Store app on your Android device and can easily download the game on your devices. Sadly there is no update on when it will be released for iOS but you can also download and enjoy the new gaming experience on your PC as the game can be also be downloaded via the Google Play store app from your desktop.
Those who have already downloaded the beta version of Battlegrounds Mobile India can update the game to the official version by heading to the Google Play Store and opening the Battlegrounds Mobile India app and tapping on the ‘Update’ button. Wait until the update gets completed. Once complete you are ready to go.The all-new Battlegrounds Mobile India will bring an array of maps, game modes, and exciting challenges. It will feature diverse maps with different terrains in a virtual setting, Weekend Vibes, Celebration Time, Friends for Life and much more with exciting rewards from outfits to weapon skins.
You can play solo or can team up with your friends. According to Krafton, as more and more players join the game, the India Ka Battlegrounds event rewards you with a permanent purple outfit for free.Besides this Krafton has also taken care of privacy and data security. The BGMI will now collect, use or share any personal information for those who are under 18 years of age without verifiable parental consent or as permitted by law. Those who are underaged will be asked to provide the mobile phone number of their parent or guardian to confirm that they are legally eligible to play the game. Also, the game will be playable for a maximum of 3 hours a day and the maximum daily amount of using our paid service will be Rs 7,000 for under 18 users.
For the latest gadget and tech news, and gadget reviews, follow us on Twitter, Facebook and Instagram. For newest tech & gadget videos subscribe to our YouTube Channel. You can also stay up to date using the Gadget Bridge Android App.
In its new update, Google has upgraded its Passes API that will be able to store and access COVID vaccination and test information on Android devices. This dedicated Card also known as COVID Card will create a shortcut on the user device home screen to display COVID vaccination and test information stored on their Android devices. This will also enable you to share your information, but will not be shared by the company on any third-party app and will not be used for targeting ads.As per the latest blog post, developers from healthcare organizations, government agencies and organizations authorized by public health authorities to distribute COVID vaccines and/or tests will have access to these APIs to create a digital version of COVID vaccination or test information. According to Google the Passes API or digital COVID card feature will be initially released in the United States followed by other countries.Using COVID Card the users will get access to all their information stored on it and a shortcut will be created on their device home screen, even when they are offline or in areas that have weak internet service. The service is accessible to a device running Android 5 or later and bePlay Protect certified. Also, there is no compulsion to have the Google Pay app installed on their device.The new COVID Card is also said to come with privacy and security features as it will store user’s COVID vaccination and test information. Also one needs to manually store it on each device when the user wants to access this information on multiple devices.Additionally, Google will not store a copy of the user’s COVID vaccination or test information. Users can also choose to COVID Card to others however Google will make sure your information is not being shared with its various services or third parties and it is not used for targeting ads.To make your info more secure a lock screen is required in order to store a COVID Card on a device. To protect the user’s personal information they will be asked for the password, pin or biometric method set up for their Android device.Besides this Google API or Google Pay for Passes also allows users to save boarding passes, loyalty programs, offers, gift cards, or tickets to their phones for easy access at the right time.
For the latest gadget and tech news, and gadget reviews, follow us on Twitter, Facebook and Instagram. For newest tech & gadget videos subscribe to our YouTube Channel. You can also stay up to date using the Gadget Bridge Android App.
The e-commerce website Flipkart is hosting Daily Trivia Quiz. Every day it brings a bunch of new questions for its users. By answering them correctly you can win exciting prizes. The questionnaire is based on questions related to general knowledge. Also, the users can win free vouchers and super coins, among other offers via the daily quiz. 2 July 2021 Flipkart Daily Trivia Quiz Answers has already gone live on its platform.
The participant should be at least 18 years old and should have a valid login ID. The Quiz is available on the mobile platform and not the web version. E-commerce conducts the quiz on daily basis and goes live at 12:00 AM IST and runs till 11:59 PM IST. The winners are announced within 15 days from the date of participation that can be viewed under the Gems/Rewards section in the app.
How to participate in the Flipkart Daily Trivia Quiz
To participate download the Flipkart app on your phone. Then open the Flipkart app then head to Game Zone. Now click on the Daily Trivia Banner or search for Daily Trivia. Enter the game and answer all 5 questions with correct answers.
2 July 2021 Flipkart Daily Trivia Quiz Answers
Question 1: Who Among these is a part of the film Jumanji: The Next Level?
Answer: Nick Jonas
Question 2: The World’s youngest PM, Sanna Marin has been recently elected as the PM Of
Answer: Finland
Question 3: Who is known as Kriss Kringle In the USA And Father Christmas In Britain?
Answer: Santa Claus
Question 4: Oxford Dictionaries has named ___ As it’s 2019 Word of the year?
Answer: Climate emergency
Question 5: The Miss Universe 2019 Zozibini Tunzi is from which Country ?
Answer: South Africa
The e-commerce website Amazon is back with another daily quiz on its platform. The e-retailer conducts Amazon quiz sessions every day for its customers. The customers from different parts of the country can win exciting prizes and today’s 2 July 2021 Amazon Quiz will let you win Rs 50,000 Pay Balance by answering all the questions correctly.
2 July 2021 Amazon Quiz is live now and the participants can stand a chance to win Amazon Pay Balance worth Rs 50,000. By participating in the daily quiz the customers can win products such as OnePlus 7T, Apple iPhone x, iPhone Xs, Go Pro Hero 8 and many more gadgets as well as Pay Balance. You can play the quiz from 12 AM to 11:59 PM every day and the winner’s names will be announced at the end of every month. Today’s quiz result will be announced via a lucky draw. Check out today’s answers for the Amazon quiz.
2 July 2021 Amazon Quiz Answers:
Question 1: Multiple lions have tested positive for COVID-19 at Nehru Zoological Park situated in which city of India?
The answer is- Hyderabad
Question 2: Which Indian has been nominated as an athlete ambassador for the International Olympic Committee’s ‘Believe in Sport’ campaign?
The answer is- PV Sindhu
Question 3: Scientists have recently discovered what may be the smallest known black hole in the Milky Way galaxy. What is it called?
The answer is- The Unicorn
Question 4: What is this centuries-old art of clipping hedges into various ornamental shapes traditionally called?
The answer is- Topiary
Question 5: What is the pirate flag with the skull and cross-bones called?
The answer is- Jolly Roger
For the latest gadget and tech news, and gadget reviews, follow us on Twitter, Facebook and Instagram. For newest tech & gadget videos subscribe to our YouTube Channel. You can also stay up to date using the Gadget Bridge Android App.
OTP stands for One Time Password and as the name signifies ‘One time’ it is not important to save an OTP message. So, Google has recently introduced a feature to its messaging app that automatically deletes the OTP messages from your Android smartphones after 24 hours. The new feature will help maintain your inbox and free it from any clutter. Earlier, many would waste time manually deleting all the messages, now it can be done automatically. Read below to know more. The feature will be available on Android 8 and later devices, make sure you have the updates. Do remember the function is not on by default so you can always change the settings when you wish. You can go to your phone settings and make the changes to the message app settings. And for turning it off do the same. The steps to turn on the function of auto delete OTP messages are simple. First check if your Google message app on your Android smartphones is up to date. You can check this on the Play Store, if it has not been updated you should update the messaging app. Now when you open the messaging app on the top you will see three categories: Transaction, OTPs, Offers. Click on OTPs and from the pop-up page select Auto-delete OTPs>Continue. And if you want to turn off the Auto-delete function. Tap on the three-dot icon menu on the top>Settings>Message organisation>Toggle off Auto-delete OTPs after 24 hrs.
Read more: How to remove the news and interest widget from the Windows 10 taskbar?Since different smartphones have different settings this is another way to turn on the Auto delete function. Open the Google message app on your Android smartphone and go to settings using the three-dot icon on the top right corner next to the search box. From the drop-down page scroll down to settings and click on it. For the next step, click on Message organisation. Now when the page opens up, toggle both Messages by category and Auto-delete OTPs after 24 hours. Now that you have enabled the option to auto delete your OTPs, the message will be deleted after 24 hours. And just in case if you want to turn off the auto-delete use the same step to go to Auto-delete OTPs and toggle it off.
Read also: Here is how to fix the Poco X2 camera crashing issueFor more information, the Google messages app uses a machine-learning algorithm that will sort your messages into personal, transactions, and OTPs. This will help in filtering all your messages on the app. Please note, the other messaging apps have also enabled the categorisation of the messages in the respective apps, but have not brought the Auto-delete of OTPs in 24 hrs features. Also, Google recently did add end-to-end encryption (E2EE) to the Google messages app, which is the first of its kind.
For the latest gadget and tech news, and gadget reviews, follow us on Twitter, Facebook and Instagram. For newest tech & gadget videos subscribe to our YouTube Channel. You can also stay up to date using the Gadget Bridge Android App.
The Chinese smartphone company Oppo today announced that on July 14 it is going to launch Oppo Reno 6 Series in India. The new series consists of two phones Oppo Reno 6 Pro 5G and Reno 6 5G. Both the phones debuted in China in May this year. The smartphones come with 65W fast charging support and are powered by MediaTek SoCs and multiple cameras set up.Just ahead of the official launch the company has listed the Oppo Reno 6 5G series on Flipkart for its availability. The listing also highlights some of the key specs of the upcoming Reno smartphones. As we are already aware of its specification, the company is going to officially reveal the pricing on the launch day only. The handset is set to debut on July 14 at 3 PM IST. To recall, Oppo Reno 6 5G was launched in China at a starting price of CNY 2,799 that translates to Rs 32,253 for the base 8GB RAM with 128GB storage options. There is another 12GB RAM with 256GB storage variant which is priced at CNY 3,199 translating to Rs 36,866. On the other hand, Reno 6 Pro is made available in two variants, the 8GB RAM with 128GB storage options retails at CNY 3,499 that translates to Rs 40,309 and the 12GB RAM with 256GB options comes with a price tag of CNY 3,799 that comes around Rs 43,790.Oppo Reno 6 5G specsOppo Reno 6 was launched in China featuring a 90Hz 6.43-inch full-HD+ hole-punch AMOLED display. The phone ships with ColorOS 11 based on top of Android 11 out of the box. Under the hood, there is a MediaTek Dimensity 900 SoC, paired with up to 12GB RAM and up to 25GB storage. In terms of optics, there is a triple rear camera set up that includes a 64-megapixel primary sensor, an 8-megapixel secondary sensor, and a 2-megapixel tertiary sensor. Upfront there is a 32-megapixel selfie camera. The device is backed by a 4,300mAh battery that comes with 65W fast charging.Oppo Reno 6 Pro 5G specsOppo Reno 6 Pro 5G features a bigger 90Hz 6.55-inch full-HD+ OLED display. Powered by MediaTek Dimensity 1200 SoC the Pro variant comes with up to 12GB of RAM and up to 256GB storage option. In terms of imaging, the phone consists of a quad rear camera setup that includes a 64-megapixel primary sensor. Further assisted by an 8-megapixel secondary camera, and dual 2-megapixel sensors. The selfie sensor is the same as above. There is a 4,500mAh battery on board with 65W fast charging support.
For the latest gadget and tech news, and gadget reviews, follow us on Twitter, Facebook and Instagram. For newest tech & gadget videos subscribe to our YouTube Channel. You can also stay up to date using the Gadget Bridge Android App.
Samsung today announced the official launch date for its upcoming smartphone in the Indian market. The company has scheduled to launch the Samsung Galaxy F22 in India on July 6. The firm has also listed the device on Flipkart to tease its availability. As revealed by the company, the forthcoming phone will feature a 90Hz HD+ display. In addition to this, there is a 6,000mAh battery onboard and a quad rear camera set up as well. After introducing Samsung Galaxy F02s, Galaxy F12, and Galaxy F62 in the Indian market, the South Korean giant has today announced plans to expand its Galaxy F series lineup with the launch of Samsung Galaxy F22 in the Indian market on July 6. The device will be available via Flipkart, Samsung’s online store and select retail stores after it went official in the country. Prior to the arrival, Flipkart dedicated pages also went live.
Also Read: Samsung Galaxy Z Fold 3, Galaxy Z Flip 3, Galaxy Watch 4, and Galaxy Watch Active 4 could launch on August 3 at the Galaxy Unpacked Event
Besides this, the company has also shared some details of the Galaxy F22 smartphone which includes a 6.4-inch HD+ sAMOLED display that will come with 90Hz refresh rate support. Moreover, it is said to offer a super smooth performance by reducing motion blurs and response time.
In addition to this, the upcoming handset will be backed by a 6000mAh battery that is claimed to provide uninterrupted content viewing. In terms of optics, the Samsung Galaxy F22 will be featuring a True 48MP Quad Camera set-up. The details about the other three sensors will be revealed later on.
The official information about this product is very scarce but recently the phone was spotted on the Google Play Console website. As per the listing, Galaxy F22 will come with a display having 720×1339 pixels of resolution. The device is said to be powered by MediaTek MT6769T which is believed to be MediaTek Helio G80 SoC. Paired with 4GB of RAM the mobile phone will ship Android 11 out of the box. Looking over the specs the device is speculated to be a rebadged version of Galaxy A22, which was launched in the European market earlier last month. However, the information is not reliable but you can take it with a grain of salt.
For the latest gadget and tech news, and gadget reviews, follow us on Twitter, Facebook and Instagram. For newest tech & gadget videos subscribe to our YouTube Channel. You can also stay up to date using the Gadget Bridge Android App.
There are many reasons to factory reset an iPhone. Buying a new iPhone and throwing away our old iPhone can be the first reason. So before you sell your old iPhone or give it away to someone, the first thing you should do is completely factory reset your iPhone. But make sure you have backed up all your data somewhere. Here is how you can factory reset your iPhone.
Backup your iPhone:
Creating a backup of all your data is helpful in many ways. For instance, it stored your valuable files and images, and second, you can access the same data on your new iPhone. You can back up all your data including contacts, images, and messages to your Mac. check the steps below.
Another reason to factory reset an iPhone is to fix glitches and lag when the iPhone gets older. One thing to remember before you factory reset your iPhone is it rolls back to the basic default settings and you lose all your saved data, so follow the above steps first. Here are the steps below to reset your iPhone.
Open the Setting with the gear icon.
Go to general.
Scroll down to the bottom of the page>Tap Reset.
From the page open up you will find many options for reset>Choose the Erase all Content and Settings.
The iPhone will ask for your iPhone password which you have set>Erase iPhone.
Now enter your Apple ID when prompted.
The process will take a few minutes and the factory reset will be completed.
The data which you had backup to your Mac can now be restored when the factory reset process is completed, Or if you want to restore the backup of the iPhone you just factory reset to a new iPhone. Follow the guide below.
Connect the fresh factory reset iPhone or your new iPhone to Mac.
After the computer asks for a passcode enter the passcode>Trust.
Select on your device.
And from the open up page>Click restore backup.
Carefully check the date of each backup>Choose the most relevant and recent since you recently backed up.
Facebook is leading the graph of Social media apps and websites. The word Facebook has become synonymous with social media. However, if online privacy is your biggest concern and if you feel the need to delete your Facebook account the following steps will guide you. For those who want to disconnect from social media, Facebook has added two options to deactivate your account permanently or temporarily. Note: There are differences between deleting a Facebook account and deactivating a Facebook account. When you deactivate your account you can retrieve your account when you want to. And deleting means you are permanently deleting it from the Facebook domain.
Deactivating your Facebook account:
When you deactivate your Facebook account people can not always see your timeline or search profile on FB. But the messages you have sent will still be seen by your FB friends. The advantage of just deleting your account and deleting it is that you have the option to deactivate your account. Now follow the steps to deactivate your Facebook.
Open Facebook and log in with your username and password.
Go to the top right corner and click the upside-down arrow.
Press Settings and Privacy.
Then tap on Settings.
Now from the left side panel>Your Facebook information.
Go to the right side window>Scroll down and go to Deactivation and Deletion.
Select Deactivate account>Continue to account deactivation.
Additional information:
Your Profile is not visible.
But your Facebook Friends can see your name in their friend’s list.
Your Posts and Comments will be visible to the Group admin with your Profile name.
You can still use messenger from the Facebook messenger app.
If you strongly decide to delete your account you will delete the account permanently. This means you completely wiping out all information and shared items on your Facebook. The deleting process can take up to 90 days after you have pressed the delete button. It is advised that before you decide to delete it permanently you should download your information from FB. You can do this in some steps: Upside down arrow>Settings and Privacy>Settings>Your Facebook information>Download your information>View. Now for the steps on deleting your Facebook account follow the guide below and delete your FB account permanently using the steps.
Login to your Facebook account with your unique username/email and password.
Now navigate to the top right corner from the homepage and click on the upside-down arrow.
Now from the drop-down menu click on Setting & Privacy.
From the menu select Settings.
On the left column find Your Facebook information and click on it.
Scroll down on the right column to Deactivation and Deletion.
Now choose Permanently delete account>Continue to account deletion.
AirPods are one of the finest Apple products for your ears, designed to give you the ultimate sound. If you are in need of help in connecting your AirPods to your iPhone or Mac computers, the steps will walk you through the connectivity process of your AirPods. Though the process is known to be a simple task. The steps will make the process easier and a beginner can always take advantage of it. Follow the below guide.
How to connect your AirPods to Mac computers:
The below steps will teach you how to set up the AirPods on your Mac. So that when your Airpods are nearby your Mac you can listen to music, Siri, and phone calls. There are some requirements you need to check before trying to connect your AirPods to your Mac. For AirPods 2nd generation check if the Macbook has macOS Mojave 10.14.4 and for AirPods Pro see if the Mac is Catalina 10.15.1 macOS. Now the steps.
The first step, switch on your AirPods device>Press the button on the case until a light flashes white.
Now on your Mac Click the Apple menu>Select system preference>Bluetooth.
After the Bluetooth is on>Select Airpods from the device list>Paired the device
Select the Airpods and click the connect button next to it.
Now you can enjoy unbelievable sound and music from your Mac computers.
You can also enable the Siri voice control on your AirPods for more advanced functions.
To improve Siri and Dictation>Share audio recording>And Apple will review a sample of your stored audio.
The following are step-by-step instructions to connect your truly wireless earbuds. Airpods are meant to make full use of your iPhone connectivity and gear up your listening experience. The wireless earbuds can deliver true sound than most of the wireless earbuds available. Check out the steps below to connect your AirPods to your iPhone.
For the first step, you need to get your AirPods device ready. You do not have to worry much about switching on the AirPods is built-in with an Apple H1 chip that initiates a seamless pairing process.
Now on your iPhone, the screen will display an option to connect the AirPods>Connect.
Use the media control that pops out to pause/play/skip.
You can also make controls from the Control center that can help with noise cancellation and transparency settings.
Use more settings: Use Siri to announce your messages.
If you want to start over the process>Press the button on the back of the Airpods case.
Transsion holding smartphone brand, Tecno Mobile, today officially announced the launch of the Tecno Spark Go 2021 smartphone in India. The device comes with a dual rear camera set up and a Dot Notch display. The entry-level phone is powered by a quad-core MediaTek Helio A20 SoC. The phone ships a 5,000mAh battery and is available in a single configuration.
Tecno Spark Go 2021 tech specs
Tecno Spark Go 2021 comes with a 6.52-inch HD+ Dot Notch display. It offers 720×1,600 pixels of resolution, 20:9 aspect ratio and 480 nit peak brightness. The smartphone ships with Android 10 Go Edition and there is a quad-core MediaTek Helio A20 SoC under its hood. It will be available in 2GB of RAM with 32GB of storage which can be expanded up to 256GB using a microSD card.In terms of imaging, Tecno Spark Go 2021 features a dual rear camera setup that consists of a 13-megapixel primary sensor with an f/1.8 aperture and a secondary camera sensor. There are 18 AI Auto scene detection modes such as HDR, Night Portrait, Backlight Portrait and AI-powered Background Bokeh Effect. Upfront there is an 8-megapixel sensor on the front with an f/2.0 aperture. The selfie camera also supports AI Beauty Mode, AI Portrait Mode and Wide Selfie Mode for capturing the perfect group selfie.This budget smartphone packs a 5,000mAh battery which comes with a standby time of 36 days on a single charge. It also supports calling time of 27 hours, web browsing of 19 hours, video playback of 21 hours, game playing of 14 hours and music playback of 145 hours. In terms of connectivity, there is 4G LTE, Wi-Fi, Bluetooth v4.2, and more. The sensor onboard includes a rear-mounted fingerprint scanner, accelerometer, ambient light sensor, and proximity sensor.
Tecno Spark Go 2021 price and availability details
Tecno Spark Go 2021 has been launched in India with a price tag of Rs 7,299 for the single 2GB RAM with a 32GB storage option. The company will be offering the phone at a special launch price of Rs 6,699 for limited stock only. It will be offered in three colour options of Galaxy Blue, Horizon Orange, and Maldives Blue. The handset will go on sale via the e-commerce website (Amazon) from July 7 at 12 noon onwards.
For the latest gadget and tech news, and gadget reviews, follow us on Twitter, Facebook and Instagram. For newest tech & gadget videos subscribe to our YouTube Channel. You can also stay up to date using the Gadget Bridge Android App.
The popular video streaming platform, YouTube, has come up with a new feature letting users share video chapters from android devices. This functionally is only workable as long as the video has timestamped chapters allowing links to specific points in a video. Earlier the users were only able to share a link of the whole video, but now using the chapter sharing button on the YouTube app the user can send a video link with a particular timestamp and the recipient will be able to start the video exactly from where you wanted.First spotted by Android Police, the new feature for YouTube on Android allows users to share video chapters. Last year YouTube rolled out the functionality to add chapters to a video and the new update has brought the ability to share a particular chapter instead of sending a whole video link. With this ability, the users need not watch a whole video or start from the beginning. The video chapter feature allows you to see a complete list of chapters including the video you are watching so that you can skip to the relevant section of a video, rewatch a portion of a video and more. Each of the videos also includes a preview thumbnail of what you’ll find in that chapter, which is a very useful feature helping you to save your time by quickly jumping to the part you’re interested in.According to the report, the users will be able to add their own timestamp to the end of a URL manually if they know the shortcode. For instance ?t=77 at the end will start the video at 1:17. “but you also have to work out the time in seconds so it’s not always a quick and easy solution. The new feature stops short of the full timestamp sharing functionality we see on desktop, but it’s one step closer to that at least.”Image Courtesy: Android Police
How to access chapter sharing feature on YouTube
In order to share a chapter of a YouTube video, all you need to do is open the YouTube app on your smartphone. Then click on the chapter link at the bottom of the video. When you see a list of all the chapters a chapter sharing button will automatically appear next to each chapter. Now select the app from the list of sharing options or you may also copy the link to share on an app. The receiver will be able to start the video from the point where you wanted him/her to be watched.
For the latest gadget and tech news, and gadget reviews, follow us on Twitter, Facebook and Instagram. For newest tech & gadget videos subscribe to our YouTube Channel. You can also stay up to date using the Gadget Bridge Android App.
PDF has become a medium with remote work and remote education in place. Editing and sending a PDF is a big part of your daily work, so the following will help make the process faster and simpler. There are several ways to edit your PDF, you have the option to do the editing online or from a downloaded software. Follow the guide below to know about how to edit a PDF file today.
Edit PDF on Windows PC/Laptop:
PDFs can be edited through Microsoft Word on your Windows. MS Word allows you to open a PDF file directly and edit the file. Here are the steps you can employ in order to edit a PDF on Windows using MS word.
Save the PDF on your Windows PC/Laptop.
Right on the file and select open with MS word.
When the file opens up>Go to the top of the page and click editing: In some MS Word versions, you do not need to do these steps.
Now make required changes to the file: Signature, insert images, or text entry, and so on.
After the changes are completed>File>Export>PDF files.
Acrobat is one of the most popular tools to edit a PDF. To use this step you can either download or visit the Acrobat website. Follow the steps to edit a PDF on your Windows PC or Laptop.
Open the Adobe Acrobat app or visit the website.
Select File>Open.
Find the PDF file you need to edit.
When the PDF file opens up>Choose Edit PDF from the toolbar on the right.
If you are using a Mac and the need comes to edit a PDF the Mac Preview will help you edit the file. Mac Preview is a free tool that lets you edit PDF or other file types. Using the tool you can highlight text, include a signature, and add text and comments. Follow the steps below.
Save the PDF>Double click on the file.
Place and click your cursor on the text you want to edit.
Go to Tools>Click Annotate>Select Text>And type the Text.
To make changes in font size or colour: Select View>Click on Show Markup Toolbar>Press A.
You can also use the option to move the text box.
Using Sjeda tool:
The other option is to edit PDF files using Sjeda, an online PDF management service. Using Sjeda you can edit, convert, merge and split documents. Read the steps below to edit a PDF using Sjeda online tool.
Samsung Galaxy A52 was launched in the Indian market some time back at a starting price of Rs 26,499. The smartphone looks is very good and different to look at, sports a quad camera setup and packs a 4,500mAh battery. But does the performance of the device match its good looks and specifications? We spent a few days with the smartphone and here’s our review of Samsung Galaxy A52 that details on all the pros and cons of the device:
Samsung Galaxy A52 design and display
The look and feel of Samsung Galaxy A52 really make it stand out. The smartphone is available in Awesome Black, Awesome White, Awesome Blue, and Awesome Violet colour options and the latter two variants look funky. The device that we got for review was dressed in blue. The back panel of Samsung Galaxy A52 is made up of plastic and has a matte finish, so you will not face any problem with fingerprint smudges. There is a camera module on the back of the handset which houses four lenses and an LED flash. Besides this, the back panel also has ‘Samsung’ branding.
The company could have opted for a material other than plastic to make the device look more premium at this price point. But moving on, the edges of the smartphone have a glossy finish and the Power and Volume Rocker keys are sandwiched on the left one. The top edge has the SIM tray and the secondary microphone, while the bottom edge has the Type-C port, speaker grill, microphone and a 3.5mm headphone jack. The handset has an IP67 rating, which means that it is dust and sand proof and is also tested to work perfectly after being in up to 1 meter of water for half an hour.
Flip over and you will see the 6.5-inch Super AMOLED full-HD+ hole-punch display of Samsung Galaxy A52. We have seen thinner bezels than that of the smartphone, and the chin at the bottom is even thicker. There is a selfie camera in the hole on the top and the fingerprint scanner embedded on the lower half of the screen of the device. The colours projected on the display of the smartphone were bright and vibrant and the images were crisp and sharp. The colours remain consistent at different viewing angles and the sunlight readability was decent.
The display of the smartphone comes with a refresh rate of 90Hz, which can also be turned down to 60Hz in case you want to get more battery life. We watched quite a few Netflix episodes on the device, and during our time with it, we had a decent viewing experience. YouTube videos were much better to watch even at 1080p.
Samsung Galaxy A52 performance and cameras
Before we begin talking about the performance of Samsung Galaxy A52, let’s take a minute to shed light on the rest of its specifications. The handset is powered by the Qualcomm Snapdragon 720G processor coupled with up to 8GB of RAM and 128GB internal storage. The smartphone has a hybrid SIM card slot, so you can either choose to add a second SIM card or a microSD card. The device houses 4,500mAh battery and runs Android 11 skinned with OneUI 3.1. There are plenty of bloatware apps on Samsung Galaxy A52 including Snapchat, Candy Crush Saga, Moj, ShareChat, PhonePe, Amazon, etc. The good thing is that most of these apps, apart from the ones from Samsung’s own suite, can be uninstalled. The device also comes with Galaxy Store, which sends quite a few notifications.
Samsung Galaxy A52 turned out to be a smooth performer. We multitasked a lot on the smartphone and it managed to most tasks we threw at it with ease. We opened and switched between a lot of apps and multiple Chrome tabs during the day, and we didn’t encounter any lag or stutter while doing so. We read e-books on Kindle, watched shows on Netflix, listened to audiobooks for hours, and we our experience was a pleasant one. We should mention though that the device starts warming up while watching movies and playing games. In fact, gaming was an aspect that we have mixed feelings about. On one hand, even graphic-hungry games like Asphalt 9: Legends ran smoothly, but as we mentioned earlier, the device started heating up after a while and we also noticed a drop in the battery levels just after 15 minutes.
Coming to the battery life of the smartphone, the 4,500mAh battery can last a day and a half with moderate usage involving watching Netflix and YouTube videos, listening to music, clicking pictures and an active Instagram account.
The call quality of the smartphone was good too, and neither we faced a problem listening to callers, nor did they while listening to us.
Also read:Oppo Watch review: For the everyday power user
Finally, let’s talk about the cameras of Samsung Galaxy A52. The device comes with a quad-camera setup on its back panel that includes a 64MP primary sensor, a 12MP ultra-wide angle lens, a 5MP macro lens, and a 5MP depth sensor. On the front panel, there is a 32MP selfie camera. We should mention that the camera app has a variety of other modes including Single Take, Pro, Night mode, Slow Motion, Hyperlapse, etc. There is a scene optimizer on the camera app which could recognise most of the objects we clicked.
The camera experience on the device was average. The images that were taken in daylight by the primary camera turned out to be decent, but we should mention that when we transferred them to our laptop, they did lose some quality. But the images taken from the primary camera were obviously better in terms of detail as compared to the ones taken from the ultra-wide sensor. But those weren’t bad either. The images clicked in dimly-lit areas were average and Night Mode only made them marginally better.
We tried using the Macro and Portrait modes on the smartphone too, and the results that we got from them were quite good. We were happy with the quality and the details of the images that were captured.
The selfie camera mostly did a good job too, and performed decently in low-light areas too.
Verdict
We had much fun in the Samsung Galaxy A52 review. The smartphone has a great design, a good display, and its IP67 rating is definitely a big plus. The battery was lasting too. The cameras could be a lot better, and some aspects of the performance like warming up of the device were a bit disappointing. If the pros of the smartphone that we mentioned in the review are what you look for in a device, you can go for Samsung Galaxy A52, but otherwise, you may want to consider another Samsung device. There are plenty of handsets from Samsung’s own M and A-range that have proven their mettle, so you might want to go for them instead.
For the latest gadget and tech news, and gadget reviews, follow us on Twitter, Facebook and Instagram. For newest tech & gadget videos subscribe to our YouTube Channel. You can also stay up to date using the Gadget Bridge Android App.


")


 It is common for users to accidentally hit the mute button in the dedicated media keys row and kill the sound on their PCs. If you are wondering why there is no sound on Google Meet, it might be a good idea to check the system audio settings. Either hit the mute button on the keyboard or access the volume controls from the taskbar and make sure the device volume is at an optimum level.
 If your PC is connected to a Bluetooth audio device, it will not relay the audio through its own speakers. This is the case when you are on a Google Meet meeting as well. It is easy to connect wireless headphones or earbuds to your PC and then forget about them. Access the Bluetooth settings from the taskbar and make sure it is not connected to any audio device.


 The company could have opted for a material other than plastic to make the device look more premium at this price point. But moving on, the edges of the
  The display of the smartphone comes with a refresh rate of 90Hz, which can also be turned down to 60Hz in case you want to get more battery life. We watched quite a few
  Samsung Galaxy A52 turned out to be a smooth performer. We multitasked a lot on the smartphone and it managed to most tasks we threw at it with ease. We opened and switched between a lot of apps and multiple Chrome tabs during the day, and we didn’t encounter any lag or stutter while doing so. We read e-books on Kindle, watched shows on Netflix, listened to audiobooks for hours, and we our experience was a pleasant one. We should mention though that the device starts warming up while watching movies and playing games. In fact,
  Coming to the battery life of the smartphone, the 4,500mAh battery can last a day and a half with moderate usage involving watching Netflix and YouTube videos, listening to music, clicking pictures and an active
  The camera experience on the device was average. The images that were taken in daylight by the primary camera turned out to be decent, but we should mention that when we transferred them to our
  We tried using the Macro and Portrait modes on the smartphone too, and the results that we got from them were quite good. We were happy with the quality and the details of the images that were captured.
 The selfie camera mostly did a good job too, and performed decently in low-light areas too.