

-
In This Article
Restart Phone
 As we all know, restarting any smart device fixes most of the issues in it. Restarting any smartphone kills all the applications and clears up the memory. Doing this can result in fixing bad system cache, which may be causing this issue as well. This should be the first and basic step of fixing the issue. If the issue is not resolved. Head to the next step.
-
Ensure auto rotation is turned on
 The next step will be to check if this feature is turned on for your mobile. For doing so, swipe down from top to open the Quick setting menu. Check for the Auto-rotate option. If it is turned off, press the icon to turn it on. In some phones, they will be named as portrait or landscape mode. Switching to landscape if in portrait will switch on the auto-rotate option.
Read Also: How to rotate your computer screen or desktop
The next step will be to check if this feature is turned on for your mobile. For doing so, swipe down from top to open the Quick setting menu. Check for the Auto-rotate option. If it is turned off, press the icon to turn it on. In some phones, they will be named as portrait or landscape mode. Switching to landscape if in portrait will switch on the auto-rotate option.
Read Also: How to rotate your computer screen or desktop
-
Check for rotation settings on the specific application
-
Calibrate the phone’s G sensor
 There might be a reason that the G sensor and accelerometer sensor has lost their calibration, which is causing issues with the auto-rotate feature. The smartphone uses these sensors to know if the phone is in landscape mode or in portrait and shifts accordingly.
To fix this try making 8 in the air while holding the smartphone(refer to the image above). This will fix the calibration issue if any.
There might be a reason that the G sensor and accelerometer sensor has lost their calibration, which is causing issues with the auto-rotate feature. The smartphone uses these sensors to know if the phone is in landscape mode or in portrait and shifts accordingly.
To fix this try making 8 in the air while holding the smartphone(refer to the image above). This will fix the calibration issue if any.
-
Uninstall recently installed application
-
Update your phone
 The previous update of android may have or caused some issues or triggered some bug in the UI. To solve it simply check for updates. If any updates are pending, we recommend completing them.
Smartphone companies notice these minor bugs and address them by giving regular updates. So, it’s important to update your smartphone to the latest version by the company.
Read Also: How to rotate your computer screen or desktop
The previous update of android may have or caused some issues or triggered some bug in the UI. To solve it simply check for updates. If any updates are pending, we recommend completing them.
Smartphone companies notice these minor bugs and address them by giving regular updates. So, it’s important to update your smartphone to the latest version by the company.
Read Also: How to rotate your computer screen or desktop
-
Head to the service centre
Bonus tip
 There is a force screen tilt option if you use the manual navigation buttons on your Android smartphone (not the gestures). Head to the application you want to use in landscape mode. After opening, tilt your screen to see the rotation option in the right corner of your screen(consider the above image for reference). By pressing that it will force landscape the screen of your mobile
These are the top 7 methods to fix the Android screen auto rotate not working issue. One of the methods will surely work for you and you will continue to enjoy your phone experience utilising the screen completely.
For the latest gadget and tech news, and gadget reviews, follow us on Twitter, Facebook and Instagram. For newest tech & gadget videos subscribe to our YouTube Channel. You can also stay up to date using the Gadget Bridge Android App. You can find the latest car and bike news here.
There is a force screen tilt option if you use the manual navigation buttons on your Android smartphone (not the gestures). Head to the application you want to use in landscape mode. After opening, tilt your screen to see the rotation option in the right corner of your screen(consider the above image for reference). By pressing that it will force landscape the screen of your mobile
These are the top 7 methods to fix the Android screen auto rotate not working issue. One of the methods will surely work for you and you will continue to enjoy your phone experience utilising the screen completely.
For the latest gadget and tech news, and gadget reviews, follow us on Twitter, Facebook and Instagram. For newest tech & gadget videos subscribe to our YouTube Channel. You can also stay up to date using the Gadget Bridge Android App. You can find the latest car and bike news here. 


")


")
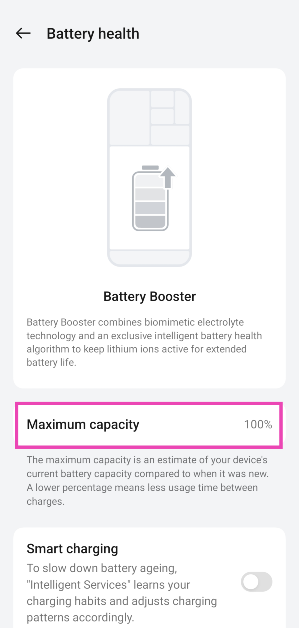
 Step 2: Tap on Battery health.
 Step 3: Check the maximum capacity of the battery.
 Read also:
  The above method gives you merely a vague idea of battery health. To get technical details in numbers, you can use a third-party app called Ampere. All you need to do is install
  Ampere is simply an app, and it doesn’t have any magical powers to increase your smartphone’s battery life. All it does is analyse your phone’s software and hardware battery usage to urge an estimate of your smartphone’s current capacity and give you an idea about its battery health.
It gives you useful stats like battery charging and discharging speeds per hour, temperature, and battery wear per recharge cycle. So looking at that you can adjust your battery usage type to prolong its life.
Ampere is simply an app, and it doesn’t have any magical powers to increase your smartphone’s battery life. All it does is analyse your phone’s software and hardware battery usage to urge an estimate of your smartphone’s current capacity and give you an idea about its battery health.
It gives you useful stats like battery charging and discharging speeds per hour, temperature, and battery wear per recharge cycle. So looking at that you can adjust your battery usage type to prolong its life.


 not working on Android")
 Step 2 –
 Read Also:

")

 Google Play Points is a great way to accumulate points that can later be redeemed to buy paid apps. If you make a lot of purchases on the Play Store or buy in-app items using Google Play, there is no reason why you should miss out on Google Play Points. These points are credited to your profile. Over a period of time, you can collect enough points to buy a paid app for free.
Download from
Google Play Points is a great way to accumulate points that can later be redeemed to buy paid apps. If you make a lot of purchases on the Play Store or buy in-app items using Google Play, there is no reason why you should miss out on Google Play Points. These points are credited to your profile. Over a period of time, you can collect enough points to buy a paid app for free.
Download from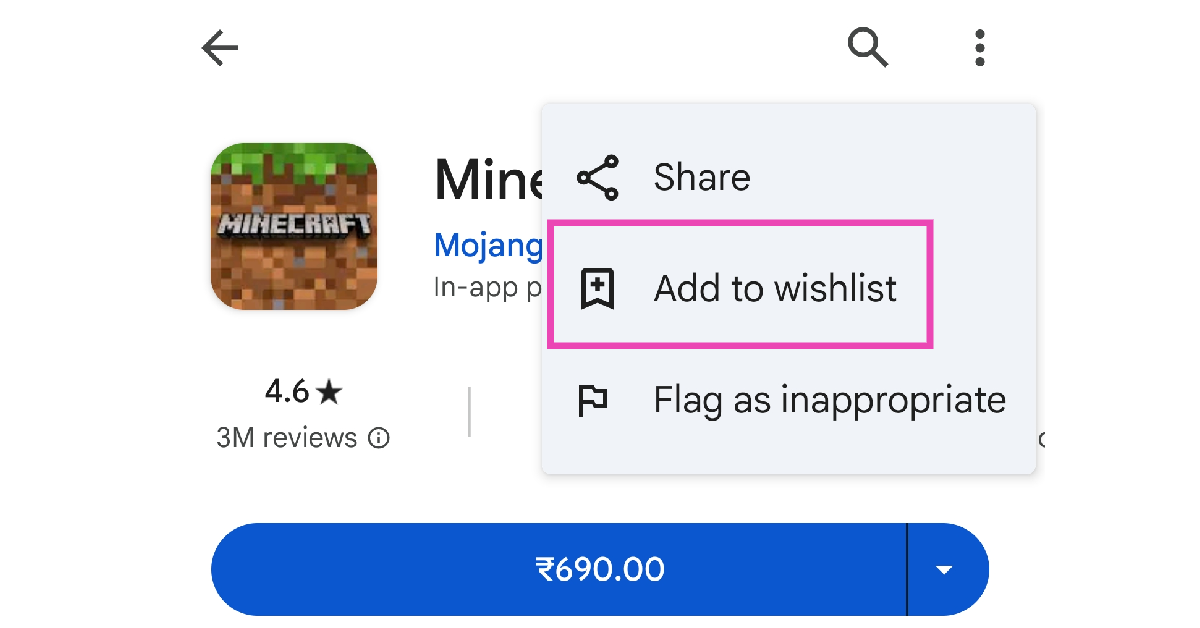 If you want someone else to buy you an app, simply put it on your wishlist and share it with them. If you have a lot of followers on social media, you can share your wishlist with them as well. To add a paid app to your wish list, go to its page in the Google Play Store, hit the ellipses at the top right corner of the screen, and select ‘Add to wishlist’.
Read also:
If you want someone else to buy you an app, simply put it on your wishlist and share it with them. If you have a lot of followers on social media, you can share your wishlist with them as well. To add a paid app to your wish list, go to its page in the Google Play Store, hit the ellipses at the top right corner of the screen, and select ‘Add to wishlist’.
Read also: 


")
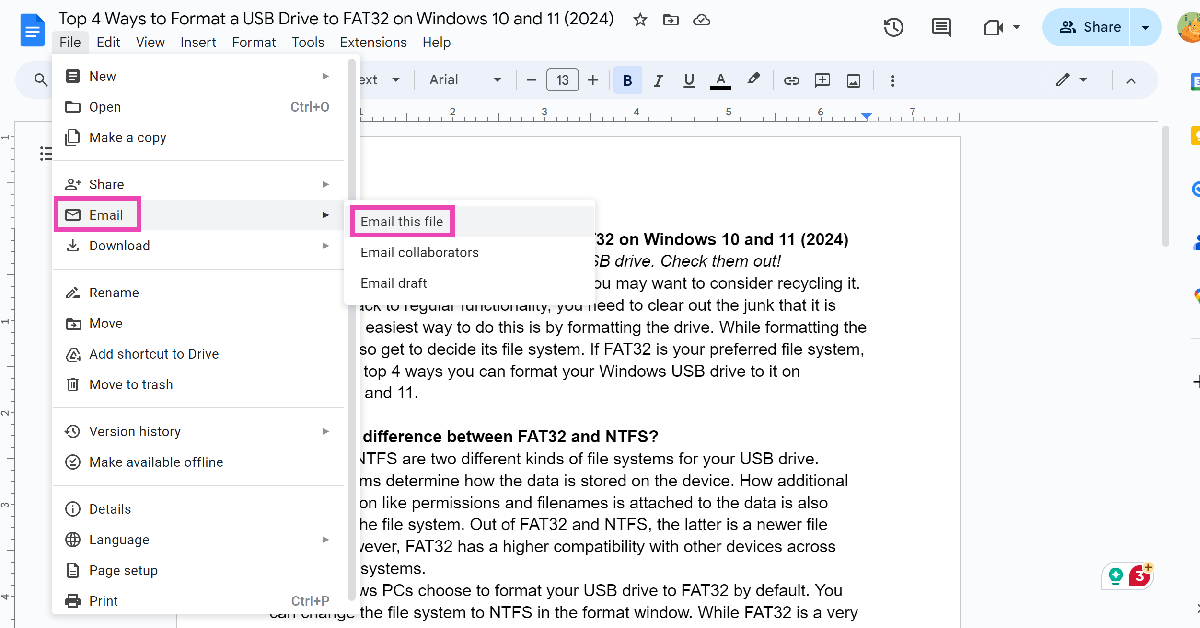
 Step 4 –
  Step 6 –
  Read Also:
  Step 5 –
 Step 3: Click on File type and select PDF.
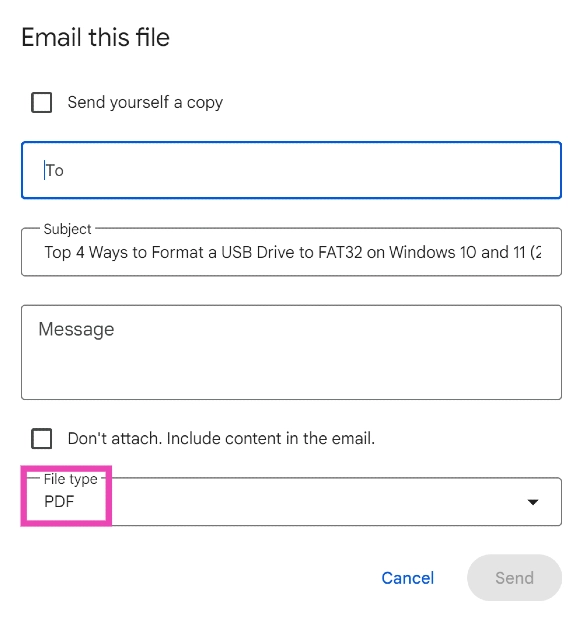 Step 4: Enter the email address of the recipient in the ‘To‘ field.
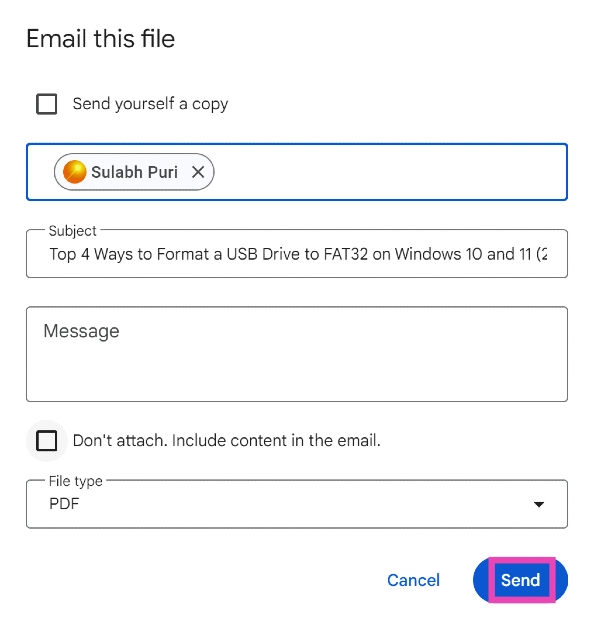
Step 5: Hit Send. You can also choose to save yourself a copy.
Step 4: Enter the email address of the recipient in the ‘To‘ field.
Step 5: Hit Send. You can also choose to save yourself a copy.
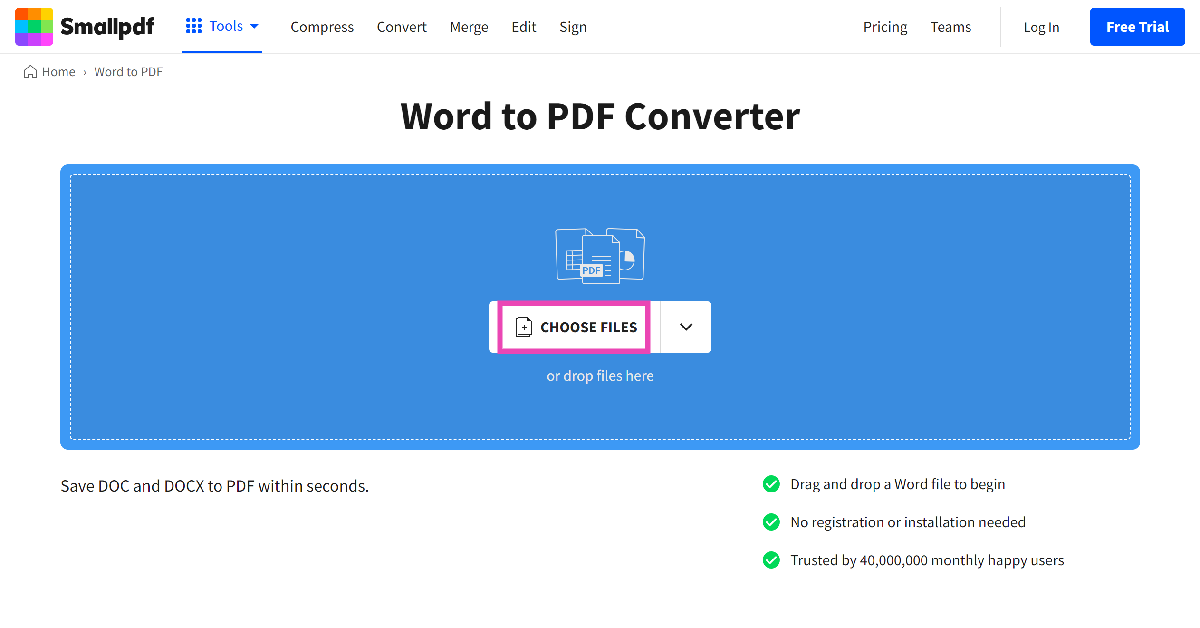 Step 2: Upload the docx file from your PC’s storage.
Step 3: The docx file will be converted to PDF. Hit Download to store it on your PC.
Step 2: Upload the docx file from your PC’s storage.
Step 3: The docx file will be converted to PDF. Hit Download to store it on your PC.


 The Apple Student Discount is only available on MacBook Air, MacBook Pro, iMac, iMac Pro, Mac Pro, Mac Mini, Pro Display XDR, iPad Pro, iPad Air, iPad, and iPad Mini versions. You cannot claim the offer on other products like the iPhone, Apple Watch, AirPods, Apple TV, or any other accessories. The discounted price offered on the selected range of products is as follows:
MacBook Air – Starting at Rs 83,691
MacBook Pro – Starting at Rs 1,10,691
iMac – Starting at Rs 89,910
iMac Pro – Starting at Rs 4,18,410
Mac Pro – Starting at Rs 4,49,910
Mac Mini – Starting at Rs 67,410
Pro Display XDR – Starting at Rs 4,04,910
iPad Pro – Starting at Rs 68,305
iPad Air – Starting at Rs 50,783
iPad – Starting at Rs 28,106
iPad Mini – Starting at Rs 33,155
Read also:
The Apple Student Discount is only available on MacBook Air, MacBook Pro, iMac, iMac Pro, Mac Pro, Mac Mini, Pro Display XDR, iPad Pro, iPad Air, iPad, and iPad Mini versions. You cannot claim the offer on other products like the iPhone, Apple Watch, AirPods, Apple TV, or any other accessories. The discounted price offered on the selected range of products is as follows:
MacBook Air – Starting at Rs 83,691
MacBook Pro – Starting at Rs 1,10,691
iMac – Starting at Rs 89,910
iMac Pro – Starting at Rs 4,18,410
Mac Pro – Starting at Rs 4,49,910
Mac Mini – Starting at Rs 67,410
Pro Display XDR – Starting at Rs 4,04,910
iPad Pro – Starting at Rs 68,305
iPad Air – Starting at Rs 50,783
iPad – Starting at Rs 28,106
iPad Mini – Starting at Rs 33,155
Read also:  Buyers must provide information like student ID and college or institution address for further verification. Parents or teachers shopping for
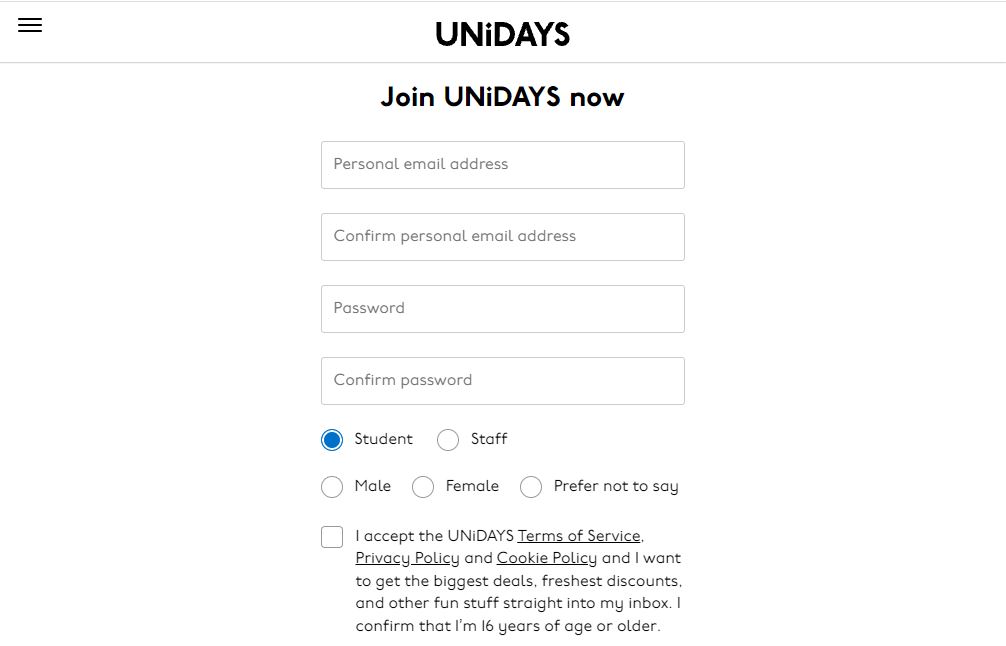 Now follow the process by clicking continue. You will be asked to create an account after which you will be asked to add documents. When you are accepted by UNiDAYS apple India, you are eligible for student discounts.
Read also:
Now follow the process by clicking continue. You will be asked to create an account after which you will be asked to add documents. When you are accepted by UNiDAYS apple India, you are eligible for student discounts.
Read also: 


