Battlegrounds Mobile India is rolling out a fresh 1.5 update. The new update comes integrated with Tesla products as Krafton has teamed up with Motor Vehicle giant Tesla to include its EV products in the game. With the new BGMI update, you will see Tesla Gigafactory, Tesla Model Y EV and other driving features.The South Korean video game developer, Krafton has announced its partnership with the EV maker Electric vehicle giant Tesla and Battlegrounds Mobile India 1.5 update that promises to bring a new gaming experience. With said that the update will include Mission Ignition Mode. The classic mode in the game has also been upgraded that will include a new weapon, the MG3, as well as a new feature to toss medical items to your squadmates in those clutch situations. As per the company, the MG3 is capable of taking up to a 6X scope and no other attachment is a light machine gun that may be obtained by airdrops while playing classic maps apart from Karakin. In addition to this, the M249 which was previously airdropped will now appear directly on the map for loot. The Battlegrounds Mobile India 1.5 update also brings a multitude of features to improve the gameplay. Now the gyroscope sensitivity can be changed, Third Person Perspective (TPP) camera angles can be tuned, and ammo indicators will allow for more finesse in strategy. 90FPS is now supported on a host of new devices, while a graphical option lower than smooth has been added for low-end devices. Additionally, the update will also get Sand Bottle Exchanges added to the Events section as a free event. To earn Sand Bottles the players have to complete challenges that can be swapped for great prizes. Moreover, brand-new events have been added to the mix, including Damage Missions, Movement Missions and, in keeping with the theme, all-new Mission Ignition Events.Furthermore, Kratfon has also announced the Royale Pass Month system, RPM1 for the inaugural month, in the BGMI 1.5 update. Each of the Royal Pass Month will last for a month and is priced at 360UC, with the highest rank achievable limited to 50. The company has also introduced the Challenge Point System rewards players for positive behaviour such as not quitting, not using friendly fire or going AFK.As per the company in the Battlegrounds Mobile India 1.5 update, there will be a new Mission Ignition mode containing six major places on the Erangel map which will be transformed into research and energy facilities. This will allow the players to enjoy a whole new method of tactically manipulating the game with the addition of combat features such as patrol robots, information collectors. The automatic Hyperline which transports players is another eye-catching feature. With Clan Clash the clans can fight against each other in a fortnightly battle to get Clan Points.Last but not least the developer has also collaborated with Tesla to integrate EV maker’s products in the popular video game. The updated BGMI game will display Tesla Gigafactory in four fixed locations across the map. The player can enter the factory and see how how the Tesla Model Y is produced from the very beginning. Also, they can drive away in their new car and also experience the ground-breaking autopilot feature available in all Tesla vehicles. A self-driving Tesla Semi feature will originate randomly on rural roads and automatically run along specific routes. Players can deal damage to the Semi to force its supply boxes to drop and obtain combat supplies.
For the latest gadget and tech news, and gadget reviews, follow us on Twitter, Facebook and Instagram. For newest tech & gadget videos subscribe to our YouTube Channel. You can also stay up to date using the Gadget Bridge Android App.
Xiaomi 2021 lineup includes semi-flagship, mid-range and budget smartphones. To take on the OnePlus and Samsung flagship series Xiaomi introduced its Mi 11X series that has three devices: the vanilla 11X, Mi 11X Pro and the recently launched Mi 11X Lite. The company’s Mi 11X Pro comes under the premium and semi-flagship territory that will go after the OnePlus 9 Series and Samsung Galaxy S21 series. For its affordable price range, which starts at Rs 39,990, let’s find out in our review whether the device is a true value for money or not. Ok now let’s get on with our Mi 11X Pro review.
In This Article
Mi 11X Pro Design and Display
Starting with the design of the Mi 11X Pro, it comes with an excellent overall design. However, the device is quite identical to the Redmi Note 10 Pro Max. Yet this flagship mid-range phone looks more premium and ergonomic and does not have any sharp edges like some of the other devices in the category. Over that, it is thinner too, probably because of its battery. The camera layout is a bit different, which you can see here. It gets a quad-camera module and as you can see there is a very thin silver ring around the primary lens, which looks appealing. We have got the celestial Silver for the review but you can choose from Cosmic Black and Frosty White colour variants. The colour variant that we have got is our personal favourite and it looks stunning. The reflective back changes its hues from silver to blue and blue to pink depending on its position, which gives a prism-like effect refracting the light off the back panel. The mobile phone is covered in Gorilla Glass 5, from front to back, however, the side is still made out of plastic. Though the phone is resistant to scratches, we would recommend you to put on a silicon cover because whatever protection it has, after all the back panel is of glass. It may break when falling from a certain height so the cover will be an extra shield (that comes inside the box). The power button on the right side of the frame also acts as a fingerprint sensor, is easy to reach and works swiftly. Just above the fingerprint sensor, there is a volume rocker button too. There is no button or slot on the other side. There is no MicroSD card slot and a 3.5mm headphone jack, but Xiaomi provides a 3.5mm jack to Type C dongle inside the box so you can easily plug in your headphones. The stereo speaker is given on the top as well as the bottom and an IR emitter is placed in one of the speaker grills on the top to control your TV, Set Top Box from the phone itself. At the bottom frame a SIM Tray, a USB Type-C port and a primary microphone is given. On the front, the bezels are slim and have a very small camera hole to play house to the selfie camera is placed, which will be less distracting. All in all, the design of the device gives a premium feel.The display is the best thing about the Mi 11X Pro. It has a 6.67-inch full-HD+ Super AMOLED display with 1,080×2,400 pixels of resolution. It also offers a 120Hz refresh rate panel, 1,300 nits of peak brightness, 360Hz touch sampling rate and 20:9 aspect ratio. The smartphone also has support for HDR10, which is great for content viewing. On the spec sheet, the specifications look similar to Redmi Note 10 Pro Max but in reality, the display is just superior to the other Redmi smartphone. Mi 11X Pro delivers better colour reproduction, better viewing angles, but we have also realised that its touch responses are good too, thanks to the 360Hz touch sampling rate. Like we have noticed some jitters and lags in the Note 10 Pro Max 120Hz SAMOLED display, but here on the Mi 11X Pro we experienced no such issue as it is powered by a Snapdragon 888 chipset. Overall, a lovely display for all kinds of needs.
Mi 11X Pro Performance and Cameras
Now coming to the performance, Mi 11X Pro takes its power from a powerful Qualcomm Snapdragon 888 chipset, which is already seen on some of the flagship devices by Samsung, Asus and OnePlus. It has been paired with Adreno 660 GPU and comes with 8GB of RAM and up to 256GB of storage. We got our hands on the 8GB RAM with a 128GB storage variant. Also, you will notice how fast the apps open while multitasking. Given the hardware, even the most demanding game titles run effortlessly. You will also feel a noticeable change when shifting from a mid-range phone to this device, unlocking great gaming performance. Call of Duty: Mobile can be cranked up to the highest of settings in favour of better details, which is great. The phone does get slightly warm at the back when playing for long, which is not an issue. Paired with good haptics and an excellent pair of hybrid stereo speakers the smartphone is awesome. Also, the RAM management is good, which was a big issue with few otherRedmi phones. It did not reload any of the apps running in the background when we reopened it after 10 or 15 minutes. Scrolling through applications, switching between them, browsing the internet and social media apps is extremely smooth. The device runs MIUI 12 on top of Android 11. Here too, we saw the ads running on the locked screen and were also spammed with unnecessary notifications, which is not expected in a premium smartphone.The battery life is also decent on the Mi 11X Pro. The 4,520mAh battery will easily provide you with a day’s worth of endurance when used moderately. The device also charges pretty fast as the company has provided a 33W fast charger, which takes about an hour or less to get from zero to 100 percent. The speakers on the phone are loud and deliver a good dynamic range as well as immersive audio powered by Dolby Atmos.Moving ahead, the triple camera set up on the MI 11X Pro is the biggest highlight of this phone. Here it has a 108-megapixel Samsung HM2 sensor with an f/1.75 aperture accompanied by an 8-megapixel ultra-wide-angle lens and a 5-megapixel macro sensor. On the front, there is a 20-megapixel selfie camera. Personally speaking, the 108-megapixel primary lens does offer quality during the daytime. However, the device clicks a bit of saturated images outdoors. We also tried to capture some shots in standard mode as well, which came out as per our liking portrait mode shots produced are stunning with a good amount of details and edge detection on point. But sometimes you don’t get good subject focus, blur and the images look less pleasing.The telemacro lens can catch minor details. So the results are very exhilarating. But sometimes the Tele macro lens struggles to differentiate between the subject and the background and does not lock the focus well. Macro ShotsThe photos from the Mi 11X Pro do not look under-exposed or dark while the dynamic range is already good.108-megapixelSimilarly, with the dedicated night mode, you can improve the nighttime pictures as without its support the camera struggles a lot. The selfie shots are good as well. The videography on the phone is decent as the EIS works well. It offers 8K videos @60fps with natural colours as well as a dynamic range under good lighting conditions. However, there is an option of 8K videos at 30fps and 4K as well. Also, the selfie videos look stable and the audio quality is not bad either.
Conclusion
Xiaomi has provided the Mi 11X Pro with a 108-megapixel camera sensor but one has to work a little to get the perfect shot. The autofocus could have been better, however in the case of portraits the subject separation from the background is accurate. Saying that, in some cases, the camera successfully delivers epic image quality, which is worth being framed. In terms of hardware, the company has not compromised at all when it comes to performance. The overall performance of the phone is excellent, which includes a crisp display, clear audio, IP53 rating, good to decent cameras and gaming. So, all in all, Mi 11X Pro is worth considering and a brilliant contender in the category.
The Amazfit Bip U Pro smartwatch (priced at Rs 4,999) comes with an array of fitness-focussed features and has support for Amazon’s Alexa assistant. It can track your heart rate, sleep, steps and do a lot more. We spent a few days with the smartwatch and here’s our Amazfit Bip U Pro review detailing on its pros and cons:
In This Article
Amazfit Bip U Pro review: Design
The Amazfit Bip U Pro smartwatch has a simple and minimalistic design. The smartwatch’s dial is rectangular in shape with rounded corners and it houses the display of the device that has rather thick bezels on all the four sides. The chin, in fact, is thicker than the other three bezels and it has Amazfit branding on it. There is a button on the right edge of the smartwatch that has can perform tasks like waking up the home screen, opening the menu and going back to the previous page. You can also long press it to set a customized task for it. It should be noted that the button can only be pressed and not rotated. On the back, the smartwatch comes with a BioTracker 2 PPG biological optical sensor that is used to measure the heart rate.
Amazfit Bip U Pro comes with Black coloured silicone straps and an interlocking buckle which keeps the smartwatch tight on your wrist. Users also get the option of changing the straps of the watch – which we think is a big plus, especially because Amazfit Bip U Pro is a budget device. The smartwatch comes with a sturdy built, but it doesn’t feel too premium. But since it is a budget device, we really cannot complain about this being a problem. In fact, for this price point, we consider the look and feel to be pretty good. We wore the smartwatch around almost a week and it didn’t feel uncomfortable to us during that time. Due to its lightweight, we can easily say that we had no issues wearing the watch round the clock. Even when we wore it while sleeping, it didn’t cause any discomfort.
The 1.43-inch TFT LCD display of the smartwatch comes with a resolution of 320×302 pixels and is protected with a layer of Corning Gorilla Glass 3. It looked vibrant and all the icons, numbers or stats projected on it were sharp. There are four levels of brightness that you can choose from, but it is worth mentioning that one can’t set auto-brightness on Amazfit Bip U Pro. The sunlight readability of the device was decent too, and in case you face a problem, you can always increase the brightness manually. However, there was one thing that we did miss – always on display. But then, maybe at this price point it’s too much to ask for.
Amazfit Bip U Pro review: Performance
Most aspects of the performance of Amazfit Bip U Pro impressed us. Pairing the smartwatch with our phone was simple. We had to download the Zepp app from Google Play Store and then connect the devices using Bluetooth. It got connected within seconds and the watch did almost everything really smoothly. The touchscreen was very responsive and we didn’t notice any stutter while we carried out basic functions on the app like checking our heart rate or changing watch faces.
The smartwatch can be used for a variety of tasks like counting steps, measuring heart rate, fitness and sleep tracking, et al, and the app on the smartphone has much more detailed information on these stats. For instance, you can only see the number of hours you slept on your smartwatch. But if you access sleep data on the app, you can see exactly how much time and when you were in a deep sleep.
If you are a fitness freak, you would particularly love to have this smartwatch because of the sheer number of options that it offers. It has several modes like Outdoor Running, Treadmill, Outdoor Cycling, Indoor Cycling, Walking, Pool Swimming, Rope Skipping, Yoga, Free Exercise, Badminton, Cricket, Dance, and so many more. The smartwatch also offers some specific workout modes like Core Training, Stair climber, Zumba, Thai Boxing, etc. In a nutshell, it doesn’t matter what you choose to stay fit, Amazfit Bip U Pro most likely does have a mode for your kind of workout.
We enabled Yoga when we did our workout thrice a week and we were happy with the results that we got from the smartwatch. In the fitness mode, we could see the total time we spent exercising and the calories we burnt during our workout session. There was also a live heart rate counter and a graph of your heart rate. The fitness data on Zepp app is a lot more detailed and it proved to be helpful to us in improving the way we workout.
There are also a women-centric feature on the device called Cycles using which, female users can record and manage their menstruation data.
While we loved most of the tasks that the smartwatch performed, there was one thing that simply refused to work: The SpO2 monitor. Firstly, it doesn’t work till you tie the watch around your wrist a bit too tightly, and secondly, even then the data seemed inaccurate as it didn’t match with our pulse oxymeter.
Another cool feature of the smartwatch is integration with Amazon‘s Alexa. But in order to access the assistant your smartwatch must be connected to your phone and you have to enable it on the app. An active internet connect is also required. Obviously, this is another, particularly given the price range of the device.
Another aspect of the smartwatch which we found commendable is its battery life. With usage that involved sleep tracking, active stress and heart rate tracking, and using the device for our workouts, we’re still on 70% on Day 8.
Verdict
At Rs 4,999, Amazfit Bip U Pro is a really good buy and you certainly won’t be disappointed with it. The smartwatch may not be the best to look at, but it is certainly quite a performer! Besides, the sheer number of features – especially fitness focussed features – that it offers at this price point makes it one of the bests in that range.
For the latest gadget and tech news, and gadget reviews, follow us on Twitter, Facebook and Instagram. For newest tech & gadget videos subscribe to our YouTube Channel. You can also stay up to date using the Gadget Bridge Android App.
Xiaomi Mi 11 Ultra was launched in India exactly two months back. Now the company has announced that the device will go on open sale on July 15 in the country. The camera-centric device has also received a lot of praise from DxoMark for its pro-grade camera performance So if you are planning to buy the device the open sale will be accessible through the company’s official website as well as the e-commerce platform Amazon. Mi 11Ultra is scheduled to go on open sale in India on July 15. The sale will begin at 12 noon through Xiaomi’s website and Amazon. To recall, Xiaomi’s flagship smartphone was launched in India in a single 6GB RAM with 256GB storage priced at Rs 69,999. This phone will come in two colour options of Black and White. As per the Amazon listing, there will be an instant discount of Rs 5,000 to the SBU Bank customers. Additionally, the buyers will also get Mi 11 Ultra merchandise from July 15 only accessible to Superfan Limited Quantity sale customers.Xiaomi Mi 11 UltraMi 11 Ultra features a quad-curved 6.81-inch 2K WQHD+ E4 AMOLED display having 3,200× 1,440 pixels of resolution and HDR10+ support. The camera-centric phone supports a 120Hz refresh rate with a 240Hz touch sampling rate, a 551ppi pixel density protected with Corning Gorilla Glass Victus as well as Dolby Vision support. There is a secondary display on the back featuring a 1.1-inch AMOLED touch screen with 126×294 pixels of resolution.Under the hood, there is a Qualcomm Snapdragon 888 SoC paired with Adreno 660 GPU. It packs up to 12GB LPDDR5 RAM, and up to 256GB UFS 3.1 storage. It ships MIUI 12 on top of Android 11 out of the box.Xiaomi Mi 11 Ultra is highlighted with a rectangular-shaped triple rear camera setup with a multi-functional secondary display for notifications, battery level, and weather alerts. The camera set-up includes a 50-megapixel Samsung GN2 primary wide-angle sensor with f/1.95 aperture and OIS support. In addition to this, there are two 48-megapixel Sony IMX586 ultra-wide-angle and tele-macro sensors (5x optical and 120x digital zoom) onboard. All three sensors support 8K video recording at 24fps. Upfront, there is a 20-megapixel sensor for taking selfies and video calling.It is backed by a 5,000mAh battery, which has support for 67W wired and wireless fast charging tech along with 10W reverse wireless charging functionality. On the connectivity front, there is 5G, dual-band Wi-Fi 6, Bluetooth v5.2, GPS, AGPS, NavIC support, NFC, and a USB Type-C port.
For the latest gadget and tech news, and gadget reviews, follow us on Twitter, Facebook and Instagram. For newest tech & gadget videos subscribe to our YouTube Channel. You can also stay up to date using the Gadget Bridge Android App.
Recently tech firm Nothing founder Carl Pei hinted at the pricing of its very first product, Ear 1 TWS earbuds, which will be launching on July 27. As per the company’s head, the TWS earphones will be offered at a global price tag of GBP 99 that translates to Rs 10,200. Now the device has been listed on Flipkart, therefore, revealing the Indian pricing of the audio device.Yes, ahead of the official launch of the Nothing Ear 1 TWS earbuds the company has listed the TWS earphone on the home-grown e-commerce website Flipkart to tease its availability in the country. As per the dedicated microsite, the Nothing TWS earphone will be made available in India with a price tag of Rs 5,999. The landing page doesn’t confirm the launch date for India nor does it reveal the design concept of the device but the pricing only. It should be noted that in an interview the company CEO Carl Pei revealed that the upcomingEar 1 true wireless stereo (TWS) earbuds will be offered at a global price tag of GBP 99 that translates to Rs 10,200 which is considerably higher than the recently revealed Indian pricing. That could be the company’s tactics to give a tough fight to other accessible brands like Samsung Galaxy Buds Live, Google Pixel Buds A-Series, OnePlus Buds, and AirPods that are considered to be popular for offering high ends TWS earphones. However there are other brands available in India which are offering the product at much lower rates but the company is aiming at the consumers who are inclined towards brands such as Sony, Samsung, OnePlus, Apple and Google. Considering the design as well, Nothing Ear 1 earbuds will also offer a more costly design to realize than a standard, non-transparent design. So the device will feature a unique transparent casing in order to ensure that the inside looks just as good as the outside. In addition to ANC three “high definition”. As revealed by the CEO, “ It could be getting the right magnets — as magnets are usually designed to go inside of a product and not be seen by the consumer — to figuring out the best type of glueing. You never have to solve that problem if you have a non-transparent product, but what kind of glue will keep the industrial design intact?”It should be noted that the Noting earbuds are designed in association with Stockholm-based Teenage Engineering. Recently the company also appointed Samsung’s executive Manu Sharma who recentlyannounced the collaboration of Nothing with Flipkart. He took to Twitter to announce the association to make its TWS earbuds available for purchase in India. Initially, the UK based tech firm Nothing is eyeing on U.K., India, Europe and North America, followed by Japan, Korea and other countriesThe Nothing Ear 1 TWS earbuds are scheduled to launch on July 27. The launch event is going to kickstart at 2 PM BST and 6:30 PM IST.
For the latest gadget and tech news, and gadget reviews, follow us on Twitter, Facebook and Instagram. For newest tech & gadget videos subscribe to our YouTube Channel. You can also stay up to date using the Gadget Bridge Android App.
The e-commerce website Flipkart is hosting Daily Trivia Quiz. Every day it brings a bunch of new questions for its users. By answering them correctly you can win exciting prizes. The questionnaire is based on questions related to general knowledge. Also, the users can win free vouchers and super coins, among other offers via the daily quiz. 13 July 2021 Flipkart Daily Trivia Quiz Answers has already gone live on its platform.
The participant should be at least 18 years old and should have a valid login ID. The Quiz is available on the mobile platform and not the web version. E-commerce conducts the quiz on daily basis and goes live at 12:00 AM IST and runs till 11:59 PM IST. The winners are announced within 15 days from the date of participation that can be viewed under the Gems/Rewards section in the app.
In This Article
How to participate in the Flipkart Daily Trivia Quiz
To participate download the Flipkart app on your phone. Then open the Flipkart app then head to Game Zone. Now click on the Daily Trivia Banner or search for Daily Trivia. Enter the game and answer all 5 questions with correct answers.
13 July 2021 Flipkart Daily Trivia Quiz Answers
Question 1: Which piece in chess can only move forward and never retreat?
Answer: Pawn
Question 2: English computer scientist Allan Plaskett invented which innovation used in cricket?
Answer: Snickometer
Question 3: Which Indian has included ICC Women’s ODI and T201 teams of 2019?
Answer: Smriti Mandhana
Question 4: Which of these major sports is strictly of US origin?
Answer: Basketball
Question 5: A game of which sport consists of six periods of 7 1/2 minutes each called chukkas?
Answer: Polo
Amazon Quiz is getting more popular in the country as many people are participating in the quiz every day. The quiz can be played daily from 12 AM to 11:59 PM. The e-commerce platform brings an opportunity for all its customers to play and win free gadgets as well as Amazon Pay Balance. July 13 2021 Amazon Quiz will give you a chance to win Rs 25,000 Pay Balance.
In the Amazon daily quiz, you have to answer 5 questions that are based on general knowledge and current affairs. The participants have to answer each question correctly to get their names selected for the lucky draw. The result of the lucky draw will be announced at the end of every month. Every day we update all the quiz questions along with their correct answers on our website to help you to clear the quiz successfully. If you are lucky you might win something by answering all the questions correctly. Check out today’s answers for the Amazon quiz to win Rs 25,000 Pay Balance.
July 13 2021 Amazon Quiz Answers
Question 1:In which country is a massive public protest, referred to as the “five twos revolution”, taking place?
The answer is- Myanmar
Question 2: Aryabhatta Research Institute of Observational Sciences, who recently built an indigenous spectrograph, is located in which hill station?
The answer is- Nainital
Question 3: During the recent T20I series between the Indian Women’s Team and the South African Women’s Team, who won Player of the Series?
The answer is- Shafali Verma
Question 4: What is the name of this difficult to prepare exotic vegetable?
The answer is- Artichoke
Question 5: What do you call the person who is obsessed with collecting this item?
The answer is- Sneakerhead
This year the Chinese smartphone company Xiaomi has refreshed its flagship, mid-range and budgets lineup by introducing the best smartphones in each category at their best price. However recently the company hiked the prices of some of its smartphones but now you can grab them at a reduced price. Yes, the company has kicked off its Mi Anniversary Sale 2021 on its Mi.com website on which Xiaomi is running a host of offers and deals on smartphones, smart TVs, smart wearables and TWS earbuds. So if you were planning to upgrade your old phone or your Smart TV now is the best time.Mi Anniversary Sale 2021, which has commenced today, will continue until midnight of July 16 in India. It will bring exciting offers and deals on the finest range of products across Redmi and Mi via Mi.com,Mi Homes, Amazon. in,Flipkart.com and other retail partners.As per the company during the sale the customers can avail an array of exciting offers and discounts on products across categories such as Mi 11 X, Mi 10i, Redmi Note 10 Series, Redmi 9 Series, Mi Notebook Horizon edition, among others, coupled with bank offers. The consumers can also avail of offers on the 99 store and get products such as Mi Electric ToothBrush, Mi Home Security Camera, Redmi 9 Prime, among others, with additional discounts starting at Rs 99 at 4 pm every day. Additionally, they can avail of some Hot Deals at 10:00 AM every day with Redmi Note 10 Pro Max at Rs 19,999, Mi TV 4A (40) at Rs.22,999, Mi Notebook i5 at Rs 54,999 & more.Xiaomi is also running the MiTurns7 quiz which can be accessed through Manu Kumar Jain’s Twitter. The participants can stand a chance to win Mi 11X, Mi Robot Vacuum – Mop P, Mi TV, Mi Watch Revolve Active, Mi Boost Pro Power Bank 30000mAh & much more. The customers can also create their personalized bundle of 2 products, they can Pick N’ Choose and avail exciting offers. From availing Rs 8700 off on Mi 10i and 20000mAh Mi Power Bank 3i bundle to Rs 14,000 off on Mi Notebook 14 Horizon i7 and Mi True Wireless Earphones 2C bundle, users will have a host of options to choose from. In addition to this, Mi India is providing a free one-year warranty on Mi TV 4A & Mi TV 4A Pro and Free Mi True Wireless 2C & Mi Screen Protection with Mi 11X. The smartphones up for sale includes Redmi Note 9 4GB RAM with 64GB variant, Mi 10T 8GB RAM with 128GB storage and Redmi Note 10 Pro Max 6GB RAM with 128GB storage model. There will be up to Rs 11,000 off on the purchase of smartphones. On the other hand, the insurance bundle includes Mi TV 4A TV with 1Y Extended Warranty @ Re1; Smart speaker @1999. Redmi Smart TV with free Redmi Earbuds 2c, Mi NoteBook Horizon 14 i5 & i7 with free TWS 2c; Smart speaker @1999 and Mi Robot Vacuum-Mop P Black with free 1 Year EW + Mi Smart speaker.
For the latest gadget and tech news, and gadget reviews, follow us on Twitter, Facebook and Instagram. For newest tech & gadget videos subscribe to our YouTube Channel. You can also stay up to date using the Gadget Bridge Android App.
The Redmi Note 10T 5G finally has a launch date. The Chinese smartphone company today officially announced to launch the smartphone in India on July 20. The device has also been listed on Amazon before the official launch to tease the availability. To recall, before arriving in India the smartphone debuted in Russia last month only. “We have worked relentlessly to accelerate technological innovation by making 4G accessible to Indian households. Our growth over the last 7 years is a testimony to our contribution to democratise the internet. As we step into the new era of technology with the market preparing for the 5G network, we are focused on yet again democratizing technology to make it accessible for our users” the company announced.Xiaomi India Communications Head Kasturi Paladh viavideo teaser announced the upcoming launch of the Redmi Note 10T 5G in India. The launch is set for July 20 at 12 noon. Before the official announcement, the company also listed the 5G smartphone on the e-commerce website Amazon. Moreover, Redmi Note 10T is teased to be fast and futuristic, indicating 5G connectivity.To recall, the Redmi Note 10T 5G debuted in Russia last month at RUB 19,990 for the 4GB RAM with 128GB storage that translates to Rs 20,500. The smartphone features a 6.5-inch full-HD+ hole-punch design display with a 90Hz refresh rate support. The phone runs MIUI 12 based on top of Android 11 out of the box and is powered byMediaTek Dimensity 700 SoC coupled with up to 6GB of RAM and 128GB of storage.In terms of imaging, the Russian model of Redmi Note 10T 5G comes with a triple rear camera setup that consists of a 48-megapixel primary sensor. Additionally, there is a 2-megapixel macro lens and a 2-megapixel depth sensor. Upfront there is an 8-megapixel selfie sensor for taking selfies and video calling.Backed by a5,000mAh battery the 5G smartphone comes with an 18W fast charging support. There is a side-mounted fingerprint sensor for phone unlocking. On the connectivity front, there are dual-SIM slots, 4G, NFC, dual-band Wi-Fi, Bluetooth v5.1, 3.5 mm audio jack, and a USB Type-C port for charging.
For the latest gadget and tech news, and gadget reviews, follow us on Twitter, Facebook and Instagram. For newest tech & gadget videos subscribe to our YouTube Channel. You can also stay up to date using the Gadget Bridge Android App.
Hong Kong-based smartphone manufacturer, Tecno introduced Tecno Camon 16 smartphone in India last year. The company is now prepping up to launch its successor in the Indian market soon. The latest Amazon teaser confirms the availability of the Tecno Camon 17 series that will be available in the country soon after they get official in the country.Tecno Camon 17 series is going to succeed the Camon 16 smartphone in India. The company has revealed the arrival of the upcoming series by listing it on the e-commerce website Amazon. However, the teaser page does not confirm the exact launch date of the smartphone series but the company is expected to introduce two smartphones Tecno Camon 17 Pro and Tecno Camon 17. The new lineup has already been introduced in Nigeria in May this year and will make its way to the Indian market soon.The Amazon teaser reveals that a 48-megapixel selfie camera and a 64-megapixel quad camera set up. In addition to this, the smartphone will be powered by Helios G95 SoC. As per the listing, the device will debut during the Amazon Prime Day Sale which is set to begin from July 26 and will run till July 27.As mentioned before Tecno Camon 17 series was launched in Nigeria in May this year. The series includes two devices Tecno Camon 17 Pro and Tecno Camon 17. The price of the former one is set at NGN 74,000 that translates to Rs 14,200 whereas the former one at Rs NGN 125,000 translates to Rs 24,100.Speaking of the pricing, Tecno Camon 17 Pro comes with a 6.8-inch full-HD+ display with 1080×2469 pixels of resolution and 90Hz refresh rate support. The phone is powered by MediaTek Helio G95 SoC. It features a quad rear camera set up that includes a 64-megapixel primary sensor, an 8-megapixel wide-angle lens, a 2-megapixel bokeh lens, and a 2-megapixel monochrome sensor. While on the front there is a 48-megapixel ultra-clear selfie camera. The device is backed by a 5,000mAh battery with 33W fast charging support.On the other hand, Tecno Camon 17 comes with a 6.6-inch HD+ display with a 90Hz screen refresh rate. Under the hood, there is MediaTek Helio G85 SoC. In terms of imaging, the smartphone features a triple rear camera setup that includes a 48-megapixel primary sensor, a 2-megapixel bokeh lens, and an AI sensor. Upfront there is a 16-megapixel selfie camera. Backed by a 5,000mAh battery which is supported by an 18W fast charger.For the latest gadget and tech news, and gadget reviews, follow us on Twitter, Facebook and Instagram. For newest tech & gadget videos subscribe to our YouTube Channel. You can also stay up to date using the Gadget Bridge Android App.
Poco X3 Pro was recently launched at a starting price of Rs 18,999, and hence, it lands in the most competitive segment of the Indian smartphone market. It comes with a 48MP camera, Qualcomm’s Snapdragon 860 processor and a very impressive design. But what is it like when used for a few days? Read our Poco X3 Pro review to find out.
In This Article
Poco X3 Pro review: Design and display
Flashy, funky, bold…so many words come to our mind when we think of describing the design of Poco X3 Pro. It’s anything but mundane. The smartphone is kind of bulky to look at, and not surprisingly, a little heavy to hold at 213 grams. The device is available in Graphite Black, Steel Blue and Golden Bronze colours and the one that we got for review was dressed in Black.
It has a uniquely shaped camera module on its back panel, that looks somewhat like a circle, but its top and bottom are more like that of a rectangle. The module has four camera lenses and an LED flash. The sides of the back panel have matte finish, whereas in the centre, there is a glossy stripe with diagonal lines and POCO branding on it. Poco X3 Pro comes with IP53 rating and according to the company, it is splash-proof.
The right edge of the smartphone has the volume rocker keys and the Power button that doubles up as a fingerprint sensor. During our time with the device, it worked perfectly well every time we tried to use it. The left edge of the handset has a hybrid SIM tray, so you must choose between a second SIM card or a microSD card. The top edge has an IR emitter, the secondary speaker and another hole for better sound, while the bottom edge has a 3.5mm headphone jack, the primary speaker and the Type-C port.
Flip over, and you will see the 6.67-inch full-HD+ LCD display of the smartphone that comes with a hole-punch camera on the centre-top. The earpiece is tucked between the display and the top edge of the handset. The screen of the device is protected with Corning Gorilla Glass 6 and comes with a maximum refresh rate of 120Hz and a maximum touch sampling rate of 240Hz. The display also has support for HDR10 and it outlined with thin bezels, although the chin is slightly thicker. The colour reproduction is accurate and they remain consistent at various viewing angles. The images are sharp and clear, but the sunlight readability could be better. We spent hours watching Netflix shows on the device, and we were very happy with the results.
In a nutshell, we were quite happy with the design and the display of Poco X3 Pro smartphone. Both are definitely among the pros of the smartphone.
Poco X3 Pro review: Performance and cameras
Before we speak about the performance of Poco X3 Pro, let’s take a minute to talk about the smartphone’s specifications. The device is powered by Qualcomm Snapdragon 860 octa-core processor, coupled with up to 8GB of RAM and 128GB internal storage. The handset packs 5,260mAh battery and supports 33W fast charging, and runs Android 11 skinned with MIUI 12.
Poco X3 Pro smartphone’s OS has several customizations including Game Turbo for gaming shortcuts and Second Space to enhance user privacy. It also comes with a number of preloaded apps including Facebook, LinkedIn, Prime Video, etc, and GetApps store, which along with Themes browser is responsible for a lot of notifications that you’ll get. The lock screen of the device also shows a lot of promoted content, unless you go and disable it.
Coming to the performance, the smartphone could handle everyday task very smoothly. We often multi-tasked on the device and ran several apps and Chrome browsers simultaneously, and during our time with the device, we noticed no lag while doing so.
Gaming is one of the best aspects of Poco X3 Pro. We played games starting from Temple Run 2 to heavy ones like Asphalt 9: Legends and they all ran without any hiccups. We really enjoyed gaming on the device, and it only became better when we enabled Game Turbo, which made sure that no notifications distracted us. If you spend too much time gaming, the phone starts warming up, but then, that’s not something unique to Poco X3 Pro.
The biometrics of the smartphone including the fingerprint sensor and facial recognition worked well at all times, and were quick to respond. The battery life was also very lasting. With usage that involved gaming, an active Instagram account, listening to Spotify and clicking pictures, we could easily manage a day and a half. Over this, the device can be charged completely in less than an hour, which is another plus.
Clicked by primary camera
Finally, let’s talk about the cameras of Poco X3 Pro. The device comes with a 48MP primary camera, an 8MP ultra-wide lens, a 2MP macro sensor and a 2MP depth sensor. The camera app comes with a number of modes like Vlog, Dual Video, Short Video, Time Lapse, Slow Motion, etc.
Clicked by ultra-wide camera
The cameras are not among the pros of the handset. The shots that we took in daylight turned out good enough, but the colours were not as vibrant as they should have been in the shots that we took indoors. The details in the images captured dropped when we used the ultra-wide camera and the results were not super. We used the other two cameras as well to capture some close-up and portrait shots, and they turned out to be average. The quality doesn’t really match up to what we have seen in other phones in this price range.
Zoomed in shot
Images taken in dimly lit areas could really be better, and even with Night Mode turned on, the camera could only manage average shots. We have seen better from some of the Redmi smartphones.
The 20MP selfie camera of the smartphone does a decent job, but again, the images taken can’t be termed as great. Overall, the cameras left us with mixed bag of feelings.
Verdict
Most aspects of Poco X3 Pro work in its favour. The design and the display of the smartphone are definitely among its pros, and so are its battery and performance. However, what goes against it is the spammy notifications, the promotional content, and the cameras could have been better. We do recommend the phone for its smooth performance, but you should know what you’ll be missing out on before you make the purchase. We for one feel, gamers would love it.
Pros
The YouTube app has been very convenient and easy to use on an iPhone. You can access it with a click of a button and browse your favourite YouTube channels. The YouTube app also allows you to get notification alerts from the channels you subscribe to. But the notification can sometimes not work. Follow the 6 methods mentioned below to fix the ‘YouTube notifications not working’ issue on your iPhone.Read Also:Top 3 Ways to Right-Click on an iPad (2024)
In This Article
Update your iOS to the latest version
The first option to fix the ‘YouTube notifications not working’ issue on your iPhone is by updating the iOS software. It is to review that the older version of iOS might not be very stable with the new update on the YouTube app. So to enhance the performance and compatibility of the updated YouTube it is highly advised to update the iOS to the latest version available. You can update your iOS by going to Settings>General>Software update>Download and install.Read Also: How can you enable Google Chrome extensions in incognito window?
Change iPhone notifications settings
The next best way is to check if the notifications settings in your iPhone are correctly set to the right settings. This will definitely fix the YouTube notification not being able to get alerts. Configuring the YouTube app notifications on your iPhone is simple and easy. Follow the steps below.
Open your iPhone and visit the Settings app.
Scroll down and select YouTube.
Click on Notifications and turn on the toggle switch for Allow notifications.
Scroll down on the same page and find the Alerts category.
Tick all three options: Lock Screen, Notifications Centre, and Banner.
Now from the Banner style options, turn on the toggle switch for Sound and Badges.
The YouTube app also has some advanced settings you can configure. It is very important that these settings are right. The app allows you to customise push notifications for activities, video recommendations, subscription highlights, and etc. If there is a problem with your notifications it is better you review your notifications preferences on the app. Follow the guide below.
Open the YouTube app on your iPhone.
Go to the bottom right corner with your profile icon and tap on it.
Hit the cog wheel icon at the top right corner of the screen to open Settings.
Tap on Notifications.
Select Turn on.
Follow the steps mentioned in the previous method.
Switch off your Incognito mode
There is a change also that enabling the incognito mode might have stopped the YouTube app notifications. Incognito mode is an option that lets you watch your video privately on your iPhone. This basically means YouTube does not have it on watch history or searches. Here are the steps to turn off the incognito mode.
On the YouTube app check if there is a mask icon next to your profile icon.
If you see the icon click on it.
Tap on Turn off incognito.
Enable notifications from channels in your subscription list
Hit the notification bell icon at the top of the screen.
Tap on Turn on Notifications.
Follow the steps mentioned in the first method.
Turn on Background App Refresh
Go to Settings.
Scroll down and select YouTube.
Turn on the toggle switch for Background App Refresh.
Frequently Asked Questions (FAQs)
Why is YouTube not showing notifications on iPhone?
This may be because you have disabled notifications for the YouTube app. If that is not the case, keep your iPhone off DND and make sure that background app refresh is turned on for YouTube.
How do I turn on reminders for my subscribed channels on YouTube?
Go to the channel page and tap the bell icon to receive every update from the YouTube channel.
How do I turn on Background App Refresh for YouTube?
These are the top 6 ways to fix the ‘YouTube app notifications not working’ on your iPhone. On Android, make sure the notifications for YouTube are turned on by going to its page in the app settings. If you know any other ways to go about this task, let us know in the comments!
After the global chip shortage, Samsung has hiked the price of some of its smartphones in India. The list includes three devices: Samsung Galaxy F02s, Samsung Galaxy M02s, and Samsung Galaxy A12. The major smartphone player has hiked the prices of the three phones by Rs 500. The new hiked rates are applicable across all their variants.To recall, Samsung launched Galaxy F02s, Galaxy M02s, and Galaxy A12 are the company’s latest budget smartphones to debut in India in 2021. The devices are speculated to be more expensive due to the global chip shortage. After the increase in prices the Samsung Galaxy F02s is Rs 500 more expensive and will retail at Rs 9,499 and Rs 9,999 for the 3GB RAM with 32GB storage and 4GB RAM with 64GB storage options respectively. To recall, both the variants were launched in India at 8,999 and Rs 9,499. This phone will be available in three colour options of Diamond Black, Diamond Blue, and Diamond White. Samsung Galaxy F02s features a 6.5-inch HD+ HD+ Infinity-V Display. It runs on One UI based on Android 10 OS and is powered by an octa-core Qualcomm Snapdragon 450 SoC. It comes with a triple rear camera setup that includes a 13-megapixel primary sensor. Moreover, there is a 2-megapixel depth sensor and a 2-megapixel macro lens. While on the front, there is a 5-megapixel selfie camera. The device is backed by a 5,000mAh battery with 15W fast charging support.Similarly, Galaxy M02s which was launched at Rs 8,999 for the 3GB RAM with 32GB storage is now available at Rs 9,499. The 4GB RAM with 64GB storage model is now accessible at Rs 10,499 which retailed at Rs 9,999 before the price hike. Both variants will be available in two colour options of Black, Blue, and Red. The phone features a 6.5-inch TFT waterdrop-style notch display. It is powered by an octa-core Qualcomm Snapdragon 450 processor paired with Adreno 506 GPU. Also Read: Samsung Galaxy M02s review: For those who need a big-battery smartphone
There is a triple rear camera set-up that includes a 13-megapixel primary sensor. In addition to this, there is a 2-megapixel depth sensor and another 2-megapixel tertiary lens for macrophotography. While on the front you get a 5-megapixel camera sensor aperture for taking selfies. The smartphone is fuelled by a 5,000mAh battery which comes with 15W quick charge support.
On the other hand, Samsung Galaxy A12 has also received a price hike of Rs 500. It comes in two variants of 4GB RAM with 64GB storage and 4GB RAM with 128GB internal memory. The former one was launched at 12,999 which is now available at Rs 13,499. Whereas the latter one priced at Rs 13,999 which is now available at Rs 14,499.
It comes in Celestial Black, Sea Green, and Sky Blue colour options. Samsung Galaxy F12 is highlighted with a 6.5-inch HD+ Infinity-V Display. Under the hood, there is an octa-core Exynos 850 SoC and runs One UI 3.1 Core on top of Android 11. A quad rear camera setup includes a 48-megapixel primary sensor, a 5-megapixel ultra-wide-angle, a 2-megapixel macro lens and, a 2-megapixel depth sensor. Upfront, there is an 8-megapixel camera sensor for taking selfies and video calling. The phone packs a massive 6,000mAh battery that comes with 15W fast charging support.
For the latest gadget and tech news, and gadget reviews, follow us on Twitter, Facebook and Instagram. For newest tech & gadget videos subscribe to our YouTube Channel. You can also stay up to date using the Gadget Bridge Android App.
OnePlus has recently announced to launch the next generation of its Nord smartphone in India on July 22. Alongside the OnePlus Nord 2 5G, the company is also going to launch its audio product, which is an upgrade to the OnePlus Buds or Buds Z. The company has officially confirmed to bring the OnePlus Buds Pro to India on the same day of Nord 2 5G launch.The news comes by way of a forum post in which the Chinese company has officially announced to launch the OnePlus Buds Pro in India on July 22. In addition to this the company also wants its community members to sign up for testing both the products: OnePlus Nord 2 5G and the Buds Pro and give their feedback prior to the launch in the country. OnePlus is seeking Lab Reviewers and the applications to sign up for the testing process has already begun. As per the company, it will also announce the name of the winners just a day before the official announcement that is on July 22. If you are willing to be a Lab Reviewer then you can apply here.The community forum post reads, Are you excited about the upcomingOnePlus Nord 2 5G launch? I bet you didn’t know the new instalment of the Nord series would be accompanied by the yet-to-be-announced Buds Pro! Do you want to test them both? Well, you might have to wait less than you expected.The Lab is back and following our most recent edition of The Lab –OnePlus U1S – we’ll have a non-phone product again. This time we are including two products – The OnePlus Nord 2 5G and the Buds Pro.The Lab Reviewers are announced the company will then ship the devices on July 22 and other information related to unboxing and embargo will be discussed with the reviewers.The Lab page has gone live and the participants are required to share links to photos/videos in the application. Do remember that the links must be accessible by us. It should be noted that all the users are eligible for our program. However, users who have previously participated in either the Nord 2 or OnePlus Buds Pro beta test programs cannot participate. Whereas the entry will be reviewed based on your photography and writing skills. Other criteria include your tech gadget experience, review history, blogging, and related user-generated content highlighting your writing proficiency. Moreover, the company has prepared 10 devices for each edition of the Lab. And approximately seven calendar days will be given to reviewers to write their reviews. A follow-up review after using the device for one month is also required.As of now there is no information related to OnePlus Buds Pro as the device has not been leaked nor it has been spotted on any certification websites. On the other hand, OnePlus Nord 2 5G has been listed on Amazon ahead of the official launch, The device is expected to be priced around CYN 2,000 that translates to Rs 23,000. In terms of specs, the phone is confirmed to be powered by MediaTek Dimensity 1200-AI SoC. According to rumours, the handset will come with a 6.43-inch full-HD+ AMOLED display with 90Hz refresh rate support. It will also feature a triple rear camera set-up that will be highlighted with a 50-megapixel primary sensor. For taking selfies it will sport a 32-megapixel front-facing camera. Moreover, there will be a 4,500mAh battery and an in-display fingerprint sensor onboard.
For the latest gadget and tech news, and gadget reviews, follow us on Twitter, Facebook and Instagram. For newest tech & gadget videos subscribe to our YouTube Channel. You can also stay up to date using the Gadget Bridge Android App.
QR code has emerged as a new method for payments or as a web authenticator. Now every app or every payment option has a QR code which you can easily make a payment or open an app. With the digitisation of payment scanning, the QR has become a daily activity. Here are the best ways you can scan any QR code on your Android smartphone. Follow the guide. Read Also:Nothing Phone 2a Community Edition Project announced
In This Article
Scan the QR code on Google Lens
This is the most popular option to scan any QR code. And most Android smartphones come with a Google lens. The process to scan a QR code on Google Lens is simple: you just point at the QR code and it will decipher and show you a web link. For numbers and values, you need to check the buttons at the bottom of the page. Here are the steps to scan a QR code using Google Lens.
Launch the camera app on your Android smartphone.
When the camera opens up, find the Google lens button next to the shutter button.
Step 1:Swipe down from the status bar to reveal the Quick Settings Menu.
Step 2: Tap the Scan tile.
Step 3: This will trigger the camera. Point it towards the QR code to read it.
Scan the QR Code from an image
Step 1: Open the Google Photos app on your smartphone and tap on the picture containing the QR code.
Step 2: Tap on the screen to reveal the toolbar and then select the Google Lens icon.
Step 3: Google Lens will scan the QR code in the picture and present a clickable link for you to access the information.
Scan the QR code using Google Chrome
Google Chrome app also allows you to scan a QR code. You have the Chrome browser app already installed and you can easily scan a QR code using the Chrome app. It also allows you to create a QR code link as well. The following steps are on how to scan any QR code on your Android smartphone using Google Chrome.
Open the Google Chrome app and click on the link of the QR code.
Now the menu option at the bottom of the page, select QR code.
As soon as the link is converted into a QR code, click on Scan.
Now you should allow the camera access and the QR code will open to its contents.
Scan the QR code using the Paytm app
Digitalised payment has made it necessary to scan a QR code and make any payment using the code. As such for this activity using a Paytm QR scanner to make payment is highly convenient and easier. The built-in scanner on Paytm will scan any QR code payment using your Android smartphone camera. The process of scanning and paying any UPI QR code is simple Click on Pay and it will open the camera to scan the code. But unlike any other UPI payment app, Paytm allows you to scan a QR code even from a web link which many apps do not have. Read also:Paytm app mysteriously disappeared from Google Play Store
Scan the QR code using an App: Free QR scanner
You can download this free QR scanning app from the Google Play Store. This scanner app is one of the most popular QR scanning apps for your Android smartphones. The app gives you some interesting features such as you can save the QR code and share it with your friends. In situations where you have to scan the QR code in dark light, the app allows you to toggle your flashlight. The installation process is not a problem, you just need to install the app and allow access to your Android smartphone camera.Download link
Frequently Asked Questions (FAQs)
Which is the easiest way to scan a QR Code on my Android phone?
Swipe down from the status bar, select the ‘Scan QR Code’ tile, and point your camera at the code. The link will pop up in the camera app.
How do I scan a QR code saved in my phone’s gallery?
Open the QR image in the Google Photos app, hit the Lens icon at the bottom, and click on the link displayed on the screen.
These are the top 6 ways to scan a QR code using your Android smartphone. Given there are multiple ways to go about this task natively, there is no need to download a third-party app. You can also use QR codes to share your WiFi password with ease. If you need any further help with this task, let us know in the comments!
The e-commerce website Flipkart is hosting Daily Trivia Quiz. Every day it brings a bunch of new questions for its users. By answering them correctly you can win exciting prizes. The questionnaire is based on questions related to general knowledge. Also, the users can win free vouchers and super coins, among other offers via the daily quiz. 12 July 2021 Flipkart Daily Trivia Quiz Answers has already gone live on its platform.
The participant should be at least 18 years old and should have a valid login ID. The Quiz is available on the mobile platform and not the web version. E-commerce conducts the quiz on daily basis and goes live at 12:00 AM IST and runs till 11:59 PM IST. The winners are announced within 15 days from the date of participation that can be viewed under the Gems/Rewards section in the app.
In This Article
How to participate in the Flipkart Daily Trivia Quiz
To participate download the Flipkart app on your phone. Then open the Flipkart app then head to Game Zone. Now click on the Daily Trivia Banner or search for Daily Trivia. Enter the game and answer all 5 questions with correct answers.
12 July 2021 Flipkart Daily Trivia Quiz Answers
Question 1: Actor Dev Anand’s biography is titled ‘_______’ with file?
Answer: Romancing
Question 2:Which of these is a Jon Abraham film directly by Anurag Kasyap?
Answer: No Smoking
Question 3: Which actor made his directorial debut with the fim Dil Chahta Hain?
Answer: Farhan Akthar
Question 4: Which actor has ranked 2nd in the Forbes India Celebrity 100 list after Virat Kohli?
Answer: Akshay Kumar
Question 5: The 1999 Bollywood film ‘Aa ab Laut Chalein’ is the directorial debut of?
Answer: Rishi Kapoor
12 July 2021 Amazon Quiz has now gone live. Every day the e-commerce website brings a daily quiz for its customers. The quiz begins from 12 AM to 11:59 PM. Those participating in the quiz can win exciting prizes by answering all the questions correctly. Today all customers across the country can win a Rs 10,000 Amazon Pay balance.
Amazon is back with another new daily quiz. Amazon quiz brings an opportunity for its customers to win daily prizes such as mobile phones, other gadgets including Pay Balance also. If you managed to answer all the questions correctly, you can stand a chance to win HP Omen Gaming Laptop. Check out today’s answers for the Amazon quiz.
12 July 2021 Amazon Quiz Answers
Question 1: Recently, a National Committee was formed to celebrate what in 2022 in the form of Azadi Ka Amrit Mahotsav?
The answer is- 75 years of India’s Independence
Question 2: The immense Chicxulub crater, that may have caused the extinction of Dinosaurs, is located underneath the Yucatan Peninsula in which nation?
The answer is- Mexico
Question 3: In an ODI match at which venue in 2021, did you have 1 pair of brothers representing India and another pair representing England?
The answer is- Pune
Question 4: Which necessary phone peripheral was recently removed from the box of the newest version of this particular mobile phone?
The answer is- Both of the above
Question 5: These animals can eat upto a kilogram of what per day?
The answer is- Eucalyptus leaves
As you all know, using Microsoft words traditionally means an awful amount of typing and using the keyboard. But in the case of people who are not comfortable with a lot of typing, Microsoft has enabled the speech-to-text feature. MS Word has support for voice typing where you can dictate your writing using voice recognition. This feature is very convenient and highly accurate also. Follow the guide below to use voice typing in Microsoft Word.
In This Article
Conditions for using the Dictate your documents on Microsoft Word:
The prerequisite for using the speech-to-text on MS Word is: you need to make sure you have a working built-in microphone connected to your laptop/PC or an external microphone. Using headphones that have a good quality microphone is also a good option. And also make sure you have a proper functional internet connection.
Read more: Microsoft Word is soon getting predictive text: Everything you need to know
Guide to enable the speech-to-text features:
The following guide is to show how to enable the dictation of your document using Microsoft Word. The function is useful for many situations and for many people. Check out the guide to learn how to enable voice typing and use it in Microsoft Word.
Open the Microsoft Word software on your computer.
Once the MS word is open>Go to Home on the tab above.
From the “Home” tab from the top taskbar between “File” and “insert”>Click on the Home tab.
Now from the drop-down menu on the top of the screen>Go to Dictate with the microphone icon that is on the right side of the screen>Click Dictate.
Once you click the button you will hear a beep>Now the icon will turn into a red icon.
You can now start dictating your speech or words>Recording has started when the icon turns red.
Make sure you pronounce the word clearly and speak slowly and clearly for more accurate dictating.
Use this keyword as you dictate along: dictate punctuation as you record along, say New line so that you can start a new line like pressing the Enter key.
Make sure you have to dictate everything accurately and precisely>After you are done click on the Date button again to finish the process.
You can also use the voice command to complete your dictation or stop the function.
To know some more advanced options>You can still use the keyboard when you are using the Speech-to-text features on MS word.
There are options to make language settings as well: Click on the downward arrow on the Dictate icon>Scroll down and click on the preferred language>There is additional Preview language also.
Using an Android smartphone with a quick-draining battery is a pain. There are many reasons for the battery draining the power quickly. The apps that are running in the background are one of the main reasons to blame. Here are some methods to check which apps are draining your Android smartphone battery.
In This Article
Re-configure your phone Display settings:
Optimising your app battery usage from the settings might help with the Android battery performance. There are some changes to the display and screen settings. These are some of the settings changes you can make to prevent the battery from draining on your Android smartphone.
Setting changes on Screen display: Settings>Display>Advanced>Screen Timeout>Not more than 30 seconds.
Reducing screen brightness: Settings>Display>Adaptive brightness>Turn it on.
Turning off keyboard sound and vibration: Settings>Click sound>Advanced>Turn it off.
Check for the Apps which are draining more battery:
The biggest reason for the battery juice to drain so fast can be because of all apps running in the background. To the user’s comfort, an Android smartphone allows you to make changes in Apps controls. You can delete the app, limit the app, force stop the app, pause the app. Here are the steps to check which app is drawing the juice more.
Go to the settings from the menu and open it.
Scroll down and click on the Battery settings.
Using the % given find which app uses the most battery.
Now Tap the app which uses the maximum percentage of battery
Uninstall it or Stop the app to use it in the background.
Find the app using a third-party app: AccuBattery App
Using an app from the Google Play Store is another option available to check which apps are draining your Android Smartphone battery. The app is one of the best apps available to control battery usage. The AccuBattery app also lets you know about battery health. Here is the guide on how to use the AccuBattery app.
Find the option App usage access using the three-dot icon on the top right corner.
Click on Grant Permission.
When prompted on the screen Allow the Usage access.
Now on the AccuBattery app homepage, you will find many options indicating the phone app usage of the battery.
Some options: Charging, Discharging, Health.
Using the app: Battery HD app
There is another third-party app you can download to find which app is draining your Android smartphone battery. You can download Battery HD from the Google Play Store. Here are the steps to operate the app.
Download the app from Play Store or use this link.
Install the app>Open Battery HD app on your Android smartphone.
The homepage will show the metrics of the Android battery.
Using a graph the app will indicate the Charging speed, Percentage usage, and temperature of the phone.
Truecaller is a Caller ID app that can now be used for many features. This Caller ID app is emerging as people’s best choice for identifying spam calls. With new features kept updating the app can now be used as more than a Caller ID app. Find out below the tips and tricks to use Truecaller like a Pro.
In This Article
Enabling Call Alerts:
One of the best features updated by the Truecaller app is to alert calls before even ringing. Though the feature only works with people who have installed the Truecaller app on their phones. So even before dialling your number to give you a ring the Truecaller app will send you a notification of the incoming call contacts and let you decide if you want to pick it up or not. The feature is enabled using data or Wi-Fi to send you the alert faster, as cellular networks are slower than internet networks the alerts can reach faster as notifications.
Read more: Oppo F17 Pro Diwali Edition price revealed, now up for pre-orders
Use Full-screen Caller ID:
There is an option on the Truecaller app where you can use full-screen for all incoming calls on the Truecaller interface. And the incoming calls which will be highlighted in colours to show if it is important or spam. For example, for saved contacts, the incoming calls will be blue, for spam calls it will be red, for priority calls it will be purple, for users who have gold accounts it will appear gold. Here are the steps to enable the feature.
Download the Truecaller app and install it.
Open the app>Go to Settings.
Scroll down on the left panel>Click Caller ID.
From the right panel>Select Full-screen>Set as default.
Now the Full-screen feature will be enabled.
Use the Gold Caller ID or Premium badge:
Using the paid options of Premium and Gold will let you use some advanced options like a Pro. The Premium account will allow you to block ads, also let you see the profile who viewed you, some advanced spam calls blocking etc. And the Gold accounts will give you a gold caller ID in addition to the above-mentioned premium features. And your profile will be in gold colour when you make outgoing calls, it is usually hard to ignore such a gold account on the Truecaller ID app.
Read also: Apple’s iPhone 13 is rumoured to launch soon: Features, launch date, and price
Choose a reason for the outgoing calls:
To make your outgoing calls very important and make sure the one you are dialling will pick up your call, you can add a reason for the call. Once you choose the reason before dialling the calls the call reason will appear on the screen along with Call alerts and Caller ID on the call receiver phone. These are the steps you can do to use the choose a reason feature.
Open the Truecaller app.
Click on the three-horizontal icon on the top left corner.
Go to settings>Select General.
Scroll down and toggle the Choose a reason before calls
Now from the options shown up, you can select a reason before your outgoing calls.
Hide online or Last seen on the app:
For those who like to stay hidden the option is available to off the last seen on the app. Truecaller uses many icon colours to indicate if the profile is online, on a call, or busy. To avoid the feature and stay hidden follow the steps.
Go to settings from the menu options.
Navigate to the Privacy Center.
From the Privacy Center page>Toggle off the Availability.
The e-commerce website Flipkart is hosting Daily Trivia Quiz. Every day it brings a bunch of new questions for its users. By answering them correctly you can win exciting prizes. The questionnaire is based on questions related to general knowledge. Also, the users can win free vouchers and super coins, among other offers via the daily quiz. 10 July 2021 Flipkart Daily Trivia Quiz Answers has already gone live on its platform.
The participant should be at least 18 years old and should have a valid login ID. The Quiz is available on the mobile platform and not the web version. E-commerce conducts the quiz on daily basis and goes live at 12:00 AM IST and runs till 11:59 PM IST. The winners are announced within 15 days from the date of participation that can be viewed under the Gems/Rewards section in the app.
In This Article
How to participate in the Flipkart Daily Trivia Quiz
To participate download the Flipkart app on your phone. Then open the Flipkart app then head to Game Zone. Now click on the Daily Trivia Banner or search for Daily Trivia. Enter the game and answer all 5 questions with correct answers.
10 July 2021 Flipkart Daily Trivia Quiz Answers
Question 1:Which chess piece can move one square in any direction?
Answer: King
Question 2:In honour of which Greek god was the ancient Olympics held?
Answer: Zeus
Question 3:In which Australian city would you find a cricket stadium named “The G”?
Answer: Melbourne
Question 4: Which IPL team’s coach is the former New Zealand captain Brendon McCullum?
Answer: KKR
Question 5: At 48, who is the oldest player in 2019’s IPL auction list?
Answer: Pravin Tambe
The e-commerce website Amazon is back with another daily quiz on its platform. The e-retailer conducts Amazon quiz sessions every day for its customers. The customers from different parts of the country can win exciting prizes and today’s quiz will let you win Rs 15,000 Pay Balance by answering all the questions correctly.
10 July 2021 Amazon Quiz is live now and the participants can stand a chance to win Rs 15,000 Pay Balance. By participating in the daily quiz the customers can win products such as OnePlus 7T, Apple iPhone x, iPhone Xs, Go Pro Hero 8, Galaxy Watch Active, and many more gadgets as well as Pay Balance. You can play the quiz from 12 AM to 11:59 PM every day and the winner’s names will be announced at the end of every month. Check out 10 July 2021 Amazon Quiz answers.
June 9 Amazon Quiz Answers
Question 1: The Full Moon of May is known as what?
The answer is- Flower Moon
Question 2: At the 2021 PGA Championship, who became the oldest major championship winner in history at the age of 50 years?
The answer is- Phil Mickelson
Question 3: European Space Agency’s Mars rover for the ExoMars programme is named after which famous scientist?
The answer is- Rosalind Franklin
Question 4: Which alcoholic drink is made primarily with this ingredient?
The answer is- Mead
Question 5: Which unit of measurement is used to measure these structures?
The answer is- Pyramid Inch
To FaceTime from an iPhone with an Android phone you need to create a link from the FaceTIme app and send the link using Whatsapp, email, and more. The link received on the Android smartphone can be opened using Google Chrome. And you can join the FaceTime call using Chrome Web. Follow the guide below to use FaceTime on your Android through a link.
In This Article
How to create a FaceTime link from iPhone:
To use the FaceTime call on the Android mobile you need to receive an invite link from an Apple iPhone, Mac, or iPad user. The FaceTime call link can only be created from the FaceTime app supported on an iPhone. The following steps tell you how to create a FaceTime call link.
Open the FaceTime app (iOS 15).
Click on Create Link from the app homepage.
Select the Info button having an “i” icon.
From the open-up page click on Share Link.
Now from the options pop-up>Choose how to share it.
There are many options on how to send the link using which app: WhatsApp, email, Apple messages, or copy the link to send it from another online platform.
How to join the FaceTime link using an Android smartphone:
Since Facetime calls are supported only on Safari and Google Chrome. You need to use FaceTime using Chrome web on the Android mobile. When you have received the invite link click on the link and open it using Chrome. Follow the guide below to open the FaceTime link and join the video call from an Android smartphone.
Click on the invite link>Enter your name or username>And press Continue.
When the pop-up appears on the screen “facetime.com wants to use your camera”>Press Allow>Select Allow when Allow camera prompt.
From the browser open-up,>Click on the Join>Green Colour icon on the top right corner
Now the video call will be connected as soon as the iPhone user who created the link approve you to join
There is an option to leave when deemed using the Leave button>Red colour on the top of the page.
The Taiwanese electronics giant, Asus, has partnered with Flipkart to launch a new category of Products in India. The company has also launched a dedicated microsite on the e-commerce portal which says the collaboration between both companies is a transformation partnership for radical innovation that is #ThoughtfullySimple. Besides this, the Asus Zenfone 8 Series is also to hit the Indian stores soon. The launch has been confirmed by a teaser web page which has gone live on the company official website in the country.Leon Yu, Regional Director, India and South Asia, ASUS said, “India has the stature of the home market within ASUS and we are deeply committed to the needs of our Indian consumers and the Indian Market. To enable and help millions of our Indian customers to digitally access education, e-commerce, social interaction and work. Flipkart has been our long-term strategic partner to bring path-breaking innovations to the Indian market. We are very happy and strongly believe this collaboration will bring about a radical change in the digital lives of Indians.”As per the latest dedicated microsite which has been created on Flipkart the strategic partnership between Asus and Flipkart will kick off on June 15 at 12 noon. With this collaboration, the company aims to launch a new category of affordable and simple products in India. Both the e-commerce and electronics brands are yet to reveal the details about the launch but the speculations suggest that the company is going to launch a new Chromebook from Asus.
Ajay Veer Yadav, Senior Vice-President, Mobiles, Electronics and Large Appliances at Flipkart said, “As India’s home-grown e-commerce marketplace, Flipkart continues to meet customers’ evolving requirements with its widest selection of products and delivering it in a safe and hygienic manner across the country. In this endeavour, Asus has been a long-standing partner with its best-in-class technology solutions and I’m excited to take this partnership ahead with the upcoming launch of a new range of its offerings aimed at simplifying digital access for millions of Indians and I expect it to become a customer favourite.”Besides this Asus has also begun teasing the Asus 8Z series aka Zenfone 8 in India. The latest teaser page conforms to the India launch which has gone live on Asus India official website. To recall, the flagship smartphone series was introduced globally in May this year. Due to a surge in COVID-19 cases in India, Asus Zenfone 8 Series launch was deferred. However, the company still went ahead with the global launch.The company’s head in India Dinesh Sharma also took to Twitter to make an announcement, “To all Fans asking me about our new smartphone’s India launch – the answer is yes. The team is relentlessly working towards the same and we will announce the launch date soon. Deeply appreciate your enthusiasm. Watch this space for more infohttps://asus.in/new-phone”As of now, the company has not yet revealed any launch date but the launch is expected to happen later this month or in the first week of August. The Asus Zenfone 8 Flip was launched at €799 for the 8GB RAM with 256GB of storage that translates to Rs 70,648. Whereas the price of the Asus Zenfone 8 6GB RAM with 128GB storage is set at €599 that translates to Rs 52,966, 8RAM with 128GB storage at €669 (approx Rs 59,159) and 8RAM with 256GB storage at €729 (approx Rs 64,461). Lastly, the 16GB RAM with 256GB storage will be available with a price tag of €799 that translates to around Rs 70,648. Earlier the device was spotted through a Google Play supported devices listing. As per the listing, both Zenfone 8 Indian variants with model code I006D have been codenamed as “ASUS 8Z”. Whereas ZenFone 8 Flip has been listed as its original name but the device is most likely to come with an ASUS 8Z Flip branding in India.Speaking of the specifications, the Asus Zenfone 8 Flip features a 6.67-inch Samsung AMOLED display with 1,080×2,400 pixels of resolution, 90Hz refresh rate support and Corning Gorilla Glass 6 protection. The device ships ZenUI 8 on top of Android 11 and is powered by a Qualcomm Snapdragon 888 processor paired with 8GB of LPDDR5 RAM and 256GB of UFS 3.1. Moreover, the device packs a 5,000mAh battery supported by 30W fast charging tech. Also Read:Asus ZenFone 8 and ZenFone 8 Flip to be renamed as Asus 8Z and Asus 8Z Flip ahead of the India launch
The smartphone is highlighted with a triple camera with a flip mechanism that includes a 64-megapixel Sony IMX686 primary sensor with an f/1.8 aperture. In addition to this, there is a 12-megapixel ultra-wide-angle lens with f/2.2 aperture and an 8-megapixel telephoto lens with 3x optical zoom and OmniVision sensor. The camera module is protected by Gorilla Glass 3.
Asus Zenfone 8 features a 5.9 inch AMOLED display, a 120Hz refresh rate and HDR10+ support. There is a Qualcomm Snapdragon 888 SoC under its hood with up to 16GB of LPDDR5 RAM and 256GB of UFS 3.1 storage. The phone supports 30W HyperCharge with a 4,000mAh battery.This handset has a fixed dual camera set up that includes a 64-megapixel Sony IMX686 primary sensor with an f/1.8 aperture and a 12-megapixel Sony IMX363 ultra-wide-angle camera with Dual PDAF that also supports 4cm macro photography. Upfront there is a 12-megapixel selfie camera.
For the latest gadget and tech news, and gadget reviews, follow us on Twitter, Facebook and Instagram. For newest tech & gadget videos subscribe to our YouTube Channel. You can also stay up to date using the Gadget Bridge Android App.
Google is rolling out a new update for Google Calendar to bring new features, considering the work from the home situation due to the COVID pandemic. The product is getting a new RSVP menu to make Google Calendar more flexible in the hybrid workplace model. With the introduction of new RSVP options for Calendar invitations, the users will be able to indicate how they plan to join a meeting – in the meeting room, or virtually. As per the official blog post, the new Google Calendar update will bring an RSVP option to allow users to join a meeting virtually or in person. This feature is accessible alongside the option of whether the recipient will be attending a meeting in person. As explained by the company both the organizer and guests will be able to see how attendees are planning to attend the meeting in the event detail. Therefore helping the meeting attendees know what to expect when joining a meeting, and prepare accordingly. It should also be noted that when the user chooses the new RSVP options, the join method details (e.g. “joining virtually”) are not shared with contacts on other platforms, such as Microsoft Outlook. Right now the RSVP menu options will be accessible only for Google Calendar and the company is planning to extend this calendar invitations feature to Gmail soon. The new feature can be seen under the Yes option. From there you can select from three options- Yes, Yes in a meeting room and Yes, joining virtually. The gradual rollout for the rapid release domains has already begun and the scheduled release domain gradual rollout will begin from July 22. Besides this Google has also released several new features giving more ways to work with, display, and organize BigQuery data using Connected Sheets. This will include hourly refreshes, specific start dates and frequency options every five days, every two months, etc. According to the company, these additional options will make it easier to automate data refreshing at a specified frequency with more granular scheduling options, giving you more flexibility when working with your data.
For the latest gadget and tech news, and gadget reviews, follow us on Twitter, Facebook and Instagram. For newest tech & gadget videos subscribe to our YouTube Channel. You can also stay up to date using the Gadget Bridge Android App.


 The camera layout is a bit different, which you can see here. It gets a quad-camera module and as you can see there is a very thin silver ring around the primary lens, which looks appealing. We have got the celestial Silver for the review but you can choose from Cosmic Black and Frosty White colour variants. The colour variant that we have got is our personal favourite and it looks stunning. The reflective back changes its hues from silver to blue and blue to pink depending on its position, which gives a prism-like effect refracting the light off the back panel.
The mobile phone is covered in Gorilla Glass 5, from front to back, however, the side is still made out of plastic. Though the phone is resistant to scratches, we would recommend you to put on a silicon cover because whatever protection it has, after all the back panel is of glass. It may break when falling from a certain height so the cover will be an extra shield (that comes inside the box).
The camera layout is a bit different, which you can see here. It gets a quad-camera module and as you can see there is a very thin silver ring around the primary lens, which looks appealing. We have got the celestial Silver for the review but you can choose from Cosmic Black and Frosty White colour variants. The colour variant that we have got is our personal favourite and it looks stunning. The reflective back changes its hues from silver to blue and blue to pink depending on its position, which gives a prism-like effect refracting the light off the back panel.
The mobile phone is covered in Gorilla Glass 5, from front to back, however, the side is still made out of plastic. Though the phone is resistant to scratches, we would recommend you to put on a silicon cover because whatever protection it has, after all the back panel is of glass. It may break when falling from a certain height so the cover will be an extra shield (that comes inside the box).
 The power button on the right side of the frame also acts as a fingerprint sensor, is easy to reach and works swiftly. Just above the fingerprint sensor, there is a volume rocker button too. There is no button or slot on the other side. There is no MicroSD card slot and a 3.5mm headphone jack, but Xiaomi provides a 3.5mm jack to Type C dongle inside the box so you can easily plug in your headphones. The stereo speaker is given on the top as well as the bottom and an IR emitter is placed in one of the speaker grills on the top to control your TV, Set Top Box from the phone itself.
At the bottom frame a SIM Tray, a USB Type-C port and a primary microphone is given. On the front, the bezels are slim and have a very small camera hole to play house to the selfie camera is placed, which will be less distracting. All in all, the design of the device gives a premium feel.
The display is the best thing about the Mi 11X Pro. It has a 6.67-inch full-HD+ Super AMOLED display with 1,080×2,400 pixels of resolution. It also offers a 120Hz refresh rate panel, 1,300 nits of peak brightness, 360Hz touch sampling rate and 20:9 aspect ratio. The smartphone also has support for HDR10, which is great for content viewing. On the spec sheet, the specifications look similar to Redmi Note 10 Pro Max but in reality, the display is just superior to the other Redmi smartphone.
The power button on the right side of the frame also acts as a fingerprint sensor, is easy to reach and works swiftly. Just above the fingerprint sensor, there is a volume rocker button too. There is no button or slot on the other side. There is no MicroSD card slot and a 3.5mm headphone jack, but Xiaomi provides a 3.5mm jack to Type C dongle inside the box so you can easily plug in your headphones. The stereo speaker is given on the top as well as the bottom and an IR emitter is placed in one of the speaker grills on the top to control your TV, Set Top Box from the phone itself.
At the bottom frame a SIM Tray, a USB Type-C port and a primary microphone is given. On the front, the bezels are slim and have a very small camera hole to play house to the selfie camera is placed, which will be less distracting. All in all, the design of the device gives a premium feel.
The display is the best thing about the Mi 11X Pro. It has a 6.67-inch full-HD+ Super AMOLED display with 1,080×2,400 pixels of resolution. It also offers a 120Hz refresh rate panel, 1,300 nits of peak brightness, 360Hz touch sampling rate and 20:9 aspect ratio. The smartphone also has support for HDR10, which is great for content viewing. On the spec sheet, the specifications look similar to Redmi Note 10 Pro Max but in reality, the display is just superior to the other Redmi smartphone.
 Mi 11X Pro delivers better colour reproduction, better viewing angles, but we have also realised that its touch responses are good too, thanks to the 360Hz touch sampling rate. Like we have noticed some jitters and lags in the Note 10 Pro Max 120Hz SAMOLED display, but here on the Mi 11X Pro we experienced no such issue as it is powered by a Snapdragon 888 chipset. Overall, a lovely display for all kinds of needs.
 The phone does get slightly warm at the back when playing for long, which is not an issue. Paired with good haptics and an excellent pair of hybrid stereo speakers the smartphone is awesome. Also, the RAM management is good, which was a big issue with few otherRedmi phones. It did not reload any of the apps running in the background when we reopened it after 10 or 15 minutes. Scrolling through applications, switching between them, browsing the internet and social media apps is extremely smooth.
The device runs MIUI 12 on top of Android 11. Here too, we saw the ads running on the locked screen and were also spammed with unnecessary notifications, which is not expected in a premium smartphone.
The battery life is also decent on the Mi 11X Pro. The 4,520mAh battery will easily provide you with a day’s worth of endurance when used moderately. The device also charges pretty fast as the company has provided a 33W fast charger, which takes about an hour or less to get from zero to 100 percent. The speakers on the phone are loud and deliver a good dynamic range as well as immersive audio powered by Dolby Atmos.
The phone does get slightly warm at the back when playing for long, which is not an issue. Paired with good haptics and an excellent pair of hybrid stereo speakers the smartphone is awesome. Also, the RAM management is good, which was a big issue with few otherRedmi phones. It did not reload any of the apps running in the background when we reopened it after 10 or 15 minutes. Scrolling through applications, switching between them, browsing the internet and social media apps is extremely smooth.
The device runs MIUI 12 on top of Android 11. Here too, we saw the ads running on the locked screen and were also spammed with unnecessary notifications, which is not expected in a premium smartphone.
The battery life is also decent on the Mi 11X Pro. The 4,520mAh battery will easily provide you with a day’s worth of endurance when used moderately. The device also charges pretty fast as the company has provided a 33W fast charger, which takes about an hour or less to get from zero to 100 percent. The speakers on the phone are loud and deliver a good dynamic range as well as immersive audio powered by Dolby Atmos.
 Moving ahead, the triple camera set up on the MI 11X Pro is the biggest highlight of this phone. Here it has a 108-megapixel Samsung HM2 sensor with an f/1.75 aperture accompanied by an 8-megapixel ultra-wide-angle lens and a 5-megapixel macro sensor. On the front, there is a 20-megapixel selfie camera. Personally speaking, the 108-megapixel primary lens does offer quality during the daytime. However, the device clicks a bit of saturated images outdoors. We also tried to capture some shots in standard mode as well, which came out as per our liking portrait mode shots produced are stunning with a good amount of details and edge detection on point. But sometimes you don’t get good subject focus, blur and the images look less pleasing.
 The telemacro lens can catch minor details. So the results are very exhilarating. But sometimes the Tele macro lens struggles to differentiate between the subject and the background and does not lock the focus well.


 Amazfit Bip U Pro comes with Black coloured silicone straps and an interlocking buckle which keeps the smartwatch tight on your wrist. Users also get the option of changing the straps of the watch – which we think is a big plus, especially because Amazfit Bip U Pro is a budget device. The smartwatch comes with a sturdy built, but it doesn’t feel too premium. But since it is a budget device, we really cannot complain about this being a problem. In fact, for this price point, we consider the look and feel to be pretty good. We wore the smartwatch around almost a week and it didn’t feel uncomfortable to us during that time. Due to its lightweight, we can easily say that we had no issues wearing the watch round the clock. Even when we wore it while sleeping, it didn’t cause any discomfort.
 The 1.43-inch TFT LCD display of the smartwatch comes with a resolution of 320×302 pixels and is protected with a layer of Corning Gorilla Glass 3. It looked vibrant and all the icons, numbers or stats projected on it were sharp. There are four levels of brightness that you can choose from, but it is worth mentioning that one can’t set auto-brightness on Amazfit Bip U Pro. The sunlight readability of the device was decent too, and in case you face a problem, you can always increase the brightness manually. However, there was one thing that we did miss – always on display. But then, maybe at this price point it’s too much to ask for.
 The smartwatch can be used for a variety of tasks like counting steps, measuring heart rate, fitness and sleep tracking, et al, and the app on the smartphone has much more detailed information on these stats. For instance, you can only see the number of hours you slept on your smartwatch. But if you access sleep data on the app, you can see exactly how much time and when you were in a deep sleep.
If you are a fitness freak, you would particularly love to have this smartwatch because of the sheer number of options that it offers. It has several modes like Outdoor Running, Treadmill, Outdoor Cycling, Indoor Cycling, Walking, Pool Swimming, Rope Skipping, Yoga, Free Exercise, Badminton, Cricket, Dance, and so many more. The smartwatch also offers some specific workout modes like Core Training, Stair climber, Zumba, Thai Boxing, etc. In a nutshell, it doesn’t matter what you choose to stay fit, Amazfit Bip U Pro most likely does have a mode for your kind of workout.
We enabled Yoga when we did our workout thrice a week and we were happy with the results that we got from the smartwatch. In the fitness mode, we could see the total time we spent exercising and the calories we burnt during our workout session. There was also a live heart rate counter and a graph of your heart rate. The fitness data on Zepp app is a lot more detailed and it proved to be helpful to us in improving the way we workout.
The smartwatch can be used for a variety of tasks like counting steps, measuring heart rate, fitness and sleep tracking, et al, and the app on the smartphone has much more detailed information on these stats. For instance, you can only see the number of hours you slept on your smartwatch. But if you access sleep data on the app, you can see exactly how much time and when you were in a deep sleep.
If you are a fitness freak, you would particularly love to have this smartwatch because of the sheer number of options that it offers. It has several modes like Outdoor Running, Treadmill, Outdoor Cycling, Indoor Cycling, Walking, Pool Swimming, Rope Skipping, Yoga, Free Exercise, Badminton, Cricket, Dance, and so many more. The smartwatch also offers some specific workout modes like Core Training, Stair climber, Zumba, Thai Boxing, etc. In a nutshell, it doesn’t matter what you choose to stay fit, Amazfit Bip U Pro most likely does have a mode for your kind of workout.
We enabled Yoga when we did our workout thrice a week and we were happy with the results that we got from the smartwatch. In the fitness mode, we could see the total time we spent exercising and the calories we burnt during our workout session. There was also a live heart rate counter and a graph of your heart rate. The fitness data on Zepp app is a lot more detailed and it proved to be helpful to us in improving the way we workout.
 There are also a women-centric feature on the device called Cycles using which, female users can record and manage their menstruation data.
While we loved most of the tasks that the smartwatch performed, there was one thing that simply refused to work: The SpO2 monitor. Firstly, it doesn’t work till you tie the watch around your wrist a bit too tightly, and secondly, even then the data seemed inaccurate as it didn’t match with our pulse oxymeter.
Another cool feature of the smartwatch is integration with Amazon‘s Alexa. But in order to access the assistant your smartwatch must be connected to your phone and you have to enable it on the app. An active internet connect is also required. Obviously, this is another, particularly given the price range of the device.
Another aspect of the smartwatch which we found commendable is its battery life. With usage that involved sleep tracking, active stress and heart rate tracking, and using the device for our workouts, we’re still on 70% on Day 8.
There are also a women-centric feature on the device called Cycles using which, female users can record and manage their menstruation data.
While we loved most of the tasks that the smartwatch performed, there was one thing that simply refused to work: The SpO2 monitor. Firstly, it doesn’t work till you tie the watch around your wrist a bit too tightly, and secondly, even then the data seemed inaccurate as it didn’t match with our pulse oxymeter.
Another cool feature of the smartwatch is integration with Amazon‘s Alexa. But in order to access the assistant your smartwatch must be connected to your phone and you have to enable it on the app. An active internet connect is also required. Obviously, this is another, particularly given the price range of the device.
Another aspect of the smartwatch which we found commendable is its battery life. With usage that involved sleep tracking, active stress and heart rate tracking, and using the device for our workouts, we’re still on 70% on Day 8.


 As mentioned before Tecno Camon 17 series was launched in Nigeria in May this year. The series includes two devices Tecno Camon 17 Pro and Tecno Camon 17. The price of the former one is set at NGN 74,000 that translates to Rs 14,200 whereas the former one at Rs NGN 125,000 translates to Rs 24,100.
Speaking of the pricing, Tecno Camon 17 Pro comes with a 6.8-inch full-HD+ display with 1080×2469 pixels of resolution and 90Hz refresh rate support. The phone is powered by MediaTek Helio G95 SoC. It features a quad rear camera set up that includes a 64-megapixel primary sensor, an 8-megapixel wide-angle lens, a 2-megapixel bokeh lens, and a 2-megapixel monochrome sensor. While on the front there is a 48-megapixel ultra-clear selfie camera. The device is backed by a 5,000mAh battery with 33W fast charging support.
On the other hand, Tecno Camon 17 comes with a 6.6-inch HD+ display with a 90Hz screen refresh rate. Under the hood, there is MediaTek Helio G85 SoC. In terms of imaging, the smartphone features a triple rear camera setup that includes a 48-megapixel primary sensor, a 2-megapixel bokeh lens, and an AI sensor. Upfront there is a 16-megapixel selfie camera. Backed by a 5,000mAh battery which is supported by an 18W fast charger.
For the latest gadget and tech news, and gadget reviews, follow us on Twitter, Facebook and Instagram. For newest tech & gadget videos subscribe to our YouTube Channel. You can also stay up to date using the Gadget Bridge Android App.
As mentioned before Tecno Camon 17 series was launched in Nigeria in May this year. The series includes two devices Tecno Camon 17 Pro and Tecno Camon 17. The price of the former one is set at NGN 74,000 that translates to Rs 14,200 whereas the former one at Rs NGN 125,000 translates to Rs 24,100.
Speaking of the pricing, Tecno Camon 17 Pro comes with a 6.8-inch full-HD+ display with 1080×2469 pixels of resolution and 90Hz refresh rate support. The phone is powered by MediaTek Helio G95 SoC. It features a quad rear camera set up that includes a 64-megapixel primary sensor, an 8-megapixel wide-angle lens, a 2-megapixel bokeh lens, and a 2-megapixel monochrome sensor. While on the front there is a 48-megapixel ultra-clear selfie camera. The device is backed by a 5,000mAh battery with 33W fast charging support.
On the other hand, Tecno Camon 17 comes with a 6.6-inch HD+ display with a 90Hz screen refresh rate. Under the hood, there is MediaTek Helio G85 SoC. In terms of imaging, the smartphone features a triple rear camera setup that includes a 48-megapixel primary sensor, a 2-megapixel bokeh lens, and an AI sensor. Upfront there is a 16-megapixel selfie camera. Backed by a 5,000mAh battery which is supported by an 18W fast charger.
For the latest gadget and tech news, and gadget reviews, follow us on Twitter, Facebook and Instagram. For newest tech & gadget videos subscribe to our YouTube Channel. You can also stay up to date using the Gadget Bridge Android App. 
 The right edge of the smartphone has the volume rocker keys and the Power button that doubles up as a fingerprint sensor. During our time with the device, it worked perfectly well every time we tried to use it. The left edge of the handset has a hybrid SIM tray, so you must choose between a second SIM card or a microSD card. The top edge has an IR emitter, the secondary speaker and another hole for better sound, while the bottom edge has a 3.5mm headphone jack, the primary speaker and the Type-C port.
Flip over, and you will see the 6.67-inch full-HD+ LCD display of the smartphone that comes with a hole-punch camera on the centre-top. The earpiece is tucked between the display and the top edge of the handset. The screen of the device is protected with Corning Gorilla Glass 6 and comes with a maximum refresh rate of 120Hz and a maximum touch sampling rate of 240Hz. The display also has support for HDR10 and it outlined with thin bezels, although the chin is slightly thicker. The colour reproduction is accurate and they remain consistent at various viewing angles. The images are sharp and clear, but the sunlight readability could be better. We spent hours watching Netflix shows on the device, and we were very happy with the results.
The right edge of the smartphone has the volume rocker keys and the Power button that doubles up as a fingerprint sensor. During our time with the device, it worked perfectly well every time we tried to use it. The left edge of the handset has a hybrid SIM tray, so you must choose between a second SIM card or a microSD card. The top edge has an IR emitter, the secondary speaker and another hole for better sound, while the bottom edge has a 3.5mm headphone jack, the primary speaker and the Type-C port.
Flip over, and you will see the 6.67-inch full-HD+ LCD display of the smartphone that comes with a hole-punch camera on the centre-top. The earpiece is tucked between the display and the top edge of the handset. The screen of the device is protected with Corning Gorilla Glass 6 and comes with a maximum refresh rate of 120Hz and a maximum touch sampling rate of 240Hz. The display also has support for HDR10 and it outlined with thin bezels, although the chin is slightly thicker. The colour reproduction is accurate and they remain consistent at various viewing angles. The images are sharp and clear, but the sunlight readability could be better. We spent hours watching Netflix shows on the device, and we were very happy with the results.
 In a nutshell, we were quite happy with the design and the display of Poco X3 Pro smartphone. Both are definitely among the pros of the smartphone.
 Coming to the performance, the smartphone could handle everyday task very smoothly. We often multi-tasked on the device and ran several apps and Chrome browsers simultaneously, and during our time with the device, we noticed no lag while doing so.
Gaming is one of the best aspects of Poco X3 Pro. We played games starting from Temple Run 2 to heavy ones like Asphalt 9: Legends and they all ran without any hiccups. We really enjoyed gaming on the device, and it only became better when we enabled Game Turbo, which made sure that no notifications distracted us. If you spend too much time gaming, the phone starts warming up, but then, that’s not something unique to Poco X3 Pro.
The biometrics of the smartphone including the fingerprint sensor and facial recognition worked well at all times, and were quick to respond. The battery life was also very lasting. With usage that involved gaming, an active Instagram account, listening to Spotify and clicking pictures, we could easily manage a day and a half. Over this, the device can be charged completely in less than an hour, which is another plus.
Coming to the performance, the smartphone could handle everyday task very smoothly. We often multi-tasked on the device and ran several apps and Chrome browsers simultaneously, and during our time with the device, we noticed no lag while doing so.
Gaming is one of the best aspects of Poco X3 Pro. We played games starting from Temple Run 2 to heavy ones like Asphalt 9: Legends and they all ran without any hiccups. We really enjoyed gaming on the device, and it only became better when we enabled Game Turbo, which made sure that no notifications distracted us. If you spend too much time gaming, the phone starts warming up, but then, that’s not something unique to Poco X3 Pro.
The biometrics of the smartphone including the fingerprint sensor and facial recognition worked well at all times, and were quick to respond. The battery life was also very lasting. With usage that involved gaming, an active Instagram account, listening to Spotify and clicking pictures, we could easily manage a day and a half. Over this, the device can be charged completely in less than an hour, which is another plus.


")


 The YouTube app also has some advanced settings you can configure. It is very important that these settings are right. The app allows you to customise push notifications for activities, video recommendations, subscription highlights, and etc. If there is a problem with your notifications it is better you review your notifications preferences on the app. Follow the guide below.


 The first option to fix the ‘YouTube notifications not working’ issue on your iPhone is by updating the iOS software. It is to review that the older version of iOS might not be very stable with the new update on the YouTube app. So to enhance the performance and compatibility of the updated YouTube it is highly advised to update the iOS to the latest version available. You can update your iOS by going to Settings>General>Software update>Download and install.
Read Also: How can you enable Google Chrome extensions in incognito window?
The first option to fix the ‘YouTube notifications not working’ issue on your iPhone is by updating the iOS software. It is to review that the older version of iOS might not be very stable with the new update on the YouTube app. So to enhance the performance and compatibility of the updated YouTube it is highly advised to update the iOS to the latest version available. You can update your iOS by going to Settings>General>Software update>Download and install.
Read Also: How can you enable Google Chrome extensions in incognito window?
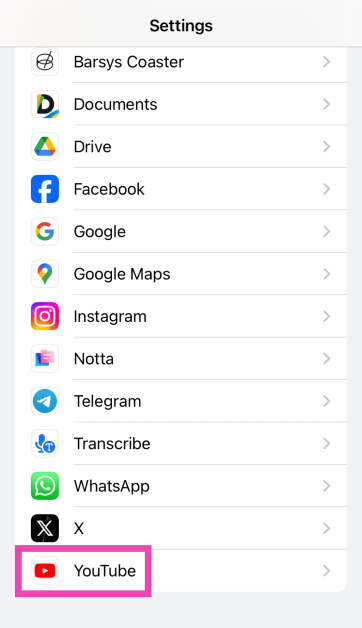
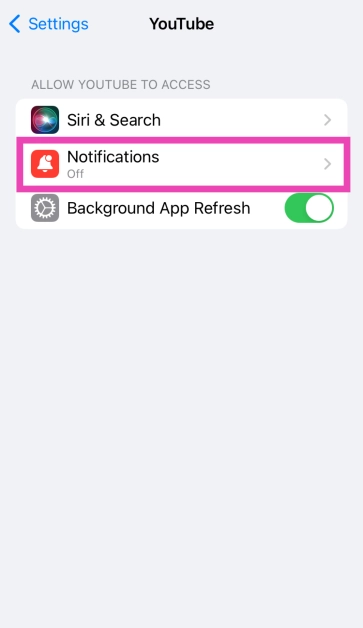
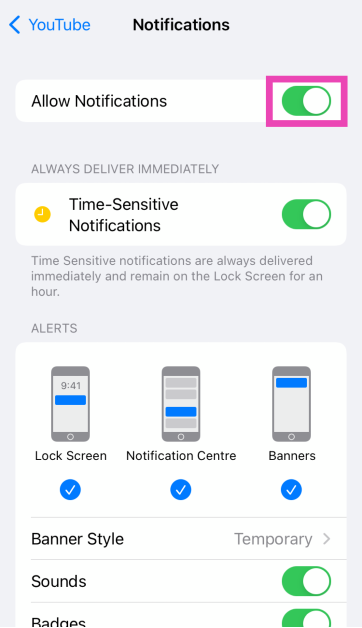
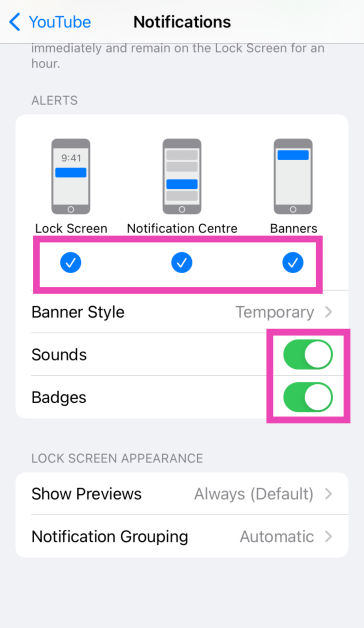
 The YouTube app also has some advanced settings you can configure. It is very important that these settings are right. The app allows you to customise push notifications for activities, video recommendations, subscription highlights, and etc. If there is a problem with your notifications it is better you review your notifications preferences on the app. Follow the guide below.
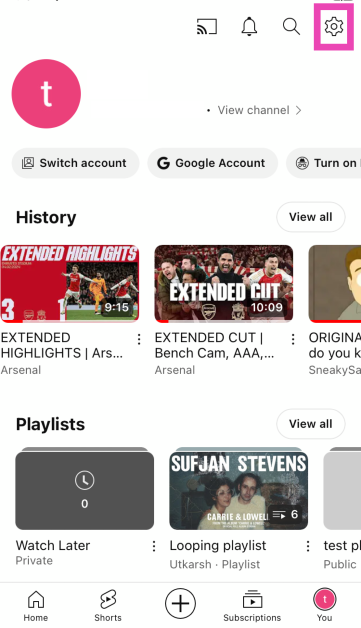
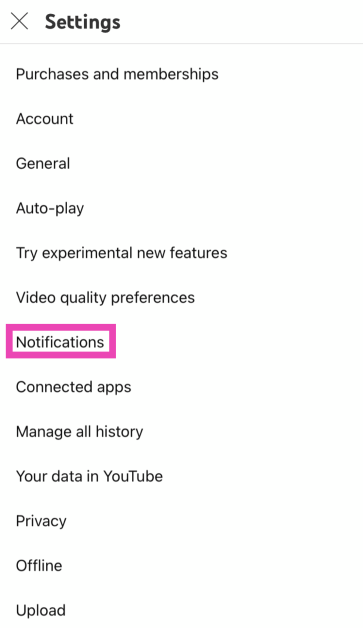


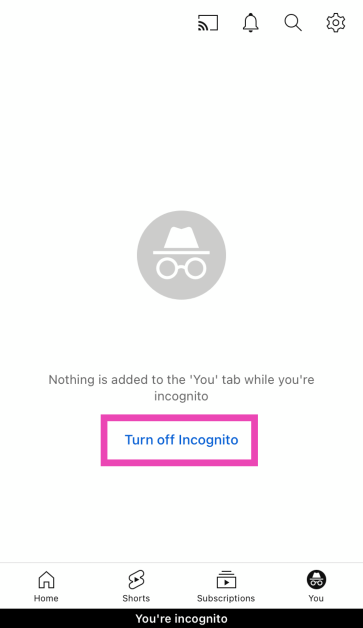
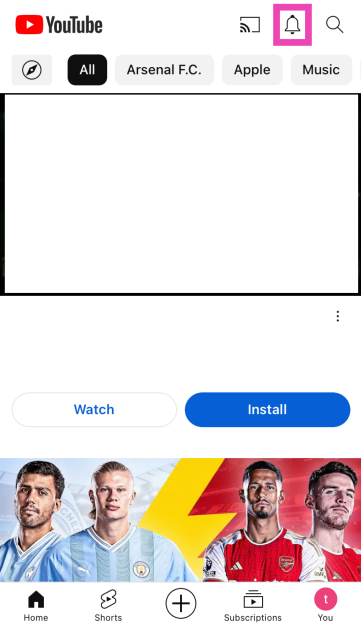
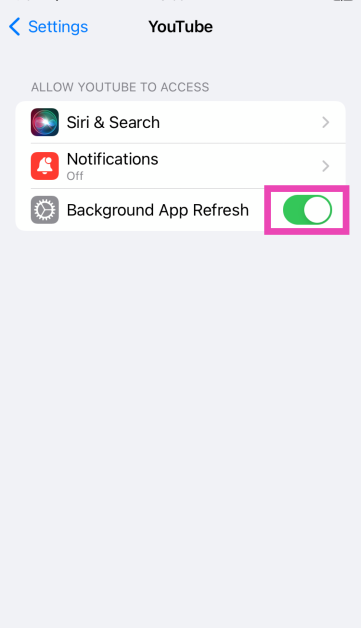


 The Lab is back and following our most recent edition of The Lab – OnePlus U1S – we’ll have a non-phone product again. This time we are including two products – The OnePlus Nord 2 5G and the Buds Pro.
The Lab Reviewers are announced the company will then ship the devices on July 22 and other information related to unboxing and embargo will be discussed with the reviewers.
The Lab page has gone live and the participants are required to share links to photos/videos in the application. Do remember that the links must be accessible by us. It should be noted that all the users are eligible for our program. However, users who have previously participated in either the Nord 2 or OnePlus Buds Pro beta test programs cannot participate. Whereas the entry will be reviewed based on your photography and writing skills. Other criteria include your tech gadget experience, review history, blogging, and related user-generated content highlighting your writing proficiency.
Moreover, the company has prepared 10 devices for each edition of the Lab. And approximately seven calendar days will be given to reviewers to write their reviews. A follow-up review after using the device for one month is also required.
As of now there is no information related to OnePlus Buds Pro as the device has not been leaked nor it has been spotted on any certification websites. On the other hand, OnePlus Nord 2 5G has been listed on Amazon ahead of the official launch, The device is expected to be priced around CYN 2,000 that translates to Rs 23,000. In terms of specs, the phone is confirmed to be powered by MediaTek Dimensity 1200-AI SoC. According to rumours, the handset will come with a 6.43-inch full-HD+ AMOLED display with 90Hz refresh rate support. It will also feature a triple rear camera set-up that will be highlighted with a 50-megapixel primary sensor. For taking selfies it will sport a 32-megapixel front-facing camera. Moreover, there will be a 4,500mAh battery and an in-display fingerprint sensor onboard.
For the latest gadget and tech news, and gadget reviews, follow us on Twitter, Facebook and Instagram. For newest tech & gadget videos subscribe to our YouTube Channel. You can also stay up to date using the Gadget Bridge Android App.
The Lab is back and following our most recent edition of The Lab – OnePlus U1S – we’ll have a non-phone product again. This time we are including two products – The OnePlus Nord 2 5G and the Buds Pro.
The Lab Reviewers are announced the company will then ship the devices on July 22 and other information related to unboxing and embargo will be discussed with the reviewers.
The Lab page has gone live and the participants are required to share links to photos/videos in the application. Do remember that the links must be accessible by us. It should be noted that all the users are eligible for our program. However, users who have previously participated in either the Nord 2 or OnePlus Buds Pro beta test programs cannot participate. Whereas the entry will be reviewed based on your photography and writing skills. Other criteria include your tech gadget experience, review history, blogging, and related user-generated content highlighting your writing proficiency.
Moreover, the company has prepared 10 devices for each edition of the Lab. And approximately seven calendar days will be given to reviewers to write their reviews. A follow-up review after using the device for one month is also required.
As of now there is no information related to OnePlus Buds Pro as the device has not been leaked nor it has been spotted on any certification websites. On the other hand, OnePlus Nord 2 5G has been listed on Amazon ahead of the official launch, The device is expected to be priced around CYN 2,000 that translates to Rs 23,000. In terms of specs, the phone is confirmed to be powered by MediaTek Dimensity 1200-AI SoC. According to rumours, the handset will come with a 6.43-inch full-HD+ AMOLED display with 90Hz refresh rate support. It will also feature a triple rear camera set-up that will be highlighted with a 50-megapixel primary sensor. For taking selfies it will sport a 32-megapixel front-facing camera. Moreover, there will be a 4,500mAh battery and an in-display fingerprint sensor onboard.
For the latest gadget and tech news, and gadget reviews, follow us on Twitter, Facebook and Instagram. For newest tech & gadget videos subscribe to our YouTube Channel. You can also stay up to date using the Gadget Bridge Android App.  The Lab is back and following our most recent edition of The Lab – OnePlus U1S – we’ll have a non-phone product again. This time we are including two products – The OnePlus Nord 2 5G and the Buds Pro.
The Lab Reviewers are announced the company will then ship the devices on July 22 and other information related to unboxing and embargo will be discussed with the reviewers.
The Lab page has gone live and the participants are required to share links to photos/videos in the application. Do remember that the links must be accessible by us. It should be noted that all the users are eligible for our program. However, users who have previously participated in either the Nord 2 or OnePlus Buds Pro beta test programs cannot participate. Whereas the entry will be reviewed based on your photography and writing skills. Other criteria include your tech gadget experience, review history, blogging, and related user-generated content highlighting your writing proficiency.
Moreover, the company has prepared 10 devices for each edition of the Lab. And approximately seven calendar days will be given to reviewers to write their reviews. A follow-up review after using the device for one month is also required.
As of now there is no information related to OnePlus Buds Pro as the device has not been leaked nor it has been spotted on any certification websites. On the other hand, OnePlus Nord 2 5G has been listed on Amazon ahead of the official launch, The device is expected to be priced around CYN 2,000 that translates to Rs 23,000. In terms of specs, the phone is confirmed to be powered by MediaTek Dimensity 1200-AI SoC. According to rumours, the handset will come with a 6.43-inch full-HD+ AMOLED display with 90Hz refresh rate support. It will also feature a triple rear camera set-up that will be highlighted with a 50-megapixel primary sensor. For taking selfies it will sport a 32-megapixel front-facing camera. Moreover, there will be a 4,500mAh battery and an in-display fingerprint sensor onboard.
For the latest gadget and tech news, and gadget reviews, follow us on Twitter, Facebook and Instagram. For newest tech & gadget videos subscribe to our YouTube Channel. You can also stay up to date using the Gadget Bridge Android App.
The Lab is back and following our most recent edition of The Lab – OnePlus U1S – we’ll have a non-phone product again. This time we are including two products – The OnePlus Nord 2 5G and the Buds Pro.
The Lab Reviewers are announced the company will then ship the devices on July 22 and other information related to unboxing and embargo will be discussed with the reviewers.
The Lab page has gone live and the participants are required to share links to photos/videos in the application. Do remember that the links must be accessible by us. It should be noted that all the users are eligible for our program. However, users who have previously participated in either the Nord 2 or OnePlus Buds Pro beta test programs cannot participate. Whereas the entry will be reviewed based on your photography and writing skills. Other criteria include your tech gadget experience, review history, blogging, and related user-generated content highlighting your writing proficiency.
Moreover, the company has prepared 10 devices for each edition of the Lab. And approximately seven calendar days will be given to reviewers to write their reviews. A follow-up review after using the device for one month is also required.
As of now there is no information related to OnePlus Buds Pro as the device has not been leaked nor it has been spotted on any certification websites. On the other hand, OnePlus Nord 2 5G has been listed on Amazon ahead of the official launch, The device is expected to be priced around CYN 2,000 that translates to Rs 23,000. In terms of specs, the phone is confirmed to be powered by MediaTek Dimensity 1200-AI SoC. According to rumours, the handset will come with a 6.43-inch full-HD+ AMOLED display with 90Hz refresh rate support. It will also feature a triple rear camera set-up that will be highlighted with a 50-megapixel primary sensor. For taking selfies it will sport a 32-megapixel front-facing camera. Moreover, there will be a 4,500mAh battery and an in-display fingerprint sensor onboard.
For the latest gadget and tech news, and gadget reviews, follow us on Twitter, Facebook and Instagram. For newest tech & gadget videos subscribe to our YouTube Channel. You can also stay up to date using the Gadget Bridge Android App. ")
 This is the most popular option to scan any QR code. And most Android smartphones come with a Google lens. The process to scan a QR code on Google Lens is simple: you just point at the QR code and it will decipher and show you a web link. For numbers and values, you need to check the buttons at the bottom of the page. Here are the steps to scan a QR code using Google Lens.


 Step 3: This will trigger the camera. Point it towards the QR code to read it.

 Step 3: Google Lens will scan the QR code in the picture and present a clickable link for you to access the information.

 Digitalised payment has made it necessary to scan a QR code and make any payment using the code. As such for this activity using a Paytm QR scanner to make payment is highly convenient and easier. The built-in scanner on Paytm will scan any QR code payment using your Android smartphone camera. The process of scanning and paying any UPI QR code is simple Click on Pay and it will open the camera to scan the code. But unlike any other UPI payment app, Paytm allows you to scan a QR code even from a web link which many apps do not have.
Read also: Paytm app mysteriously disappeared from Google Play Store
Digitalised payment has made it necessary to scan a QR code and make any payment using the code. As such for this activity using a Paytm QR scanner to make payment is highly convenient and easier. The built-in scanner on Paytm will scan any QR code payment using your Android smartphone camera. The process of scanning and paying any UPI QR code is simple Click on Pay and it will open the camera to scan the code. But unlike any other UPI payment app, Paytm allows you to scan a QR code even from a web link which many apps do not have.
Read also: Paytm app mysteriously disappeared from Google Play Store
 You can download this free QR scanning app from the Google Play Store. This scanner app is one of the most popular QR scanning apps for your Android smartphones. The app gives you some interesting features such as you can save the QR code and share it with your friends. In situations where you have to scan the QR code in dark light, the app allows you to toggle your flashlight. The installation process is not a problem, you just need to install the app and allow access to your Android smartphone camera.
Download link
You can download this free QR scanning app from the Google Play Store. This scanner app is one of the most popular QR scanning apps for your Android smartphones. The app gives you some interesting features such as you can save the QR code and share it with your friends. In situations where you have to scan the QR code in dark light, the app allows you to toggle your flashlight. The installation process is not a problem, you just need to install the app and allow access to your Android smartphone camera.
Download link
 This is the most popular option to scan any QR code. And most Android smartphones come with a Google lens. The process to scan a QR code on Google Lens is simple: you just point at the QR code and it will decipher and show you a web link. For numbers and values, you need to check the buttons at the bottom of the page. Here are the steps to scan a QR code using Google Lens.
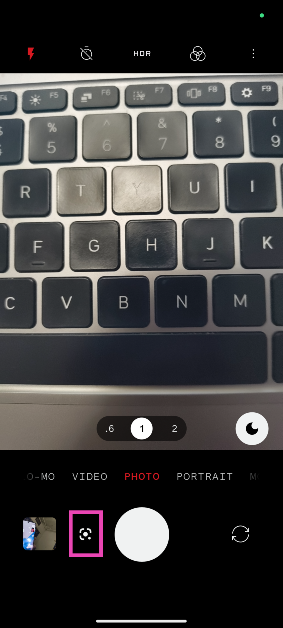
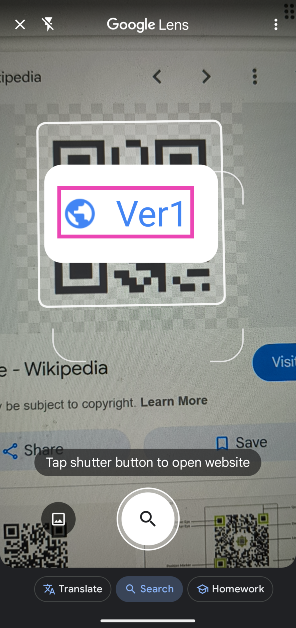
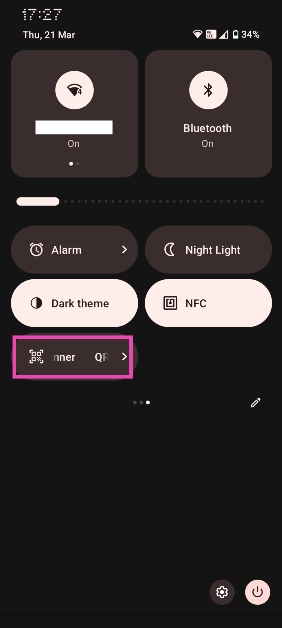 Step 3: This will trigger the camera. Point it towards the QR code to read it.
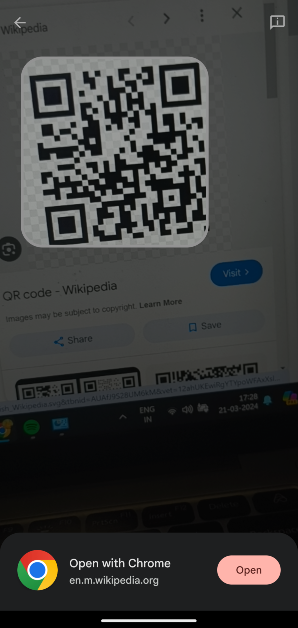
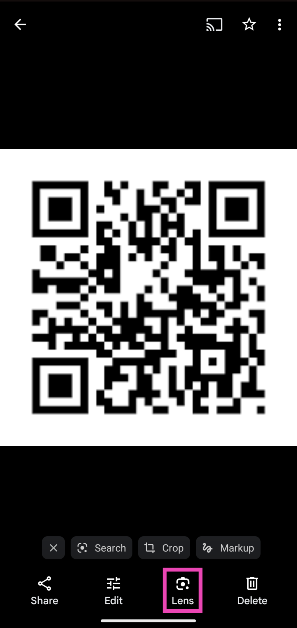 Step 3: Google Lens will scan the QR code in the picture and present a clickable link for you to access the information.
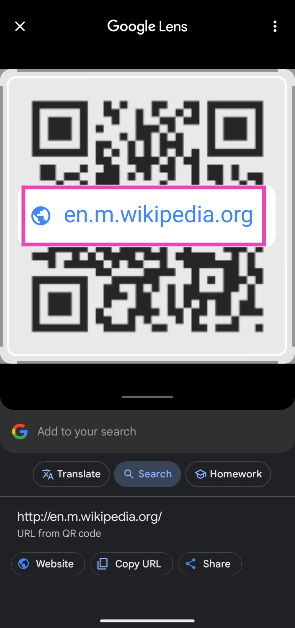
 Google Chrome app also allows you to scan a QR code. You have the Chrome browser app already installed and you can easily scan a QR code using the Chrome app. It also allows you to create a QR code link as well. The following steps are on how to scan any QR code on your Android smartphone using Google Chrome.
 Digitalised payment has made it necessary to scan a QR code and make any payment using the code. As such for this activity using a Paytm QR scanner to make payment is highly convenient and easier. The built-in scanner on Paytm will scan any QR code payment using your Android smartphone camera. The process of scanning and paying any UPI QR code is simple Click on Pay and it will open the camera to scan the code. But unlike any other UPI payment app, Paytm allows you to scan a QR code even from a web link which many apps do not have.
Read also: Paytm app mysteriously disappeared from Google Play Store
Digitalised payment has made it necessary to scan a QR code and make any payment using the code. As such for this activity using a Paytm QR scanner to make payment is highly convenient and easier. The built-in scanner on Paytm will scan any QR code payment using your Android smartphone camera. The process of scanning and paying any UPI QR code is simple Click on Pay and it will open the camera to scan the code. But unlike any other UPI payment app, Paytm allows you to scan a QR code even from a web link which many apps do not have.
Read also: Paytm app mysteriously disappeared from Google Play Store
 You can download this free QR scanning app from the Google Play Store. This scanner app is one of the most popular QR scanning apps for your Android smartphones. The app gives you some interesting features such as you can save the QR code and share it with your friends. In situations where you have to scan the QR code in dark light, the app allows you to toggle your flashlight. The installation process is not a problem, you just need to install the app and allow access to your Android smartphone camera.
Download link
You can download this free QR scanning app from the Google Play Store. This scanner app is one of the most popular QR scanning apps for your Android smartphones. The app gives you some interesting features such as you can save the QR code and share it with your friends. In situations where you have to scan the QR code in dark light, the app allows you to toggle your flashlight. The installation process is not a problem, you just need to install the app and allow access to your Android smartphone camera.
Download link


 The prerequisite for using the speech-to-text on MS Word is: you need to make sure you have a working built-in microphone connected to your laptop/PC or an external microphone. Using headphones that have a good quality microphone is also a good option. And also make sure you have a proper functional internet connection.
Read more: Microsoft Word is soon getting predictive text: Everything you need to know
The prerequisite for using the speech-to-text on MS Word is: you need to make sure you have a working built-in microphone connected to your laptop/PC or an external microphone. Using headphones that have a good quality microphone is also a good option. And also make sure you have a proper functional internet connection.
Read more: Microsoft Word is soon getting predictive text: Everything you need to know
 The following guide is to show how to enable the dictation of your document using Microsoft Word. The function is useful for many situations and for many people. Check out the guide to learn how to enable voice typing and use it in Microsoft Word.

 Optimising your app battery usage from the settings might help with the Android battery performance. There are some changes to the display and screen settings. These are some of the settings changes you can make to prevent the battery from draining on your Android smartphone.
 Using an app from the Google Play Store is another option available to check which apps are draining your Android Smartphone battery. The app is one of the best apps available to control battery usage. The AccuBattery app also lets you know about battery health. Here is the guide on how to use the AccuBattery app.
 There is another third-party app you can download to find which app is draining your Android smartphone battery. You can download Battery HD from the Google Play Store. Here are the steps to operate the app.

 One of the best features updated by the Truecaller app is to alert calls before even ringing. Though the feature only works with people who have installed the Truecaller app on their phones. So even before dialling your number to give you a ring the Truecaller app will send you a notification of the incoming call contacts and let you decide if you want to pick it up or not. The feature is enabled using data or Wi-Fi to send you the alert faster, as cellular networks are slower than internet networks the alerts can reach faster as notifications.
Read more: Oppo F17 Pro Diwali Edition price revealed, now up for pre-orders
One of the best features updated by the Truecaller app is to alert calls before even ringing. Though the feature only works with people who have installed the Truecaller app on their phones. So even before dialling your number to give you a ring the Truecaller app will send you a notification of the incoming call contacts and let you decide if you want to pick it up or not. The feature is enabled using data or Wi-Fi to send you the alert faster, as cellular networks are slower than internet networks the alerts can reach faster as notifications.
Read more: Oppo F17 Pro Diwali Edition price revealed, now up for pre-orders
 There is an option on the Truecaller app where you can use full-screen for all incoming calls on the Truecaller interface. And the incoming calls which will be highlighted in colours to show if it is important or spam. For example, for saved contacts, the incoming calls will be blue, for spam calls it will be red, for priority calls it will be purple, for users who have gold accounts it will appear gold. Here are the steps to enable the feature.
 Using the paid options of Premium and Gold will let you use some advanced options like a Pro. The Premium account will allow you to block ads, also let you see the profile who viewed you, some advanced spam calls blocking etc. And the Gold accounts will give you a gold caller ID in addition to the above-mentioned premium features. And your profile will be in gold colour when you make outgoing calls, it is usually hard to ignore such a gold account on the Truecaller ID app.
Read also: Apple’s iPhone 13 is rumoured to launch soon: Features, launch date, and price
Using the paid options of Premium and Gold will let you use some advanced options like a Pro. The Premium account will allow you to block ads, also let you see the profile who viewed you, some advanced spam calls blocking etc. And the Gold accounts will give you a gold caller ID in addition to the above-mentioned premium features. And your profile will be in gold colour when you make outgoing calls, it is usually hard to ignore such a gold account on the Truecaller ID app.
Read also: Apple’s iPhone 13 is rumoured to launch soon: Features, launch date, and price
 To make your outgoing calls very important and make sure the one you are dialling will pick up your call, you can add a reason for the call. Once you choose the reason before dialling the calls the call reason will appear on the screen along with Call alerts and Caller ID on the call receiver phone. These are the steps you can do to use the choose a reason feature.
 For those who like to stay hidden the option is available to off the last seen on the app. Truecaller uses many icon colours to indicate if the profile is online, on a call, or busy. To avoid the feature and stay hidden follow the steps.


 To use the FaceTime call on the Android mobile you need to receive an invite link from an Apple iPhone, Mac, or iPad user. The FaceTime call link can only be created from the FaceTime app supported on an iPhone. The following steps tell you how to create a FaceTime call link.
 Since Facetime calls are supported only on Safari and Google Chrome. You need to use FaceTime using Chrome web on the Android mobile. When you have received the invite link click on the link and open it using Chrome. Follow the guide below to open the FaceTime link and join the video call from an Android smartphone.

 Speaking of the specifications, the Asus Zenfone 8 Flip features a 6.67-inch Samsung AMOLED display with 1,080×2,400 pixels of resolution, 90Hz refresh rate support and Corning Gorilla Glass 6 protection. The device ships ZenUI 8 on top of Android 11 and is powered by a Qualcomm Snapdragon 888 processor paired with 8GB of LPDDR5 RAM and 256GB of UFS 3.1. Moreover, the device packs a 5,000mAh battery supported by 30W fast charging tech.
Also Read: Asus ZenFone 8 and ZenFone 8 Flip to be renamed as Asus 8Z and Asus 8Z Flip ahead of the India launch
Asus Zenfone 8 features a 5.9 inch AMOLED display, a 120Hz refresh rate and HDR10+ support. There is a Qualcomm Snapdragon 888 SoC under its hood with up to 16GB of LPDDR5 RAM and 256GB of UFS 3.1 storage. The phone supports 30W HyperCharge with a 4,000mAh battery.
This handset has a fixed dual camera set up that includes a 64-megapixel Sony IMX686 primary sensor with an f/1.8 aperture and a 12-megapixel Sony IMX363 ultra-wide-angle camera with Dual PDAF that also supports 4cm macro photography. Upfront there is a 12-megapixel selfie camera.
For the latest gadget and tech news, and gadget reviews, follow us on Twitter, Facebook and Instagram. For newest tech & gadget videos subscribe to our YouTube Channel. You can also stay up to date using the Gadget Bridge Android App.
Speaking of the specifications, the Asus Zenfone 8 Flip features a 6.67-inch Samsung AMOLED display with 1,080×2,400 pixels of resolution, 90Hz refresh rate support and Corning Gorilla Glass 6 protection. The device ships ZenUI 8 on top of Android 11 and is powered by a Qualcomm Snapdragon 888 processor paired with 8GB of LPDDR5 RAM and 256GB of UFS 3.1. Moreover, the device packs a 5,000mAh battery supported by 30W fast charging tech.
Also Read: Asus ZenFone 8 and ZenFone 8 Flip to be renamed as Asus 8Z and Asus 8Z Flip ahead of the India launch
Asus Zenfone 8 features a 5.9 inch AMOLED display, a 120Hz refresh rate and HDR10+ support. There is a Qualcomm Snapdragon 888 SoC under its hood with up to 16GB of LPDDR5 RAM and 256GB of UFS 3.1 storage. The phone supports 30W HyperCharge with a 4,000mAh battery.
This handset has a fixed dual camera set up that includes a 64-megapixel Sony IMX686 primary sensor with an f/1.8 aperture and a 12-megapixel Sony IMX363 ultra-wide-angle camera with Dual PDAF that also supports 4cm macro photography. Upfront there is a 12-megapixel selfie camera.
For the latest gadget and tech news, and gadget reviews, follow us on Twitter, Facebook and Instagram. For newest tech & gadget videos subscribe to our YouTube Channel. You can also stay up to date using the Gadget Bridge Android App.  Speaking of the specifications, the Asus Zenfone 8 Flip features a 6.67-inch Samsung AMOLED display with 1,080×2,400 pixels of resolution, 90Hz refresh rate support and Corning Gorilla Glass 6 protection. The device ships ZenUI 8 on top of Android 11 and is powered by a Qualcomm Snapdragon 888 processor paired with 8GB of LPDDR5 RAM and 256GB of UFS 3.1. Moreover, the device packs a 5,000mAh battery supported by 30W fast charging tech.
Also Read: Asus ZenFone 8 and ZenFone 8 Flip to be renamed as Asus 8Z and Asus 8Z Flip ahead of the India launch
Speaking of the specifications, the Asus Zenfone 8 Flip features a 6.67-inch Samsung AMOLED display with 1,080×2,400 pixels of resolution, 90Hz refresh rate support and Corning Gorilla Glass 6 protection. The device ships ZenUI 8 on top of Android 11 and is powered by a Qualcomm Snapdragon 888 processor paired with 8GB of LPDDR5 RAM and 256GB of UFS 3.1. Moreover, the device packs a 5,000mAh battery supported by 30W fast charging tech.
Also Read: Asus ZenFone 8 and ZenFone 8 Flip to be renamed as Asus 8Z and Asus 8Z Flip ahead of the India launch
