
Nothing Phone 1 may ship without charger: camera specifications and pricing and more

Tomorrow is the formal debut of the Nothing Phone 1 in India and across the globe, and we have learned that it might not include a charger. A YouTube video that shows the packing for the smartphone that does not include the charger also projected the upcoming smartphone’s pricing. The phone is confirmed to be armed with Qualcomm Snapdragon 778G+ SoC.
Nothing recent has indicated that the Phone 1 will have a fingerprint scanner embedded in the display. The firm also confirmed that it will be powered by Qualcomm Snapdragon 778G+ SoC, and the device will have a 50-megapixel dual-back camera configuration. But fresh information has surfaced via YouTube video which indicated the retail packaging to be slender and is reported to be built from repurposed bamboo. The Phone 1 will have a frame made entirely out of recycled aluminium, according to the video.
Prior to its unveiling on July 12, the Nothing Phone 1 camera’s specifications and samples have only been unofficially hinted at. New, excellent renderings of the phone have also appeared online. The business provided the official details and sample images of the Nothing Phone 1 camera configuration in a blog post.
Dual cameras with a 50-megapixel Sony IMX766 main sensor in addition to an ultra-wide-angle camera with a 114° field of view will be included with the Phone 1. Both optical image stabilisation (OIS) and electrical image stabilisation are supported by the phone (EIS).
According to the source, the smartphone will be made available in two colour options of Black and White. The smartphone from Nothing will have a metal chassis, according to the renderings. The Nothing Phone 1 is rumoured to have a power button on the right edge and volume rockers on the left edge.
The phone is anticipated to be a mid-range model with a price tag of between Rs. 30,000 and Rs. 40,000.
According to a report the price of the Nothing Phone 1 is likely to be EUR 469.99 which translates to Rs 37,900 for the 8GB of RAM and 128GB of internal storage, EUR 549.99 which converts to Rs 40,300 for the 8GB of RAM and 256GB of internal storage model. The price of the 12GB of RAM and 256GB of storage is said to come at EUR 499.99 which is approximately Rs 44,300
For the latest gadget and tech news, and gadget reviews, follow us on Twitter, Facebook and Instagram. For newest tech & gadget videos subscribe to our YouTube Channel. You can also stay up to date using the Gadget Bridge Android App. You can find the latest car and bike news here.
Top 11 Ways to Fix Apps Not Downloading From Google Play Store

Google Play Store is the biggest and the most used app market for Android smartphones. With its airtight security features, it is impossible for any malware to make its way to your phone. However, sometimes users face an issue or bugs where they aren’t able to download any apps from the Play Store. Today, we show you the best ways to fix the ‘apps not downloading from Google Play Store’ issue on your Android smartphone.
Read Also: What’s the Easiest Way to Learn Poker?
 If you’re trying to download a new update for an app but its Play Store page isn’t displaying it, try force-stopping the Play Store app. If you’re in the middle of downloading an app from the store, it will get cancelled when the system force stops the app. Make sure there are no pending downloads while you’re doing this. Go to Settings>Apps>Google Play Store>Force Stop.
While Google Play Store is the marketplace for all Android apps, Google Play Services links the downloaded apps to your Google Account. It also takes care of tasks like location tracking, ad integration, security checks, and more. If Google Play Services malfunctions, it may stop you from downloading any new apps from the Play Store. To fix this, clear Play Services cache by going to Settings>Apps>Google Play Services>Storage>Clear Cache.
Force-stoping and restarting your device’s download manager can fix this issue as well. Download Manager is a system app on your device. To find it in the app manager, you will first need to go to the filter options and enable system apps. Once that is done, go to Download Manager>Force Stop.
Read Also: Best Ways to Make a Collage on Android
If you’re trying to download a new update for an app but its Play Store page isn’t displaying it, try force-stopping the Play Store app. If you’re in the middle of downloading an app from the store, it will get cancelled when the system force stops the app. Make sure there are no pending downloads while you’re doing this. Go to Settings>Apps>Google Play Store>Force Stop.
While Google Play Store is the marketplace for all Android apps, Google Play Services links the downloaded apps to your Google Account. It also takes care of tasks like location tracking, ad integration, security checks, and more. If Google Play Services malfunctions, it may stop you from downloading any new apps from the Play Store. To fix this, clear Play Services cache by going to Settings>Apps>Google Play Services>Storage>Clear Cache.
Force-stoping and restarting your device’s download manager can fix this issue as well. Download Manager is a system app on your device. To find it in the app manager, you will first need to go to the filter options and enable system apps. Once that is done, go to Download Manager>Force Stop.
Read Also: Best Ways to Make a Collage on Android
In This Article
Check your Internet Connection
It is possible that Google Play Store may not be working on your phone due to a faulty internet connection. To check your internet connection open any webpage on the web browser, or use any other app that requires the internet. If they both work fine, there’s nothing wrong with your internet connection. This step is essential in figuring out whether the issue lies with the Play Store or your internet connection. Use a different router or ISP (internet service provider) and see if that works.Check your Storage Space
Google Play Store will not download apps on your phone if there is insufficient storage space. To check the storage space on your phone go to Settings>Battery and Device care>Storage. You will be presented with a breakdown of used space and available space. If your device storage is full, delete some files to create space for the app you’re trying to download.
Force Stop the Play Store app
 If you’re trying to download a new update for an app but its Play Store page isn’t displaying it, try force-stopping the Play Store app. If you’re in the middle of downloading an app from the store, it will get cancelled when the system force stops the app. Make sure there are no pending downloads while you’re doing this. Go to Settings>Apps>Google Play Store>Force Stop.
Update the Play Store app
It is common for the Play Store app to glitch and present some bugs over time. Usually, these issues are fixed with every update, but if you haven’t updated the app in a while you may have a tough time downloading new apps to your phone. In order to update the Play Store app, go to Settings>About>Update Play Store.
Clear Google Play Store and Google Play Services Cache and app data
Clearing the cache and app data of Google Play Store and Google Play Services may get rid of any faulty temporary files stored in the cache or data, returning the Play Store to normalcy. To clear cache go to Settings>Apps>Play Store>Storage. Delete app cache and app data.
Uninstall updates for Google Play Store
If you’ve recently installed a new update for Play Store, it may be incompatible with your device, resulting in apps not downloading on your phone. You can uninstall the updates and wait until Google publishes a patched update. To uninstall updates go to Settings>Apps>Google Play Store. Click the three dots on the top right corner of your screen and select ‘Uninstall Updates’.
Clear cache for Google Play Services
 While Google Play Store is the marketplace for all Android apps, Google Play Services links the downloaded apps to your Google Account. It also takes care of tasks like location tracking, ad integration, security checks, and more. If Google Play Services malfunctions, it may stop you from downloading any new apps from the Play Store. To fix this, clear Play Services cache by going to Settings>Apps>Google Play Services>Storage>Clear Cache.
Reset Download Manager
 Force-stoping and restarting your device’s download manager can fix this issue as well. Download Manager is a system app on your device. To find it in the app manager, you will first need to go to the filter options and enable system apps. Once that is done, go to Download Manager>Force Stop.
Check for System Updates
If you haven’t updated your Android OS for a while, it could be the reason why new apps aren’t downloading on your phone. To install any new updates go to Settings>Software Update and check for any new updates.
Check the Date and Time on your phone
Google Play Store may not work on your device if the date and time are incorrect. In order to fix this, go to Settings>General Management>Date and Time and enable Automatic Date and Time.
Restart your Device
A simple restart may fix any background issues that you aren’t able to diagnose. To restart your device, long-press the screen lock key and select Restart. Closing and opening the Play Store again may also help. Read Also: Best Ways to Make a Collage on Android
Bonus Tip
If you’re trying to download the paid app to your phone, make sure you’ve entered the correct account info in the payment gateway. Furthermore, check your account balance to see if you’ve got sufficient funds to download the app.Frequently Asked Questions
Why is Google Play Store not downloading apps?
If Google Play Store is not downloading any apps despite your phone having enough internal storage and a stable internet connection, try clearing the cache for Play Store and restarting the app.Why does Google Play Store show my downloads as pending and not installing?
If you get the ‘pending’ message while downloading new apps from the Play Store, it may be because other apps are currently in the queue to be downloaded. It may also display this message when your phone doesn’t have enough storage for the download to take place.Why are downloads failing on my phone?
If the downloads from Google Play Store keep cutting off before completion, it means your internet connection is not stable.Conclusion
These are the best ways to fix the ‘apps not downloading from Play Store’ issue on your phone. If the issue still persists, contact Google Play Store support for more assistance by going to Play Store Settings>Help. You can also try downloading apps from third-party stores like F-droid and APKMirror. For the latest gadget and tech news, and gadget reviews, follow us on Twitter, Facebook and Instagram. For newest tech & gadget videos subscribe to our YouTube Channel. You can also stay up to date using the Gadget Bridge Android App. You can find the latest car and bike news here.Garena Free Fire Redeem Codes Today 11 July 2022: Here is how to claim them

Garena Free Fire is a battle royale game with regular awards and tournaments to keep players interested. If you play Garena Free Fire, you should be aware of the redeem codes that are released on a daily basis. However, because the battle royale game is banned in India, players from other countries can use the Free Fire Redeem codes daily. If you’re unfamiliar with the Garena Free Fire redeem codes or don’t know how to get them, we’ve put together a step-by-step guide to help you redeem them. Check out Garena Free Fire Redeem Codes for July 11.
The Free Fire redeem codes are a great way to get free stuff. These are 12-digit codes that contain alphabets and numbers, as well as an expiration date and time. Because the Garena FF redeem codes cannot be used more than once, you should hurry to the redemption page to claim your free reward before someone else does. To get a free reward, all you have to do is go to reward.ff.garena.com/en, which is the official redemption page. Also, keep an eye on this space for daily updates on Garena Free Fire redemption codes and rewards.
In This Article
Garena Free Fire Redeem Codes Today 11 July 2022
- FV24-7BSH-JWI8
- ER42-YF86-GH23
- KD95-RO5J-6YN4
- MU54-NL89-B2V7
- FY6S-TA43-QF98
- FV23-BE4N-R5JR
- F9YH-IB87-V6UC
- FD64-XR6F-6VB3
- N4JR-5TIG-YH8A
- 76VT-5C3D-FSE7
- FVB3-N4K5-O6TY
- H9ZI-B7JG-O9F8
- FX6S-A5Q2-F12G
- FHEJ-4R3X-O9BQ
- F76C-5BRS-FE8H
How to Get Free Fire Redeem Codes for Garena on July 11?
- Visit the Garena Free Fire game’s official website at reward.ff.garena.com.
- Use your Facebook, Google, VK, Apple ID, Huawei ID, or Twitter account to log in.
- You’ll be taken to a valid redemption code (s)
- Copy and paste the 12-digit redemption code into the text box.
- On the screen, a dialogue box will appear.
- ‘Ok’ should be selected.
Users Can Co-Author a Single Tweet using the Twitter CoTweets Feature, Currently in Testing

CoTweets, a brand-new way to Tweet collectively, is a feature that Twitter is currently testing. Through this function, two accounts will be able to co-author tweets on the microblogging platform. This will also include the co-authors’ handles and profile pictures.
The social media site is testing out a new function called CoTweets that enables two users to write a tweet jointly. CoTweet can be identified when users see a header containing two authors’ usernames and profile images. According to the company, eligible Twitter users can now send invitations to CoTweet with another user.
Eligible Twitter users can draft a CoTweet in the interim by going to the Tweet composer. Following that, they must tap the CoTweet symbol after adding the jointly written message. From their list of followers, they must then choose a co-author and invite them. Before sending an invitation, users can only make changes to a co-authored tweet. The business advises users to delete their previous tweets and start again if they need to change them after sending an invitation. The business says that this feature is currently only accessible for a small number of carefully chosen accounts in the United States, Canada, and Korea and is still in the testing phase. The network’s long-form content publishing tool, Twitter Notes, was also made available to users last month. It allows users to build on their ideas and express in-depth thoughts on the website. Currently, a small group of writers are taking part in a test of Twitter’s Notes feature. Similar to how you can retweet or quote a tweet, you can share lengthy information with your followers by using notes. The best part is that since you can write and publish your notes without ever leaving Twitter, viewers won’t be sent to a new network when they open them. Clicking on the card is necessary to read the Note. As we previously mentioned, only a small number of Twitter users have access to this function, so if Twitter Notes is currently being tested in your area, you may be able to view a writer’s Notes by clicking the Notes icon on their Twitter profile on the online platform. For the latest gadget and tech news, and gadget reviews, follow us on Twitter, Facebook and Instagram. For newest tech & gadget videos subscribe to our YouTube Channel. You can also stay up to date using the Gadget Bridge Android App. You can find the latest car and bike news here.Share a Tweet, share the cred.
— Twitter Create (@TwitterCreate) July 7, 2022
Now testing CoTweets, a new way to Tweet together. pic.twitter.com/q0gHSCXnhv
Amazon Quiz Answers Today 11 July 2022: Participate to win Rs 500

11 July 2022 Amazon Quiz has gone live on its platform. The quiz timings are 12 AM to 11:59 PM. The Amazon App users can participate in the quiz daily and all they have to do is submit correct answers to the questions asked on the e-commerce platform. Today’s participants can get a chance to win Rs 500 Amazon Pay Balance.
Amazon brings a fresh questionnaire that contains 5 questions daily. These questions are based on current affairs and general knowledge. The quiz can be played from 8 AM to 11:59 PM and the contestants need to answer correctly to enter into a lucky draw.
Only one person is declared as a winner and the results will be announced at the end of every month. And to make sure that you give correct answers to all the 5 questions Gadget Bridge everyday updates all the answers to the Amazon Quiz. Do check out 11 July 2022 Amazon Quiz Answers to win Rs 500 Amazon pay Balance.
Amazon Quiz Today Prize – Rs 500 Amazon Pay Balance
Quiz Date – 11 July 2022
Daily Timing – 12 AM to 11:59 PM
Winner Announcement – Today 12 PM
In This Article
Amazon Quiz Answers Today 11 July 2022
Question 1: Rukmini Banerji, CEO of Pratham Education Foundation, has been awarded which highest education accolade in 2021? Answer: Yidan Prize Question 2: Indian Navy’s indigenous stealth guided-missile destroyer ‘Mormugao’ is named after a port in which state? Answer: Goa Question 3: Sabah Al Khaled Al Hamad Al Sabah has been appointed the new Prime Minister of which country? Answer: Kuwait Question 4: Name this animal which is endemic to the Democratic Republic of Congo and is referred to as a ‘zebra giraffe.’ Answer: Okapi Question 5: In which of these countries is this the national animal? Answer: IndiaHow To Play Amazon Quiz
Only app users are eligible to play the Amazon quiz every morning from 12 AM to 11:59 PM. The quiz is not available on the desktop. For those who are unaware of how to play the Amazon quiz below are the steps, you can follow to take the quiz.- Firstly download the Amazon app from Google Play Store or App Store
- Now fill in the required information through the Sign Up option.
- You need to log in to the Amazon app and scroll down on the home screen to find the Amazon Quiz banner.
- Tap on the Amazon Quiz banner and tap on the Start button to start the Quiz.
- Now you will get 5 questions and you need to answer them correctly. One wrong answer will eliminate you from the Quiz.
- After answering all the questions correctly you are now eligible for a Lucky Draw.
- The winner’s name will be announced today at 12 PM.
How to Find My WhatsApp Number and Name on Android mobile in 2022?

It is quite easy to forget your screen name and registered number on WhatsApp if you’ve been using it for a long time. If you have multiple WhatsApp accounts, it is quite easy to forget which number you’re using for a particular account. In this article, we show you how to find your WhatsApp number and name on an Android smartphone.
Read Also: 4 Simple ways to send large files, audio or video on WhatsApp to anyone
Step 4: Tap on your name at the top of the screen.
Step 5: You will be able to view your WhatsApp number and name on the following screen.
Read Also: How to recharge your prepaid mobile number using Facebook
Bonus tip: How to Change your WhatsApp number and name on an Android
Once you’re on the page that shows you your WhatsApp number and display name, all you need to do is click on the relevant fields to change them. Changing your WhatsApp screen name is pretty straightforward. Simply click on your name and enter a new name, then hit save. In order to change your registered phone number on WhatsApp, click on your number and enter your new number. WhatsApp will also ask you to enter your old phone number. Once you’ve entered your new phone number, you will receive an OTP from WhatsApp. Enter the OTP in the app to begin setting up your account.
This is how you can find your WhatsApp number and name on an Android smartphone. Did you know that you can use two WhatsApp accounts on one device? Simply go to ‘Dual Messenger’ on your smartphone to set up another WhatsApp account.
For the latest gadget and tech news, and gadget reviews, follow us on Twitter, Facebook and Instagram. For newest tech & gadget videos subscribe to our YouTube Channel. You can also stay up to date using the Gadget Bridge Android App. You can find the latest car and bike news here.
Here’s how you can find your WhatApp number and Name on an Android smartphone
Step 1: Open WhatsApp on your smartphone. Step 2: Tap on the three dots at the top right corner of your screen. Step 3: Tap on Settings. Step 4: Tap on your name at the top of the screen.
 Step 5: You will be able to view your WhatsApp number and name on the following screen.
 Read Also: How to recharge your prepaid mobile number using Facebook
Bonus tip: How to Change your WhatsApp number and name on an Android
Once you’re on the page that shows you your WhatsApp number and display name, all you need to do is click on the relevant fields to change them. Changing your WhatsApp screen name is pretty straightforward. Simply click on your name and enter a new name, then hit save. In order to change your registered phone number on WhatsApp, click on your number and enter your new number. WhatsApp will also ask you to enter your old phone number. Once you’ve entered your new phone number, you will receive an OTP from WhatsApp. Enter the OTP in the app to begin setting up your account.
Read Also: How to recharge your prepaid mobile number using Facebook
Bonus tip: How to Change your WhatsApp number and name on an Android
Once you’re on the page that shows you your WhatsApp number and display name, all you need to do is click on the relevant fields to change them. Changing your WhatsApp screen name is pretty straightforward. Simply click on your name and enter a new name, then hit save. In order to change your registered phone number on WhatsApp, click on your number and enter your new number. WhatsApp will also ask you to enter your old phone number. Once you’ve entered your new phone number, you will receive an OTP from WhatsApp. Enter the OTP in the app to begin setting up your account.
 This is how you can find your WhatsApp number and name on an Android smartphone. Did you know that you can use two WhatsApp accounts on one device? Simply go to ‘Dual Messenger’ on your smartphone to set up another WhatsApp account.
For the latest gadget and tech news, and gadget reviews, follow us on Twitter, Facebook and Instagram. For newest tech & gadget videos subscribe to our YouTube Channel. You can also stay up to date using the Gadget Bridge Android App. You can find the latest car and bike news here.
This is how you can find your WhatsApp number and name on an Android smartphone. Did you know that you can use two WhatsApp accounts on one device? Simply go to ‘Dual Messenger’ on your smartphone to set up another WhatsApp account.
For the latest gadget and tech news, and gadget reviews, follow us on Twitter, Facebook and Instagram. For newest tech & gadget videos subscribe to our YouTube Channel. You can also stay up to date using the Gadget Bridge Android App. You can find the latest car and bike news here. 3 Best Easy Ways to Merge or Remove Duplicate Contacts on Android smartphone

If you’ve been using your smartphone for a long period of time, chances are you’ve got several duplicate contacts on your phone. Duplicate contacts are created by importing contacts from different sources, improper syncing, or manually entering a contact more than once. Today, we bring you the 3 best easy ways to merge or remove duplicate contacts on an Android smartphone.
Read Also: How To Send Personalized Emails With Mail Merge In Gmail (2022)?
Step 3: Select ‘Merge Contacts’.
Step 4: Select the duplicate contacts you want to merge either individually or all at once.
Step 5: Select ‘Merge’.
Your duplicate contacts will be merged.
Step 3: Select ‘Delete Duplicate Contacts’.
Step 4: Press ‘Delete’ at the bottom of your screen. The duplicate contacts will be deleted.
Step 3: Select ‘Merge and Fix’.
Step 4: Select ‘Merge Duplicates’.
Step 5: Select the duplicate contacts you want to merge or merge all at once.
Read Also: How to get rid of duplicate or blurry photos in your iPhone?
Bonus Tip:
You can use third-party apps from Google Play Store to merge any duplicate contacts on your phone. Apps like Cleaner – Merge Duplicate Contacts are specialised to merge duplicate contacts and remove unnecessary contacts from your phone.
So, this is how you Merge or Remove Duplicate Contacts on your Android smartphone. If there are other apps you find useful in managing your contacts, let us know in the comments section below.
For the latest gadget and tech news, and gadget reviews, follow us on Twitter, Facebook and Instagram. For newest tech & gadget videos subscribe to our YouTube Channel. You can also stay up to date using the Gadget Bridge Android App. You can find the latest car and bike news here.
In This Article
Use your default Contacts app to merge duplicate contacts
Step 1: Go to Contacts on your phone. Step 2: Press the three dots on the top right corner of your screen and select ‘Manage Contacts’. Step 3: Select ‘Merge Contacts’.
 Step 4: Select the duplicate contacts you want to merge either individually or all at once.
Step 5: Select ‘Merge’.
Step 4: Select the duplicate contacts you want to merge either individually or all at once.
Step 5: Select ‘Merge’.
 Your duplicate contacts will be merged.
Use your default Contacts app to remove duplicate contacts
Step 1: Go to Contacts on your phone. Step 2: Press the three dots on the top right corner of your screen and select ‘Manage Contacts’.
Step 3: Select ‘Delete Duplicate Contacts’.
 Step 4: Press ‘Delete’ at the bottom of your screen. The duplicate contacts will be deleted.

Use Google Contacts to merge or remove duplicate contacts from your phone
Step 1: Install and open Google Contacts on your phone. Step 2: Select ‘Fix and Manage’ at the bottom of your screen. Step 3: Select ‘Merge and Fix’.
 Step 4: Select ‘Merge Duplicates’.
 Step 5: Select the duplicate contacts you want to merge or merge all at once.
 Read Also: How to get rid of duplicate or blurry photos in your iPhone?
Bonus Tip:
You can use third-party apps from Google Play Store to merge any duplicate contacts on your phone. Apps like Cleaner – Merge Duplicate Contacts are specialised to merge duplicate contacts and remove unnecessary contacts from your phone.
So, this is how you Merge or Remove Duplicate Contacts on your Android smartphone. If there are other apps you find useful in managing your contacts, let us know in the comments section below.
For the latest gadget and tech news, and gadget reviews, follow us on Twitter, Facebook and Instagram. For newest tech & gadget videos subscribe to our YouTube Channel. You can also stay up to date using the Gadget Bridge Android App. You can find the latest car and bike news here.
Read Also: How to get rid of duplicate or blurry photos in your iPhone?
Bonus Tip:
You can use third-party apps from Google Play Store to merge any duplicate contacts on your phone. Apps like Cleaner – Merge Duplicate Contacts are specialised to merge duplicate contacts and remove unnecessary contacts from your phone.
So, this is how you Merge or Remove Duplicate Contacts on your Android smartphone. If there are other apps you find useful in managing your contacts, let us know in the comments section below.
For the latest gadget and tech news, and gadget reviews, follow us on Twitter, Facebook and Instagram. For newest tech & gadget videos subscribe to our YouTube Channel. You can also stay up to date using the Gadget Bridge Android App. You can find the latest car and bike news here. How to send long video on WhatsApp: 4 Simple ways to send large files, audio or video

WhatsApp is easily the most used instant messenger in the world. With a user base of over a billion people, not many messengers come close. However, when it comes to sharing large files, WhatsApp is a step behind its direct rival Telegram. While Telegram users can share files up to 2GB in size, the maximum file size you can share on WhatsApp is 16MB. Today, we show you the 4 simple ways to send large files, audio, or video on WhatsApp to anyone.
Read Also: How can you reduce the size of a PDF file?
Step 2: Select the file, audio, or video you want to upload from your phone library.
Step 3: From the side menu select ‘Recent’.
Step 4: Press the three dots on the file you uploaded and select ‘Copy Link’.
Step 5: The link will be copied to your clipboard. Send the link to the WhatsApp contacts you want to share the file with.
Step 3: Select the resolution and quality you want to compress the video in.
Step 4: Select ‘Compress Video’.
Step 5: The compressed video will be saved on your phone. You can now share it with your contacts on WhatsApp.
Step 3: Select the dimensions for the final picture and press Resize.
Step 4: The resized image will be considerably smaller in file size. You can now share it with your WhatsApp contacts.
Much like Google Drive, Dropbox is a cloud storage service you can use to store and share large files with your friends. Simply download Dropbox to your phone and press the ‘+’ icon to upload any file, image, or audio. Once you’ve successfully uploaded the file on Dropbox, you can share the file link with your contacts on WhatsApp.
Read Also: 10 best Chrome browser plugins for power users
Bonus Tip:
If you do not want to download an image resizer app to your phone, you can simply crop your images a little in order to decrease the file size. Alternatively, you can take a screenshot of the image and share it with your WhatsApp contacts. The size of the screenshot will be significantly smaller than the size of the original image. Similarly, you can reduce the length of your video while sending it on WhatsApp to decrease its file size.
Using these easy techniques you can send large files, audio, or video to anyone on Whatsapp. If there are other apps you like to use to compress or share your files, let us know in the comments!
For the latest gadget and tech news, and gadget reviews, follow us on Twitter, Facebook and Instagram. For newest tech & gadget videos subscribe to our YouTube Channel. You can also stay up to date using the Gadget Bridge Android App. You can find the latest car and bike news here.
In This Article
Google Drive
You can share large files on WhatsApp by uploading them to Google Drive first, then sharing the link with your contacts on WhatsApp. Anyone with the link to the file can access it on Google Drive. Just follow these simple steps: Step 1: Open Google Drive on your phone and tap the ‘+’ icon, then select ‘Upload’. Step 2: Select the file, audio, or video you want to upload from your phone library.
Step 3: From the side menu select ‘Recent’.
Step 2: Select the file, audio, or video you want to upload from your phone library.
Step 3: From the side menu select ‘Recent’.
 Step 4: Press the three dots on the file you uploaded and select ‘Copy Link’.
 Step 5: The link will be copied to your clipboard. Send the link to the WhatsApp contacts you want to share the file with.
Video Compressor
If the video you want to share on WhatsApp is too large to share, you can always try compressing it. Simply download the Video Compressor & Video Cutter app from Google Play Store and follow these easy steps. Step 1: Install and open Video Compressor and Video Cutter on your phone. Step 2: Select the video you wish to compress. Step 3: Select the resolution and quality you want to compress the video in.
 Step 4: Select ‘Compress Video’.
 Step 5: The compressed video will be saved on your phone. You can now share it with your contacts on WhatsApp.
Resize your Photos
Sometimes, high-quality photos can be too large to send over WhatsApp. You can overcome this issue by resizing your photos. Simply download Photo & Picture Resizer app from Google Play Store and follow these easy steps. Step 1: Install and open Photo & Picture Resizer app on your phone. Step 2: Select the picture you want to resize. Step 3: Select the dimensions for the final picture and press Resize.
 Step 4: The resized image will be considerably smaller in file size. You can now share it with your WhatsApp contacts.

Dropbox
 Much like Google Drive, Dropbox is a cloud storage service you can use to store and share large files with your friends. Simply download Dropbox to your phone and press the ‘+’ icon to upload any file, image, or audio. Once you’ve successfully uploaded the file on Dropbox, you can share the file link with your contacts on WhatsApp.
Read Also: 10 best Chrome browser plugins for power users
Bonus Tip:
If you do not want to download an image resizer app to your phone, you can simply crop your images a little in order to decrease the file size. Alternatively, you can take a screenshot of the image and share it with your WhatsApp contacts. The size of the screenshot will be significantly smaller than the size of the original image. Similarly, you can reduce the length of your video while sending it on WhatsApp to decrease its file size.
Using these easy techniques you can send large files, audio, or video to anyone on Whatsapp. If there are other apps you like to use to compress or share your files, let us know in the comments!
For the latest gadget and tech news, and gadget reviews, follow us on Twitter, Facebook and Instagram. For newest tech & gadget videos subscribe to our YouTube Channel. You can also stay up to date using the Gadget Bridge Android App. You can find the latest car and bike news here.
Much like Google Drive, Dropbox is a cloud storage service you can use to store and share large files with your friends. Simply download Dropbox to your phone and press the ‘+’ icon to upload any file, image, or audio. Once you’ve successfully uploaded the file on Dropbox, you can share the file link with your contacts on WhatsApp.
Read Also: 10 best Chrome browser plugins for power users
Bonus Tip:
If you do not want to download an image resizer app to your phone, you can simply crop your images a little in order to decrease the file size. Alternatively, you can take a screenshot of the image and share it with your WhatsApp contacts. The size of the screenshot will be significantly smaller than the size of the original image. Similarly, you can reduce the length of your video while sending it on WhatsApp to decrease its file size.
Using these easy techniques you can send large files, audio, or video to anyone on Whatsapp. If there are other apps you like to use to compress or share your files, let us know in the comments!
For the latest gadget and tech news, and gadget reviews, follow us on Twitter, Facebook and Instagram. For newest tech & gadget videos subscribe to our YouTube Channel. You can also stay up to date using the Gadget Bridge Android App. You can find the latest car and bike news here. 
 Step 3:
 Step 4:
 Step 5:
 Step 3:
 Step 4:
 Step 3:
 Step 4:
What’s the Easiest Way to Learn Poker?

Worldwide, poker is one of the most popular card games. Since the 1960s, the rise of televised poker has helped to globalize the game. Since the early 2000s, the rise of online poker has made it accessible to people around the world. Today, the Twitch streaming platform also includes poker hosts who play live for subscribers.
Still, just because most people are at least aware of what poker is, that doesn’t mean it’s easy to play. In fact, poker is a deceptively complex game. In addition to memorizing hand rankings and rule variations for each type of poker, players must also learn strategies, the basics of mathematical probabilities, and how to contend with unknown variables like bluffing.
Those looking to learn the basics should first select an online platform, as it’s a more convenient method than in-person tables. For example, those who play PokerStars online have access to large tournaments, a range of poker variations, and plenty of loyalty rewards. But, most importantly for newcomers, they also have access to a poker school for beginners. Keep a lookout for similar guides, as they’re the first step to learning poker the easy way.
In This Article
Beginner Guides
The easiest way to learn poker is to take your time with a mindful and incremental approach. Keep a guide with you as you play your first games. Don’t be afraid to stick to beginner tables, as the game unfolds at a slower pace. Some players also take notes during this time, marking down what works and doesn’t work for them. Keep in mind that there’s no simple way to learn the basics— even seasoned pros like Daniel Negreanu and Phil Ivey confirm that the best method for learning is experience. Once again, keep a look out for free games. By sticking to free games, you won’t have to worry about managing bankroll right away.Memorizing Hand Rankings
One of the toughest parts of learning poker is understanding hand rankings. Learning the top rankings like a royal flush and a straight flush is just the beginning of prepping for the showdown. As mentioned above, top poker platforms offer multiple versions of poker—and hand rankings shift slightly with each. To make learning poker easier, stick to one type of game, whether Texas Hold’em or Omaha. Learn the ins and outs of one style of poker before moving on to the next. And consider listening to a poker podcast, especially to glean more about hand rankings. Thinking Poker podcast, for example, often reviews poker hands to help break-down strategies in certain situations.
Study the Pros
Once you’ve nailed down the rules of your preferred poker variation and have memorized the basics of hand rankings, along with a few extra tactical tips, the easiest way to learn poker is to follow a pro—especially those who closely mirror your preferred playing style. Each poker legend has their own unique approach to the game; Negreanu is analytical and conservative, while Ivey is focused on minimizing risk-taking. On the other hand, a pro like Phil Hellmuth relies on a more rigid tight-aggressive approach—which he also advocates for beginner Texas Hold’em players. For the latest gadget and tech news, and gadget reviews, follow us on Twitter, Facebook and Instagram. For newest tech & gadget videos subscribe to our YouTube Channel. You can also stay up to date using the Gadget Bridge Android App. You can find the latest car and bike news here.Xiaomi Turns 8, Announces Anniversary Sale

On the occasion of its 8th anniversary, Xiaomi India has announced the ‘Xiaomi Turns 8’ sale, starting July 8. The sale will go live on mi.com and MI Home and will last a week, from July 8 to July 13. Customers can avail discounts on the best Xiaomi and Redmi products across all categories.
Read Also: Xiaomi CyberDog, an open-source quadruped robot is on display in India
For those looking to buy smartphones, discounts will also be offered on Xiaomi 11 Lite NE 5G (6GB+128GB), Xiaomi 11i Hypercharge 5G (6GB+128GB), and Redmi Note 11 Pro+5G (6GB+128GB). The recently launched Xiaomi Smart TV 5A and Redmi Smart TV X43 will also be available at discounted prices, along with Mi Smart Water Purifier, RedmiBook Pro 15 8GB RAM, and many more products.
Read Also: Redmi K50i 5G India launch confirmed to take place on July 20
The full discount chart can be found below.
‘Xiaomi Turns 8’ Sale: What’s on offer?
Xiaomi will be running various activities throughout the day on their website. Customers can find Jackpot deals starting at 10 am, Surprise Store with discounts on lifestyle products at 12 pm, and Pick n Choose at 4 pm – where customers can buy two of their selected products together at a discounted price. On top of that, the Happy Hour at 6 pm will allow users to purchase certain devices at Rs 99 and at 8 pm users can purchase certain devices for Rs 8 only. For the customers shopping at mi.com, Xiaomi has a special surprise. If your order number ends in the letter 8, you can avail your entire order for free. Finally, using Reward Mi users can avail instant discounts worth Rs 5000 instantly at mi.com. For those looking to buy smartphones, discounts will also be offered on Xiaomi 11 Lite NE 5G (6GB+128GB), Xiaomi 11i Hypercharge 5G (6GB+128GB), and Redmi Note 11 Pro+5G (6GB+128GB). The recently launched Xiaomi Smart TV 5A and Redmi Smart TV X43 will also be available at discounted prices, along with Mi Smart Water Purifier, RedmiBook Pro 15 8GB RAM, and many more products.
Read Also: Redmi K50i 5G India launch confirmed to take place on July 20
The full discount chart can be found below.
For those looking to buy smartphones, discounts will also be offered on Xiaomi 11 Lite NE 5G (6GB+128GB), Xiaomi 11i Hypercharge 5G (6GB+128GB), and Redmi Note 11 Pro+5G (6GB+128GB). The recently launched Xiaomi Smart TV 5A and Redmi Smart TV X43 will also be available at discounted prices, along with Mi Smart Water Purifier, RedmiBook Pro 15 8GB RAM, and many more products.
Read Also: Redmi K50i 5G India launch confirmed to take place on July 20
The full discount chart can be found below.
| S No. | Product name | Selling price | Discount | Offer price |
| Xiaomi | ||||
| 1 | Xiaomi 11i (8GB+128GB) | 31,999 | 5,000 | 26,999 |
| 2 | Xiaomi 11i Hypercharge (8GB+128GB) | 33,999 | 5,000 | 28,999 |
| 3 | Xiaomi 12 Pro (12GB+256GB) | 84,999 | 18,000 | 66,999 |
| Redmi | ||||
| 1 | Redmi 9A (3GB+32GB) | 9,499 | 1,700 | 7,799 |
| 2 | Redmi 10A (4GB+64GB) | 11,999 | 3,000 | 8,999 |
| 3 | Redmi Note 11 Pro+ 5G (8GB+128GB) | 26,999 | 4,000 | 22,999 |
| 4 | Redmi Note 11 Pro+ 5G (8GB+256GB) | 28,999 | 4,000 | 24,999 |
| Televisions | ||||
| 1 | Xiaomi OLED 55 | 1,99,999 | 1,15,000 | 84999 |
| 2 | Mi TV QLED TV 4K 55 | 59,999 | 3,000 | 56999 |
| 3 | Mi TV QLED TV 75 | 1,99,999 | 70,000 | 129999 |
| 4 | Xiaomi Smart TV 5A 80cm 32inch | 24,999 | 9,500 | 15499 |
| 5 | Xiaomi Smart TV 5A 100cm 40inch | 29,999 | 7,000 | 22999 |
| Laptops | ||||
| 1 | Redmi i3 8/256 | 51,999 | 19,000 | 32999 |
| 2 | Redmi 15 Pro i5 8/512 | 59,999 | 20,000 | 39999 |
| 3 | Mi NB Pro i5 16/512 | 74,999 | 17,000 | 57999 |
| 4 | Mi NB Ultra i5 16/512 | 76,999 | 19,000 | 57999 |
| Ecosystem | ||||
| 1 | Redmi SonicBass Wireless Earphones (Red) | 1599 | 500 | 1099 |
| 2 | Mi Super Bass Wireless Headphones Black & Red | 2199 | 600 | 1599 |
Top 5 Ways to Enable Dark Mode In Instagram on PC, Android 2022

If you’re a seasoned dark mode user, then the bright-white display of Instagram can hurt your eyes whenever you open the app. Luckily, Instagram offers a dark mode to its users, which can be enabled from the app settings. Today, we show you the top 5 ways to enable dark mode in Instagram on PC and Android.
Read Also: How to enable a system-wide dark mode in Windows 11?
Once you’ve enabled dark mode on your phone, apps that offer dark mode will automatically switch to it as well. This includes Instagram too. You can enable dark mode on your phone by going to Settings>Display>Dark Mode.
If you do not wish to enable system-wide dark mode, you can turn on dark mode for the Instagram app alone. Simply go to your profile menu and select Settings>Theme and enable dark mode for Instagram.
While Instagram doesn’t offer dark mode for its webpage yet, you can still get it using a simple hack. Simply open Instagram on your web browser and type instagram.com/?theme=dark
Your webpage will switch to dark mode.
Google Chrome has a dark mode extension that works for every website you open on the browser, including Instagram. Simply go to the Chrome web store and search for ‘Dark Mode for Chrome’. Once you’ve installed the extension, turn it on and you’ll be able to use Instagram in the dark mode on Chrome.
Using Chrome flags, you can unlock a bunch of experimental features for your web browser. One of these features is dark mode. Simply visit chrome://flags and search for dark mode. In the ‘auto dark mode for web contents’ section, select ‘enabled’.
Read Also: How to Fix AirDrop Transfer Failure on iPhone 2022? Here are the Top 5 ways
These are all the ways to turn on dark mode in Instagram on Android and PC. The dark mode is the preferred theme for many users because it offers the least strain on the eyes. If you want to take additional measures to reduce the strain on your eyes, you can download Screen Shader or f.lux for your PC and smartphone.
For the latest gadget and tech news, and gadget reviews, follow us on Twitter, Facebook and Instagram. For newest tech & gadget videos subscribe to our YouTube Channel. You can also stay up to date using the Gadget Bridge Android App. You can find the latest car and bike news here.
In This Article
Enable system-wide dark mode using phone settings
 Once you’ve enabled dark mode on your phone, apps that offer dark mode will automatically switch to it as well. This includes Instagram too. You can enable dark mode on your phone by going to Settings>Display>Dark Mode.
Enable dark mode in the Instagram app
 If you do not wish to enable system-wide dark mode, you can turn on dark mode for the Instagram app alone. Simply go to your profile menu and select Settings>Theme and enable dark mode for Instagram.
Enable dark mode for Instagram in a web browser
 While Instagram doesn’t offer dark mode for its webpage yet, you can still get it using a simple hack. Simply open Instagram on your web browser and type instagram.com/?theme=dark
Your webpage will switch to dark mode.
While Instagram doesn’t offer dark mode for its webpage yet, you can still get it using a simple hack. Simply open Instagram on your web browser and type instagram.com/?theme=dark
Your webpage will switch to dark mode.
Enable dark mode for Instagram using Google Chrome Extension
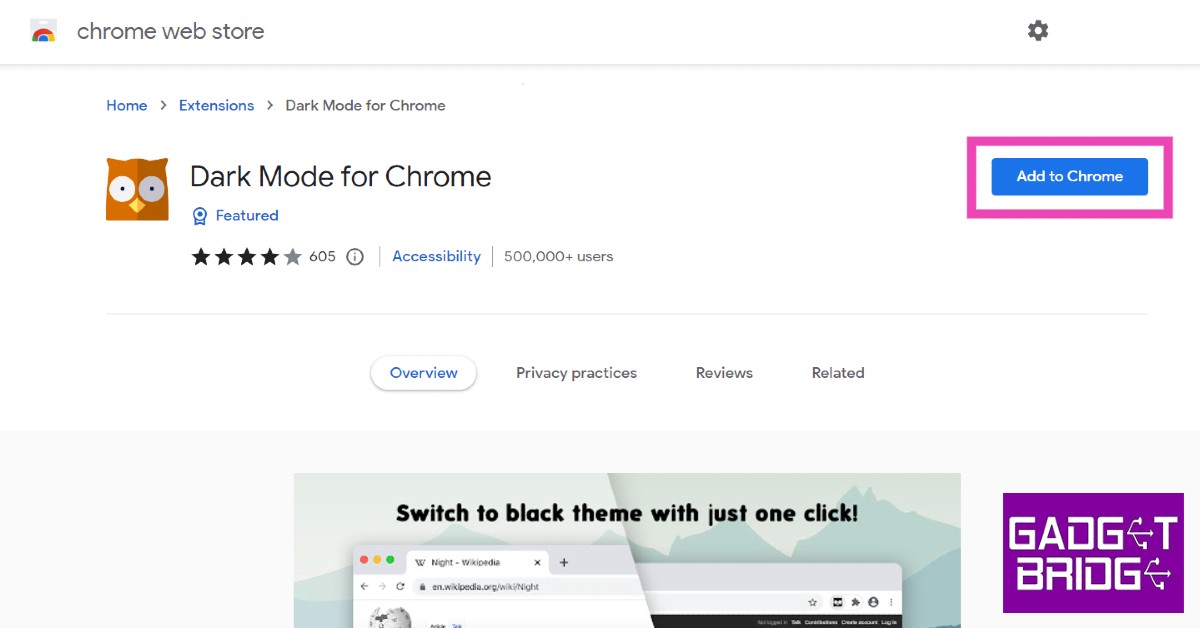 Google Chrome has a dark mode extension that works for every website you open on the browser, including Instagram. Simply go to the Chrome web store and search for ‘Dark Mode for Chrome’. Once you’ve installed the extension, turn it on and you’ll be able to use Instagram in the dark mode on Chrome.
Enable dark mode for Instagram using Chrome Flags
 Using Chrome flags, you can unlock a bunch of experimental features for your web browser. One of these features is dark mode. Simply visit chrome://flags and search for dark mode. In the ‘auto dark mode for web contents’ section, select ‘enabled’.
Read Also: How to Fix AirDrop Transfer Failure on iPhone 2022? Here are the Top 5 ways
These are all the ways to turn on dark mode in Instagram on Android and PC. The dark mode is the preferred theme for many users because it offers the least strain on the eyes. If you want to take additional measures to reduce the strain on your eyes, you can download Screen Shader or f.lux for your PC and smartphone.
For the latest gadget and tech news, and gadget reviews, follow us on Twitter, Facebook and Instagram. For newest tech & gadget videos subscribe to our YouTube Channel. You can also stay up to date using the Gadget Bridge Android App. You can find the latest car and bike news here.
Using Chrome flags, you can unlock a bunch of experimental features for your web browser. One of these features is dark mode. Simply visit chrome://flags and search for dark mode. In the ‘auto dark mode for web contents’ section, select ‘enabled’.
Read Also: How to Fix AirDrop Transfer Failure on iPhone 2022? Here are the Top 5 ways
These are all the ways to turn on dark mode in Instagram on Android and PC. The dark mode is the preferred theme for many users because it offers the least strain on the eyes. If you want to take additional measures to reduce the strain on your eyes, you can download Screen Shader or f.lux for your PC and smartphone.
For the latest gadget and tech news, and gadget reviews, follow us on Twitter, Facebook and Instagram. For newest tech & gadget videos subscribe to our YouTube Channel. You can also stay up to date using the Gadget Bridge Android App. You can find the latest car and bike news here. How to Fix AirDrop Transfer Failure on iPhone 2022? Here are the Top 10 ways

AirDrop is the quintessential tool for seamlessly sharing files among Apple devices. AirDrop has made the entire operation so easy that it’s difficult to imagine file sharing without it. But like every other tool, AirDrop also faces certain issues from time to time. Today, we show you how to fix the AirDrop transfer failure on iPhone 2022.
Read Also: How To Turn On AirDrop On iPhone (2022)?
You can set your AirDrop visibility on three modes: Everyone, Contacts Only, and Receiving Off. If your visibility is set to Everyone, there is nothing much you can do. You are already visible by other devices on the network. If your visibility is set to Contacts Only, only those devices whose phone numbers or emails are saved in your phone will be able to share stuff with you. If your visibility is set to Receiving Off, your device is practically invisible.
If you’re facing issues with AirDrop, set your visibility settings to Everyone. You can do this by going to Settings>General>AirDrop>Everyone.
If you cant access AirDrop at all, it is quite possible that you may have blocked it in Content and Privacy Restrictions. In order to unblock it, go to Settings>Screen Time>Content and Privacy Restrictions and enable AirDrop.
A stable Bluetooth and WiFi connection is necessary for AirDrop to function. Make sure both Bluetooth and WiFi are turned on. For WiFi go to Settings>Wifi and turn it on. For Bluetooth go to Settings>Bluetooth and turn it on.
As mentioned earlier, AirDrop requires Bluetooth and WiFi to function properly. Your Personal Hotspot also needs the WiFi to work. Both, Personal Hotspot and AirDrop cannot work at the same time. So, ensuring your Personal Hotspot is turned off is always a safe bet when you’re facing issues with AirDrop. In order to turn off your Personal Hotspot, go to Settings>Personal Hotspot and turn it off.
If your device is in Do Not Disturb mode, it may not send or receive files via AirDrop. Disable DND mode and try again. To turn off Do Not Disturb mode on your iPhone, iPad, or Mac, simply go to the Control Center and hit the moon icon. The moon icon is lit up when the Do Not Disturb mode is turned on. Tapping the icon again will turn it off.
If the target device does not have enough storage space to receive the files being sent to it, the AirDrop transfer will keep on failing. Make sure the target device has enough free space before transferring a large volume of files. To check the storage on your iPhone go to Settings>General>iPhone Storage.
Step 2: Scroll down and select ‘Transfer or reset iPhone’.
Step 3: Select ‘Reset’ followed by ‘Reset Network Settings’.
Updating iOS to its latest version can fix any glitches or issues that you may be experiencing on your device. Since AirDrop is a native Apple service, it gets updated with iOS. Developers are quick to fix any minor bugs with a subsequent update. To update iOS to its latest version, go to Settings>General>Software Update and download the update.
In This Article
Make sure AirDrop is compatible with your device
The first thing you need to do is check whether AirDrop is compatible with your device. Make sure your iPhone, iPad, or iPod are running iOS 7 or later. If you’re using a Mac, make sure it’s running OS X Yosemite or later.Restart your device
If a background glitch is keeping AirDrop from working properly, it can be resolved with a quick restart. Restarting your device should be the first step you take in fixing any unexpected malfunctions. Make sure you restart the device that is sending the file and well as the target device.Check your AirDrop visibility settings
 You can set your AirDrop visibility on three modes: Everyone, Contacts Only, and Receiving Off. If your visibility is set to Everyone, there is nothing much you can do. You are already visible by other devices on the network. If your visibility is set to Contacts Only, only those devices whose phone numbers or emails are saved in your phone will be able to share stuff with you. If your visibility is set to Receiving Off, your device is practically invisible.
If you’re facing issues with AirDrop, set your visibility settings to Everyone. You can do this by going to Settings>General>AirDrop>Everyone.
You can set your AirDrop visibility on three modes: Everyone, Contacts Only, and Receiving Off. If your visibility is set to Everyone, there is nothing much you can do. You are already visible by other devices on the network. If your visibility is set to Contacts Only, only those devices whose phone numbers or emails are saved in your phone will be able to share stuff with you. If your visibility is set to Receiving Off, your device is practically invisible.
If you’re facing issues with AirDrop, set your visibility settings to Everyone. You can do this by going to Settings>General>AirDrop>Everyone.
Turn off AirDrop restrictions
 If you cant access AirDrop at all, it is quite possible that you may have blocked it in Content and Privacy Restrictions. In order to unblock it, go to Settings>Screen Time>Content and Privacy Restrictions and enable AirDrop.
Check your Bluetooth and WiFi to fix AirDrop transfer failure
 A stable Bluetooth and WiFi connection is necessary for AirDrop to function. Make sure both Bluetooth and WiFi are turned on. For WiFi go to Settings>Wifi and turn it on. For Bluetooth go to Settings>Bluetooth and turn it on.
Disable Personal Hotspot on your iPhone
 As mentioned earlier, AirDrop requires Bluetooth and WiFi to function properly. Your Personal Hotspot also needs the WiFi to work. Both, Personal Hotspot and AirDrop cannot work at the same time. So, ensuring your Personal Hotspot is turned off is always a safe bet when you’re facing issues with AirDrop. In order to turn off your Personal Hotspot, go to Settings>Personal Hotspot and turn it off.
Turn off Do Not Disturb
 If your device is in Do Not Disturb mode, it may not send or receive files via AirDrop. Disable DND mode and try again. To turn off Do Not Disturb mode on your iPhone, iPad, or Mac, simply go to the Control Center and hit the moon icon. The moon icon is lit up when the Do Not Disturb mode is turned on. Tapping the icon again will turn it off.
Check the target device’s available storage
 If the target device does not have enough storage space to receive the files being sent to it, the AirDrop transfer will keep on failing. Make sure the target device has enough free space before transferring a large volume of files. To check the storage on your iPhone go to Settings>General>iPhone Storage.
Reset Network Settings
Resetting the network settings on your iPhone restores them to the factory default. This means your device will forget all WiFi networks it had been previously connected to, and will unpair itself from all Bluetooth devices. Any customised network settings will also be set back to default. Performing a network reset can fix any network-connection-related issues that may be keeping AirDrop from working. Here’s how you can go about it. Step 1: Go to Settings and select General.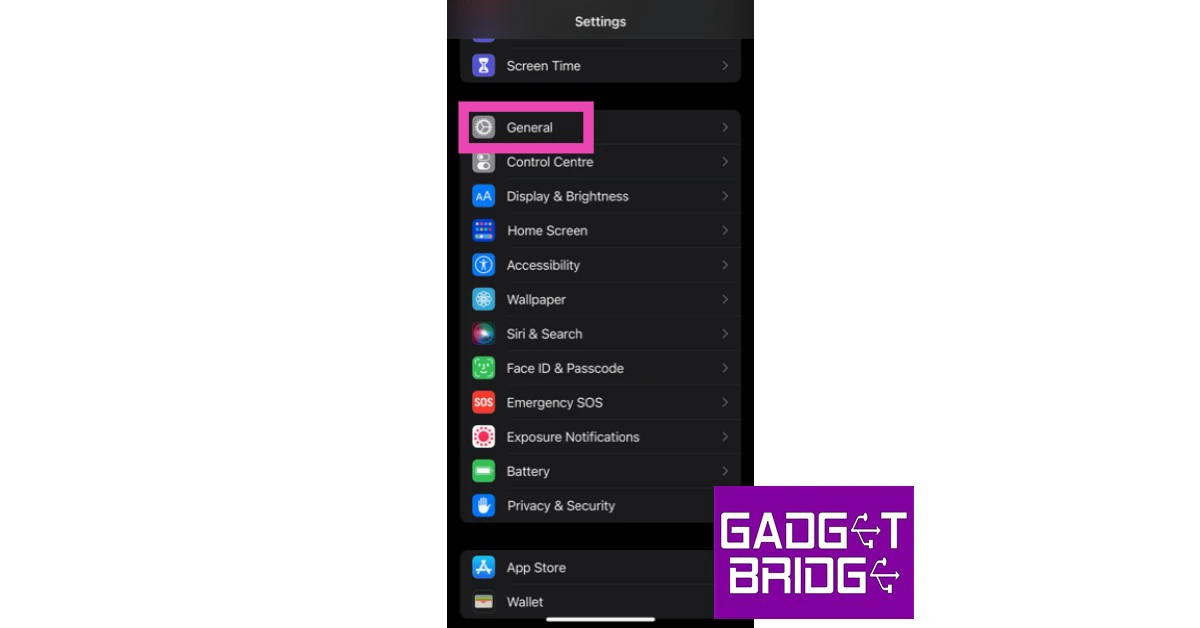 Step 2: Scroll down and select ‘Transfer or reset iPhone’.
 Step 3: Select ‘Reset’ followed by ‘Reset Network Settings’.

Update iOS Version
 Updating iOS to its latest version can fix any glitches or issues that you may be experiencing on your device. Since AirDrop is a native Apple service, it gets updated with iOS. Developers are quick to fix any minor bugs with a subsequent update. To update iOS to its latest version, go to Settings>General>Software Update and download the update.
Frequently Asked Questions
Why is AirDrop not working on my iPhone?
AirDrop can stop working on your iPhone due to WiFi or Bluetooth malfunction. Restart WiFi and Bluetooth on your device and check if AirDrop is working properly again.Do you need WiFi for AirDrop?
Yes, both devices must be connected to a common WiFi network for AirDrop to work. The Bluetooth on both devices should be turned on as well.Why is my AirDrop sending but not receiving?
If you are able to send files via AirDrop but not receive them, check your device’s available storage. If the storage is full, delete some files and try again. If storage space is not an issue, try restarting both devices to fix AirDrop. Read Also: 4 Best Methods to Copy Instagram Comments or Caption on Android mobileConclusion
These are the top 10 ways to fix AirDrop transfer failure on your iPhone in 2023. If you want to make sure that your device is at fault, try using AirDrop on a third device. If the transfer isn’t successful, your device isn’t at fault. If your VPN is turned on, turn it off and try again. For the latest gadget and tech news, and gadget reviews, follow us on Twitter, Facebook and Instagram. For newest tech & gadget videos subscribe to our YouTube Channel. You can also stay up to date using the Gadget Bridge Android App. You can find the latest car and bike news here.4 Best Methods to Copy Instagram Comments or Caption on Android mobile

If you’re an Instagram veteran you must know that the Android app does not let you select any text on it, be it captions or comments. This makes copying text to the clipboard almost impossible when you’re using the app. Luckily, there are a few workarounds to this. In this article, we show you the 4 best methods to copy Instagram comments or captions on an Android mobile.
Read Also: Best Ways to Make a Collage on Android
Step 2: Go to the web browser on your phone and paste the link on the address bar and hit enter.
Step 3: The Instagram post will open up in your web browser, copy the caption by long pressing on the screen and highlighting the text.
While you will be able to copy captions on Instagram, your web browser still doesn’t let you copy comments. Read the following methods if you want to copy comments on Instagram.
Step 2: Open Google Chrome on your smartphone and paste the link in the address bar and hit enter.
Step 3: Hit the three dots on the top right corner of your screen and select ‘Desktop site’.
Step 4: Copy the comment you want by long-pressing the text and highlighting it.
Step 3: Tap on ‘Text’ and select the text from the image you want to copy.
Step 4: Tap on ‘Copy Text’. The text will be copied to the clipboard.
Read Also: The rise in popularity of crypto casinos
These 4 methods will let you copy Instagram comments and captions on your Android mobile. If none of these methods work for you, you can also try downloading a third-party app for Instagram. Some apps let you export comments from Instagram posts and open them up in Microsoft Excel, where they can be easily copied. You can also open Instagram on your laptop or PC, and easily copy any comments or captions using the mouse.
For the latest gadget and tech news, and gadget reviews, follow us on Twitter, Facebook and Instagram. For newest tech & gadget videos subscribe to our YouTube Channel. You can also stay up to date using the Gadget Bridge Android App.
In This Article
Copy Instagram Captions using Web Browser on Android
Step 1: Select the link to the Instagram post you want to copy. Step 2: Go to the web browser on your phone and paste the link on the address bar and hit enter.
Step 3: The Instagram post will open up in your web browser, copy the caption by long pressing on the screen and highlighting the text.
Step 2: Go to the web browser on your phone and paste the link on the address bar and hit enter.
Step 3: The Instagram post will open up in your web browser, copy the caption by long pressing on the screen and highlighting the text.
 While you will be able to copy captions on Instagram, your web browser still doesn’t let you copy comments. Read the following methods if you want to copy comments on Instagram.
Copy Instagram Comments and Captions using Chrome for Desktop on Android
Step 1: Select the link to the Instagram post you want to copy.
Step 2: Open Google Chrome on your smartphone and paste the link in the address bar and hit enter.
Step 3: Hit the three dots on the top right corner of your screen and select ‘Desktop site’.
 Step 4: Copy the comment you want by long-pressing the text and highlighting it.

Use Google Photos
Step 1: Take a screenshot of the Instagram post you want to copy and open it in Google Photos. Step 2: Tap the ‘Lens’ icon at the bottom of your screen. Step 3: Tap on ‘Text’ and select the text from the image you want to copy.
 Step 4: Tap on ‘Copy Text’. The text will be copied to the clipboard.

Use Universal Copy App
Step 1: Install Universal Copy App from the Play Store. Step 2: Open the app and enable ‘Use Universal Copy’. Give the app necessary permissions whenever prompted. Step 3: Open Instagram and go to the post you want to copy. Step 4: On the notification panel, select ‘Activate Universal Copy Mode’. Step 5: Universal Copy App will let you select any text you want on the app. Highlight the caption and copy it to the clipboard. Read Also: The rise in popularity of crypto casinos
These 4 methods will let you copy Instagram comments and captions on your Android mobile. If none of these methods work for you, you can also try downloading a third-party app for Instagram. Some apps let you export comments from Instagram posts and open them up in Microsoft Excel, where they can be easily copied. You can also open Instagram on your laptop or PC, and easily copy any comments or captions using the mouse.
For the latest gadget and tech news, and gadget reviews, follow us on Twitter, Facebook and Instagram. For newest tech & gadget videos subscribe to our YouTube Channel. You can also stay up to date using the Gadget Bridge Android App.
Read Also: The rise in popularity of crypto casinos
These 4 methods will let you copy Instagram comments and captions on your Android mobile. If none of these methods work for you, you can also try downloading a third-party app for Instagram. Some apps let you export comments from Instagram posts and open them up in Microsoft Excel, where they can be easily copied. You can also open Instagram on your laptop or PC, and easily copy any comments or captions using the mouse.
For the latest gadget and tech news, and gadget reviews, follow us on Twitter, Facebook and Instagram. For newest tech & gadget videos subscribe to our YouTube Channel. You can also stay up to date using the Gadget Bridge Android App. OnePlus TV 50 Y1S Pro goes on sale in India

OnePlus announced the release of its newest OnePlus TV, the 50 Y1S Pro in India. The new OnePlus TV features a 50inch 4K UHD display. In addition to the OnePlus TV Y Series 43 Y1S Pro, which was released earlier this year, a new screen size option called the OnePlus TV 50 Y1S Pro has been made available. The OnePlus TV 50 Y1S Pro offers 4K output in addition to 10-bit colour depth, HDR10+, HDR10, and HLG format support.
 Customers can take advantage of launch offers which include Axis Bank will get a Rs 3000 instant bank discount when buying the new OnePlus TVs. Customers can take advantage of no-cost EMI deals for the same across major bank transactions on Amazon.in and OnePlus.in, and they can similarly take advantage of the same on Axis Bank transactions when buying new OnePlus TVs in physical locations. Additionally, Amazon customers who buy the new OnePlus TV on Amazon.in will receive a complimentary 12-month Amazon Prime membership. These discounts are valid at all offline partner stores, including Amazon.in, OnePlus Experience Stores, and others.
 On their new OnePlus TV, users may also engage the unique ALLM function (Auto Low Latency Mode) to experience faster and more engaging gaming. The OnePlus TV 50 Y1S Pro also has MultiCast and Google Duo functionality as part of the smarter TV experience. The television also has the Smart Manager feature.
Additionally, the innovative Kids Mode function, which enables parents to easily control and limit the content their children access while also enabling kids to enjoy healthy media, will be included in the new OnePlus TV 50 Y1S Pro. With the specific “watch time limitation” feature, people can effectively manage viewing hours in order to maintain a healthy digital life. By activating “Eye Comfort mode,” parents may also control the picture quality parameter while protecting their children’s eyes.
Additionally, the new OnePlus TVs’ Game Mode enables users to utilise the proprietary ALLM function and take advantage of an immersive gaming experience with reduced latency by connecting their gaming console to the OnePlus TV through HDMI.
The OnePlus TV 50 Y1S Pro can now be connected to any OnePlus Buds device. The new OnePlus TVs will request a connection when the OnePlus Buds packaging is opened. Users may seamlessly connect their OnePlus Watch to their OnePlus TV 50 Y1S Pro.
Users of the OnePlus TV 50 Y1S Pro can link their smartphone to their OnePlus TV using the OnePlus Connect 2.0 in addition to the functions mentioned above. Additionally, they can simultaneously connect up to five devices via the OnePlus TV. In fact, OnePlus Connect users can now use its features without a Wi-Fi or data connection, controlling their TV or projecting nearby movies without the need for Wi-Fi or cellular data.
With OxygenPlay 2.0, users can easily access material from renowned content partners while exploring a vast universe of films and television shows. Two full-range speakers with a combined output of 24W with Dolby Audio support are also included with the OnePlus TV 50 Y1S Pro.
For the latest gadget and tech news, and gadget reviews, follow us on Twitter, Facebook and Instagram. For newest tech & gadget videos subscribe to our YouTube Channel. You can also stay up to date using the Gadget Bridge Android App. You can find the latest car and bike news here.
On their new OnePlus TV, users may also engage the unique ALLM function (Auto Low Latency Mode) to experience faster and more engaging gaming. The OnePlus TV 50 Y1S Pro also has MultiCast and Google Duo functionality as part of the smarter TV experience. The television also has the Smart Manager feature.
Additionally, the innovative Kids Mode function, which enables parents to easily control and limit the content their children access while also enabling kids to enjoy healthy media, will be included in the new OnePlus TV 50 Y1S Pro. With the specific “watch time limitation” feature, people can effectively manage viewing hours in order to maintain a healthy digital life. By activating “Eye Comfort mode,” parents may also control the picture quality parameter while protecting their children’s eyes.
Additionally, the new OnePlus TVs’ Game Mode enables users to utilise the proprietary ALLM function and take advantage of an immersive gaming experience with reduced latency by connecting their gaming console to the OnePlus TV through HDMI.
The OnePlus TV 50 Y1S Pro can now be connected to any OnePlus Buds device. The new OnePlus TVs will request a connection when the OnePlus Buds packaging is opened. Users may seamlessly connect their OnePlus Watch to their OnePlus TV 50 Y1S Pro.
Users of the OnePlus TV 50 Y1S Pro can link their smartphone to their OnePlus TV using the OnePlus Connect 2.0 in addition to the functions mentioned above. Additionally, they can simultaneously connect up to five devices via the OnePlus TV. In fact, OnePlus Connect users can now use its features without a Wi-Fi or data connection, controlling their TV or projecting nearby movies without the need for Wi-Fi or cellular data.
With OxygenPlay 2.0, users can easily access material from renowned content partners while exploring a vast universe of films and television shows. Two full-range speakers with a combined output of 24W with Dolby Audio support are also included with the OnePlus TV 50 Y1S Pro.
For the latest gadget and tech news, and gadget reviews, follow us on Twitter, Facebook and Instagram. For newest tech & gadget videos subscribe to our YouTube Channel. You can also stay up to date using the Gadget Bridge Android App. You can find the latest car and bike news here.
In This Article
OnePlus TV 50 Y1S Pro price in India
The OnePlus TV 50 Y1S Pro has been launched for Rs 32,999. It is now available for sale in India on Amazon.in, OnePlus.in, OnePlus Experience Stores, and the major offline partner stores. Customers can take advantage of launch offers which include Axis Bank will get a Rs 3000 instant bank discount when buying the new OnePlus TVs. Customers can take advantage of no-cost EMI deals for the same across major bank transactions on Amazon.in and OnePlus.in, and they can similarly take advantage of the same on Axis Bank transactions when buying new OnePlus TVs in physical locations. Additionally, Amazon customers who buy the new OnePlus TV on Amazon.in will receive a complimentary 12-month Amazon Prime membership. These discounts are valid at all offline partner stores, including Amazon.in, OnePlus Experience Stores, and others.
OnePlus TV 50 Y1S Pro specifications
The OnePlus TV 50 Y1S Pro boasts Ultra HD display in addition to the characteristics mentioned above, as well as HDR10+, HDR10, and HLG format support for an improved watching experience. The 10-bit colour depth feature also allows viewers to see over a billion colours with amazing colour accuracy in every frame. The Gamma Engine function, which deftly adjusts the graphics to produce ultra-clear material with dynamic contrast and bright colour, allows users to also enjoy real-time image quality. Fast-moving scenes are further improved with the MEMC technology to provide smoother, more lifelike motion. A smart hub for one’s home entertainment, the OnePlus TV 50 Y1S Pro is powered by the dependable and secure Android TV 10.0 platform and offers consumers a fully integrated smarter TV experience. Users may operate their new OnePlus TVs by using the Google Assistant feature built into the Android TV. On their new OnePlus TV, users may also engage the unique ALLM function (Auto Low Latency Mode) to experience faster and more engaging gaming. The OnePlus TV 50 Y1S Pro also has MultiCast and Google Duo functionality as part of the smarter TV experience. The television also has the Smart Manager feature.
Additionally, the innovative Kids Mode function, which enables parents to easily control and limit the content their children access while also enabling kids to enjoy healthy media, will be included in the new OnePlus TV 50 Y1S Pro. With the specific “watch time limitation” feature, people can effectively manage viewing hours in order to maintain a healthy digital life. By activating “Eye Comfort mode,” parents may also control the picture quality parameter while protecting their children’s eyes.
Additionally, the new OnePlus TVs’ Game Mode enables users to utilise the proprietary ALLM function and take advantage of an immersive gaming experience with reduced latency by connecting their gaming console to the OnePlus TV through HDMI.
The OnePlus TV 50 Y1S Pro can now be connected to any OnePlus Buds device. The new OnePlus TVs will request a connection when the OnePlus Buds packaging is opened. Users may seamlessly connect their OnePlus Watch to their OnePlus TV 50 Y1S Pro.
Users of the OnePlus TV 50 Y1S Pro can link their smartphone to their OnePlus TV using the OnePlus Connect 2.0 in addition to the functions mentioned above. Additionally, they can simultaneously connect up to five devices via the OnePlus TV. In fact, OnePlus Connect users can now use its features without a Wi-Fi or data connection, controlling their TV or projecting nearby movies without the need for Wi-Fi or cellular data.
With OxygenPlay 2.0, users can easily access material from renowned content partners while exploring a vast universe of films and television shows. Two full-range speakers with a combined output of 24W with Dolby Audio support are also included with the OnePlus TV 50 Y1S Pro.
For the latest gadget and tech news, and gadget reviews, follow us on Twitter, Facebook and Instagram. For newest tech & gadget videos subscribe to our YouTube Channel. You can also stay up to date using the Gadget Bridge Android App. You can find the latest car and bike news here.
On their new OnePlus TV, users may also engage the unique ALLM function (Auto Low Latency Mode) to experience faster and more engaging gaming. The OnePlus TV 50 Y1S Pro also has MultiCast and Google Duo functionality as part of the smarter TV experience. The television also has the Smart Manager feature.
Additionally, the innovative Kids Mode function, which enables parents to easily control and limit the content their children access while also enabling kids to enjoy healthy media, will be included in the new OnePlus TV 50 Y1S Pro. With the specific “watch time limitation” feature, people can effectively manage viewing hours in order to maintain a healthy digital life. By activating “Eye Comfort mode,” parents may also control the picture quality parameter while protecting their children’s eyes.
Additionally, the new OnePlus TVs’ Game Mode enables users to utilise the proprietary ALLM function and take advantage of an immersive gaming experience with reduced latency by connecting their gaming console to the OnePlus TV through HDMI.
The OnePlus TV 50 Y1S Pro can now be connected to any OnePlus Buds device. The new OnePlus TVs will request a connection when the OnePlus Buds packaging is opened. Users may seamlessly connect their OnePlus Watch to their OnePlus TV 50 Y1S Pro.
Users of the OnePlus TV 50 Y1S Pro can link their smartphone to their OnePlus TV using the OnePlus Connect 2.0 in addition to the functions mentioned above. Additionally, they can simultaneously connect up to five devices via the OnePlus TV. In fact, OnePlus Connect users can now use its features without a Wi-Fi or data connection, controlling their TV or projecting nearby movies without the need for Wi-Fi or cellular data.
With OxygenPlay 2.0, users can easily access material from renowned content partners while exploring a vast universe of films and television shows. Two full-range speakers with a combined output of 24W with Dolby Audio support are also included with the OnePlus TV 50 Y1S Pro.
For the latest gadget and tech news, and gadget reviews, follow us on Twitter, Facebook and Instagram. For newest tech & gadget videos subscribe to our YouTube Channel. You can also stay up to date using the Gadget Bridge Android App. You can find the latest car and bike news here. How to Turn Off Sensitive Content Warning on Twitter

Twitter is one of the few social media sites that let users post sensitive content. ’Sensitive content’ can be anything from gore, violence, and nudity or adult content. In order to regulate content on the platform, Twitter marks sensitive content with a content warning label. You can disable this warning on your profile and view everything that is posted on the site. In this article, we show you how to turn off the sensitive content warning on Twitter.
Read Also: Twitter Notes is a New Way to Share Long-Form Content: Everything that we know
Step 2: Click on ‘Privacy and Safety’, followed by ‘Content You See’.
Step 3: Click on the box that says ‘Display media that may contain sensitive content’.
Your settings will be saved automatically.
Step 3: Select ‘Content you see’ and turn on ‘Display media that may contain sensitive content’.
Your settings will be saved automatically.
Read Also: How to Block, Unblock or Mute Someone on Twitter?
While searching for tweets, Twitter automatically hides results with sensitive content in them. In order to bypass this, you can disable the ‘hide sensitive content’ option in search settings. If you want to remove the ‘sensitive content’ warning from your own tweets, go to More>Settings and Privacy>Privacy and Safety>Your Tweets.
For the latest gadget and tech news, and gadget reviews, follow us on Twitter, Facebook and Instagram. For newest tech & gadget videos subscribe to our YouTube Channel. You can also stay up to date using the Gadget Bridge Android App. You can find the latest car and bike news here.
In This Article
Turning off Sensitive Content warning on Twitter Web
Step 1: Select ‘More’ from the menu on the left side of the screen and select ‘Settings and Privacy’.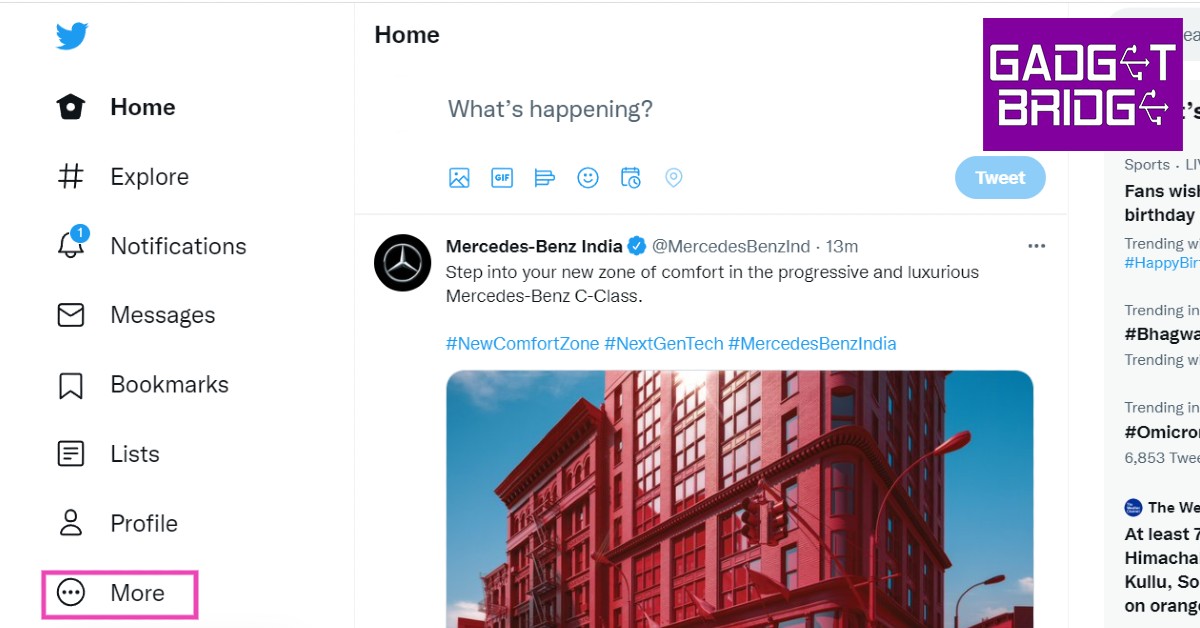 Step 2: Click on ‘Privacy and Safety’, followed by ‘Content You See’.
 Step 3: Click on the box that says ‘Display media that may contain sensitive content’.
 Your settings will be saved automatically.
Turning off Sensitive Content warning on the Twitter app.
Step 1: Open the Twitter app on your smartphone and open the side menu on the left. Step 2: Select ‘Settings and Privacy’, then select ‘Privacy and Safety’. Step 3: Select ‘Content you see’ and turn on ‘Display media that may contain sensitive content’.
 Your settings will be saved automatically.
Read Also: How to Block, Unblock or Mute Someone on Twitter?
While searching for tweets, Twitter automatically hides results with sensitive content in them. In order to bypass this, you can disable the ‘hide sensitive content’ option in search settings. If you want to remove the ‘sensitive content’ warning from your own tweets, go to More>Settings and Privacy>Privacy and Safety>Your Tweets.
For the latest gadget and tech news, and gadget reviews, follow us on Twitter, Facebook and Instagram. For newest tech & gadget videos subscribe to our YouTube Channel. You can also stay up to date using the Gadget Bridge Android App. You can find the latest car and bike news here.
Your settings will be saved automatically.
Read Also: How to Block, Unblock or Mute Someone on Twitter?
While searching for tweets, Twitter automatically hides results with sensitive content in them. In order to bypass this, you can disable the ‘hide sensitive content’ option in search settings. If you want to remove the ‘sensitive content’ warning from your own tweets, go to More>Settings and Privacy>Privacy and Safety>Your Tweets.
For the latest gadget and tech news, and gadget reviews, follow us on Twitter, Facebook and Instagram. For newest tech & gadget videos subscribe to our YouTube Channel. You can also stay up to date using the Gadget Bridge Android App. You can find the latest car and bike news here. Top 3 Ways to Log Out of Your Google Account From An Android Smartphone

If you’re switching devices, you’ll need to log out of your Google account from your older device. There are several different ways of logging out of your Google account. You may want to log out remotely if you don’t have access to the Android device or if you lost it somewhere. Today, we bring you the top 3 ways to log out of your Google account from an Android smartphone.
Read Also: How To Log Out Of Spotify From Android And Windows PC
Step 3: Select ‘Manage Accounts’.
Step 4: Select the Google Account(s) you want to log out of.
Step 5: Press the ‘Remove Account’ icon.
You will be logged out of your Google account.
Step 4: Click on ‘Sign Out’.
You will be logged out of your Google Account on that particular device.
Step 3: Once you’ve set up secure and erase details on your smartphone, click on Secure device.
You will be logged out of your Google account on your device.
Read Also: How to Access Google ‘My Activity’ on Android?
These were the best 3 ways to log out of your Google account on your Android smartphone. While logging out directly from the smartphone is the most obvious method, sometimes logging out remotely can come in quite handy. If you’re selling your phone, make sure you’re logged out of it and perform a factory reset before handing it over.
For the latest gadget and tech news, and gadget reviews, follow us on Twitter, Facebook and Instagram. For newest tech & gadget videos subscribe to our YouTube Channel. You can also stay up to date using the Gadget Bridge Android App. You can find the latest car and bike news here.
In This Article
Log out of your Google Account using Settings
Step 1: Go to Settings on your Android smartphone. Step 2: Scroll down and select ‘Accounts and backup’. Step 3: Select ‘Manage Accounts’.
 Step 4: Select the Google Account(s) you want to log out of.
 Step 5: Press the ‘Remove Account’ icon.
 You will be logged out of your Google account.
Log out of your Google Account using a web browser
If you want to log out of your Google account remotely, just follow these easy steps. Step 1: Go to your Google Account. Step 2: Select ‘Security’ from the side menu. Step 3: Scroll down and select the device you want to log out of. Step 4: Click on ‘Sign Out’.
 You will be logged out of your Google Account on that particular device.
Sign Out using Find My Device
In case you ever lose your smartphone, you can locate it using Find My Device, and even log out of your Google account remotely. Just follow these easy steps. Step 1: Sign to your Google account and visit android.com/find Step 2: Click on ‘Set up Secure and Erase’.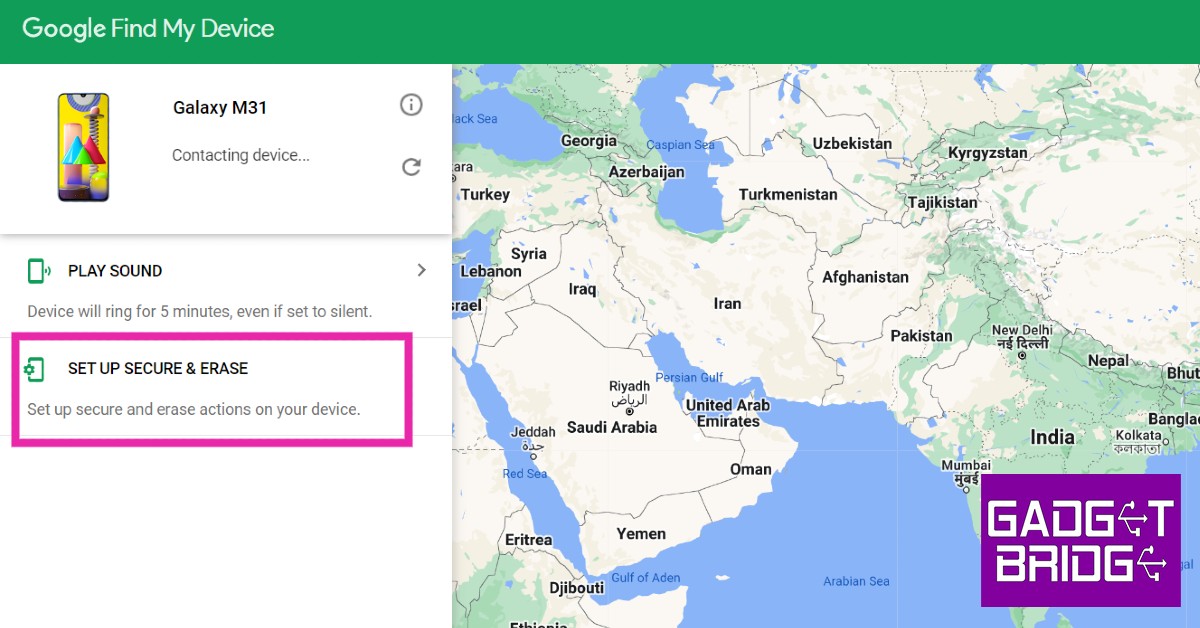 Step 3: Once you’ve set up secure and erase details on your smartphone, click on Secure device.
You will be logged out of your Google account on your device.
Read Also: How to Access Google ‘My Activity’ on Android?
These were the best 3 ways to log out of your Google account on your Android smartphone. While logging out directly from the smartphone is the most obvious method, sometimes logging out remotely can come in quite handy. If you’re selling your phone, make sure you’re logged out of it and perform a factory reset before handing it over.
For the latest gadget and tech news, and gadget reviews, follow us on Twitter, Facebook and Instagram. For newest tech & gadget videos subscribe to our YouTube Channel. You can also stay up to date using the Gadget Bridge Android App. You can find the latest car and bike news here.
Step 3: Once you’ve set up secure and erase details on your smartphone, click on Secure device.
You will be logged out of your Google account on your device.
Read Also: How to Access Google ‘My Activity’ on Android?
These were the best 3 ways to log out of your Google account on your Android smartphone. While logging out directly from the smartphone is the most obvious method, sometimes logging out remotely can come in quite handy. If you’re selling your phone, make sure you’re logged out of it and perform a factory reset before handing it over.
For the latest gadget and tech news, and gadget reviews, follow us on Twitter, Facebook and Instagram. For newest tech & gadget videos subscribe to our YouTube Channel. You can also stay up to date using the Gadget Bridge Android App. You can find the latest car and bike news here. Prime Day will be held by Amazon on July 23 and 24, with discounts of up to 55% off the newest smart speakers

On July 23 and 24, e-commerce company Amazon India will host its annual Prime Day sales. The new customers can access unbeatable savings on phones, consumer electronics, appliances, TVs, kitchen items, daily necessities, toys, fashion and cosmetics, and more.
Amazon is back with their yearly Prime Day to help Prime members in India. The sale will begin on July 23, at 12:00 AM, to July 24, 23:59 PM. The prime members will have access to new releases, never-before-seen discounts, and the finest entertainment perks for anything from smartphones, consumer electronics, TVs, appliances, fashion & beauty, groceries, and furniture to everyday necessities. Over 400 of the top Indian and international brands, including Samsung, Xiaomi, boAt, Intel, Lenovo, Sony, Bajaj, Eureka Forbes, Puma, Adidas, USPA, Max, Asics, Fastrack, Tresemme, Mamaearth, Surf Excel, Dabur, Colgate, Whirlpool, IFB, and more, have over 30,000 new product launches available in India, with Prime members getting access to them first.
During Prime Day, Amazon will continue to assist Small and Medium Businesses (SMBs) and help create consumer demand for the goods offered by tens of thousands of sellers, manufacturers, start-ups & brands, women entrepreneurs, artists, weavers, and small-town stores. Prime members will have the chance to find discounts on one-of-a-kind products during the event from sellers participating in programmes like Local Shops on Amazon, Launchpad, Saheli, and Karigar. These products fall into a variety of categories, including fashion and beauty, electronics, and home décor.
Prime members may browse from millions of unique products given by SMBs and take advantage of amazing deals including 10% cashback up to INR 100* that can be redeemed on their Prime Day purchases, among other things.
One has to sign up for Prime and take advantage of perks like free & quick delivery, unlimited video, ad-free music, special offers, free in-game content for popular mobile games, and more.
Joining Prime costs INR 1,499 for a year or INR 179 for a month. Furthermore, shoppers between the ages of 18 and 24 can join up for Prime and take advantage of the Youth Offer to receive a 50% discount on their membership by simply confirming their age on Amazon. Utilise Amazon Pay to receive rewards and secure, quick transactions. To earn rewards of up to 2,500 INR, make payments, recharge devices, send money, and more (until Prime Day). On all of their Prime Day purchases made with their Amazon Pay ICICI Bank credit card, Prime members receive an unlimited 5 percent cashback. Join the card right away to take advantage of the best welcome offer ever, which is 2,200 INR in rewards.
Additionally, this Prime Day offers Amazon Prime Members the biggest discounts on Amazon Echo, Fire TV, and Kindle devices. The most recent smart screens, speakers, and Fire TV devices will be discounted by up to 55%.
Members may shop from millions of unique products supplied by SMBs during the 14 days leading up to Prime Day, commencing July 7, 12:00 AM to July 22, 23:59 PM, and take advantage of promotions including 10% cashback up to INR 100 that can be used on their Prime Day purchases and more.
For the latest gadget and tech news, and gadget reviews, follow us on Twitter, Facebook and Instagram. For newest tech & gadget videos subscribe to our YouTube Channel. You can also stay up to date using the Gadget Bridge Android App. You can find the latest car and bike news here.
Xiaomi CyberDog, an open-source quadruped robot is on display in India

Xiaomi made a leap into the future of technology by showcasing CyberDog, a quadruped robot with a bio-inspired design. The Jetson Xavier NX AI Supercomputer for Embedded Edge Systems from Nvidia, along with 128GB of SSD storage, powers the four-legged robot.
The CyberDog is quick and adapts well to difficult terrain. It is the ideal companion for assisted living since it has 11 high-precision sensors that provide quick input to direct its movements.
 Xiaomi’s entry into the vast field of quadruped robotics is the CyberDog. According to the company the release of CyberDog, is intended for the global open-source community and developers. The CyberDog will be on exhibit at Mi Homes in Delhi, Mumbai, Bangalore, Chennai, Kolkata, and Ahmedabad as part of Xiaomi’s incredible eight-year anniversary celebration in India.
The ability of CyberDog to perceive its surroundings has been improved. A variety of camera sensors are included with it, including AI interactive cameras, binocular ultra-wide-angle fisheye cameras, and an Intel RealSenseTM D450 Depth module, and its computer vision algorithm may be taught on them.
Xiaomi says that the Centimeter-scale obstacle avoidance and navigation, autonomous object tracking, and SLAM are all based on this vision sensor system. The CyberDog has the ability to develop navigational maps, plot its course, analyse its surroundings in real-time, and avoid impediments. When combined with tracking of face recognition and human posture, CyberDog is able to build navigational maps in real-time while avoiding obstacles.
By setting a wake word, users can utilise voice assistants to command and manage CyberDog, as well as the companion remote and smartphone app. It can be used for even the most unusual jobs, and the interactions with it have limitless potential.
With three USB Type-C ports and an HDMI port, the robot may be further customised by developers to investigate and include a variety of cutting-edge and imaginative hardware add-ons or software systems, like a searchlight, panoramic camera, motion camera, LiDAR, and more.
The NVIDIA Jetson XavierTM NX platform, an AI Supercomputer for Embedded and Edge Systems with 384 CUDA Cores, 48 Tensor Cores, a 6 Carmel ARM CPU, and 2 deep learning acceleration engines, is the engine behind Xiaomi’s Cyberdog quadruped robot. calibrated with servo motors that were created in-house by Xiaomi, which results in a high rate of speed, remarkable agility, and a broad range of motion.
CyberDog is capable of a variety of fast moves up to 3.2m/s and complex manoeuvres like backflips thanks to its maximum torque output and rotation speed of 32Nm/220RPM. CyberDog handles the vast amounts of data that its sensor system captures for its owners without any problems.
Xiaomi’s entry into the vast field of quadruped robotics is the CyberDog. According to the company the release of CyberDog, is intended for the global open-source community and developers. The CyberDog will be on exhibit at Mi Homes in Delhi, Mumbai, Bangalore, Chennai, Kolkata, and Ahmedabad as part of Xiaomi’s incredible eight-year anniversary celebration in India.
The ability of CyberDog to perceive its surroundings has been improved. A variety of camera sensors are included with it, including AI interactive cameras, binocular ultra-wide-angle fisheye cameras, and an Intel RealSenseTM D450 Depth module, and its computer vision algorithm may be taught on them.
Xiaomi says that the Centimeter-scale obstacle avoidance and navigation, autonomous object tracking, and SLAM are all based on this vision sensor system. The CyberDog has the ability to develop navigational maps, plot its course, analyse its surroundings in real-time, and avoid impediments. When combined with tracking of face recognition and human posture, CyberDog is able to build navigational maps in real-time while avoiding obstacles.
By setting a wake word, users can utilise voice assistants to command and manage CyberDog, as well as the companion remote and smartphone app. It can be used for even the most unusual jobs, and the interactions with it have limitless potential.
With three USB Type-C ports and an HDMI port, the robot may be further customised by developers to investigate and include a variety of cutting-edge and imaginative hardware add-ons or software systems, like a searchlight, panoramic camera, motion camera, LiDAR, and more.
The NVIDIA Jetson XavierTM NX platform, an AI Supercomputer for Embedded and Edge Systems with 384 CUDA Cores, 48 Tensor Cores, a 6 Carmel ARM CPU, and 2 deep learning acceleration engines, is the engine behind Xiaomi’s Cyberdog quadruped robot. calibrated with servo motors that were created in-house by Xiaomi, which results in a high rate of speed, remarkable agility, and a broad range of motion.
CyberDog is capable of a variety of fast moves up to 3.2m/s and complex manoeuvres like backflips thanks to its maximum torque output and rotation speed of 32Nm/220RPM. CyberDog handles the vast amounts of data that its sensor system captures for its owners without any problems.
 The CyberDog has an improved ability to sense, evaluate, and interact with its environment thanks to its 11 high-precision sensors, which include touch sensors, cameras, ultrasonic sensors, GPS modules, and more.
As per Xiaomi CyberDog is created using open-source techniques, with basic components that Xiaomi has developed internally being rebuilt and optimised. It has established the “Xiaomi Open-Source Community” to continuously share progress and outcomes with developers across the globe and vows to build a robotics lab to give engineers a place to continue their search for novel solutions.
For the latest gadget and tech news, and gadget reviews, follow us on Twitter, Facebook and Instagram. For newest tech & gadget videos subscribe to our YouTube Channel. You can also stay up to date using the Gadget Bridge Android App. You can find the latest car and bike news here.
The CyberDog has an improved ability to sense, evaluate, and interact with its environment thanks to its 11 high-precision sensors, which include touch sensors, cameras, ultrasonic sensors, GPS modules, and more.
As per Xiaomi CyberDog is created using open-source techniques, with basic components that Xiaomi has developed internally being rebuilt and optimised. It has established the “Xiaomi Open-Source Community” to continuously share progress and outcomes with developers across the globe and vows to build a robotics lab to give engineers a place to continue their search for novel solutions.
For the latest gadget and tech news, and gadget reviews, follow us on Twitter, Facebook and Instagram. For newest tech & gadget videos subscribe to our YouTube Channel. You can also stay up to date using the Gadget Bridge Android App. You can find the latest car and bike news here.
 Xiaomi’s entry into the vast field of quadruped robotics is the CyberDog. According to the company the release of CyberDog, is intended for the global open-source community and developers. The CyberDog will be on exhibit at Mi Homes in Delhi, Mumbai, Bangalore, Chennai, Kolkata, and Ahmedabad as part of Xiaomi’s incredible eight-year anniversary celebration in India.
The ability of CyberDog to perceive its surroundings has been improved. A variety of camera sensors are included with it, including AI interactive cameras, binocular ultra-wide-angle fisheye cameras, and an Intel RealSenseTM D450 Depth module, and its computer vision algorithm may be taught on them.
Xiaomi says that the Centimeter-scale obstacle avoidance and navigation, autonomous object tracking, and SLAM are all based on this vision sensor system. The CyberDog has the ability to develop navigational maps, plot its course, analyse its surroundings in real-time, and avoid impediments. When combined with tracking of face recognition and human posture, CyberDog is able to build navigational maps in real-time while avoiding obstacles.
By setting a wake word, users can utilise voice assistants to command and manage CyberDog, as well as the companion remote and smartphone app. It can be used for even the most unusual jobs, and the interactions with it have limitless potential.
With three USB Type-C ports and an HDMI port, the robot may be further customised by developers to investigate and include a variety of cutting-edge and imaginative hardware add-ons or software systems, like a searchlight, panoramic camera, motion camera, LiDAR, and more.
The NVIDIA Jetson XavierTM NX platform, an AI Supercomputer for Embedded and Edge Systems with 384 CUDA Cores, 48 Tensor Cores, a 6 Carmel ARM CPU, and 2 deep learning acceleration engines, is the engine behind Xiaomi’s Cyberdog quadruped robot. calibrated with servo motors that were created in-house by Xiaomi, which results in a high rate of speed, remarkable agility, and a broad range of motion.
CyberDog is capable of a variety of fast moves up to 3.2m/s and complex manoeuvres like backflips thanks to its maximum torque output and rotation speed of 32Nm/220RPM. CyberDog handles the vast amounts of data that its sensor system captures for its owners without any problems.
Xiaomi’s entry into the vast field of quadruped robotics is the CyberDog. According to the company the release of CyberDog, is intended for the global open-source community and developers. The CyberDog will be on exhibit at Mi Homes in Delhi, Mumbai, Bangalore, Chennai, Kolkata, and Ahmedabad as part of Xiaomi’s incredible eight-year anniversary celebration in India.
The ability of CyberDog to perceive its surroundings has been improved. A variety of camera sensors are included with it, including AI interactive cameras, binocular ultra-wide-angle fisheye cameras, and an Intel RealSenseTM D450 Depth module, and its computer vision algorithm may be taught on them.
Xiaomi says that the Centimeter-scale obstacle avoidance and navigation, autonomous object tracking, and SLAM are all based on this vision sensor system. The CyberDog has the ability to develop navigational maps, plot its course, analyse its surroundings in real-time, and avoid impediments. When combined with tracking of face recognition and human posture, CyberDog is able to build navigational maps in real-time while avoiding obstacles.
By setting a wake word, users can utilise voice assistants to command and manage CyberDog, as well as the companion remote and smartphone app. It can be used for even the most unusual jobs, and the interactions with it have limitless potential.
With three USB Type-C ports and an HDMI port, the robot may be further customised by developers to investigate and include a variety of cutting-edge and imaginative hardware add-ons or software systems, like a searchlight, panoramic camera, motion camera, LiDAR, and more.
The NVIDIA Jetson XavierTM NX platform, an AI Supercomputer for Embedded and Edge Systems with 384 CUDA Cores, 48 Tensor Cores, a 6 Carmel ARM CPU, and 2 deep learning acceleration engines, is the engine behind Xiaomi’s Cyberdog quadruped robot. calibrated with servo motors that were created in-house by Xiaomi, which results in a high rate of speed, remarkable agility, and a broad range of motion.
CyberDog is capable of a variety of fast moves up to 3.2m/s and complex manoeuvres like backflips thanks to its maximum torque output and rotation speed of 32Nm/220RPM. CyberDog handles the vast amounts of data that its sensor system captures for its owners without any problems.
 The CyberDog has an improved ability to sense, evaluate, and interact with its environment thanks to its 11 high-precision sensors, which include touch sensors, cameras, ultrasonic sensors, GPS modules, and more.
As per Xiaomi CyberDog is created using open-source techniques, with basic components that Xiaomi has developed internally being rebuilt and optimised. It has established the “Xiaomi Open-Source Community” to continuously share progress and outcomes with developers across the globe and vows to build a robotics lab to give engineers a place to continue their search for novel solutions.
For the latest gadget and tech news, and gadget reviews, follow us on Twitter, Facebook and Instagram. For newest tech & gadget videos subscribe to our YouTube Channel. You can also stay up to date using the Gadget Bridge Android App. You can find the latest car and bike news here.
The CyberDog has an improved ability to sense, evaluate, and interact with its environment thanks to its 11 high-precision sensors, which include touch sensors, cameras, ultrasonic sensors, GPS modules, and more.
As per Xiaomi CyberDog is created using open-source techniques, with basic components that Xiaomi has developed internally being rebuilt and optimised. It has established the “Xiaomi Open-Source Community” to continuously share progress and outcomes with developers across the globe and vows to build a robotics lab to give engineers a place to continue their search for novel solutions.
For the latest gadget and tech news, and gadget reviews, follow us on Twitter, Facebook and Instagram. For newest tech & gadget videos subscribe to our YouTube Channel. You can also stay up to date using the Gadget Bridge Android App. You can find the latest car and bike news here. Best Ways to Make a Collage on Android

Making a collage is one of the best ways to liven up your social media feed, or even preserve a memory. You can even make one to send birthday wishes to a friend or just mark a personal occasion by stitching together the photos from that memory. Today, we show you the best ways to make a collage on Android.
Read Also: A complete guide on how to use Zoom and change its layout
Step 4: Select ‘Collage’ under the Create New section.
Step 5: Select the images you want to put in your collage.
Step 6: Google Photos will create a collage for you.
While this may be the easiest way to make a collage, Google Photos doesn’t let you select the layout or make any further edits. To get more control over the collage you’re creating, use one of the specialised collage apps.
Collage Maker by Inshot gives you greater control over the collage you’re making. You can combine up to 20 photos to make a collage and choose from more than 300 layouts, photo frames, and grids. On top of that, you can even customise the background and add text and other animations over the collage.
Collage Maker by Inshot saves your pictures in high resolution and also gives you the option to share your freshly made collage directly to Facebook and other social media.
Layout from Instagram: Collage is an app developed by Instagram for users to make exciting collages. This intuitive app lets you select up to 9 images at once to make fun, personalised collages. Layout from Instagram saves the collages in your phone gallery. You do not need to sign in to use it.
Read Also: Instagram Tips & Tricks – Making an Account for Your Pet
These are the best ways to make a collage on Android. While Google Photos is the easiest way to make a collage without downloading any app, it does not offer any creative control to the user. You can find a ton of apps on the Play Store, apart from the ones listed above, that have their own unique features which make the process of collage-making fun and exciting. If you have a favourite app to make collages, let us know in the comments!
For the latest gadget and tech news, and gadget reviews, follow us on Twitter, Facebook and Instagram. For newest tech & gadget videos subscribe to our YouTube Channel. You can also stay up to date using the Gadget Bridge Android App. You can find the latest car and bike news here.
In This Article
Make a collage using the Photos app
Step 1: Open the Google Photos app on your phone. Step 2: Select ‘Library’ from the bottom menu. Step 3: Tap on ‘Utilities’. Step 4: Select ‘Collage’ under the Create New section.
 Step 5: Select the images you want to put in your collage.
 Step 6: Google Photos will create a collage for you.
 While this may be the easiest way to make a collage, Google Photos doesn’t let you select the layout or make any further edits. To get more control over the collage you’re creating, use one of the specialised collage apps.
Make a collage using Collage Maker by Inshot
 Collage Maker by Inshot gives you greater control over the collage you’re making. You can combine up to 20 photos to make a collage and choose from more than 300 layouts, photo frames, and grids. On top of that, you can even customise the background and add text and other animations over the collage.
Collage Maker by Inshot saves your pictures in high resolution and also gives you the option to share your freshly made collage directly to Facebook and other social media.
Collage Maker by Inshot gives you greater control over the collage you’re making. You can combine up to 20 photos to make a collage and choose from more than 300 layouts, photo frames, and grids. On top of that, you can even customise the background and add text and other animations over the collage.
Collage Maker by Inshot saves your pictures in high resolution and also gives you the option to share your freshly made collage directly to Facebook and other social media.
Make a collage using Layout from Instagram: Collage
 Layout from Instagram: Collage is an app developed by Instagram for users to make exciting collages. This intuitive app lets you select up to 9 images at once to make fun, personalised collages. Layout from Instagram saves the collages in your phone gallery. You do not need to sign in to use it.
Read Also: Instagram Tips & Tricks – Making an Account for Your Pet
These are the best ways to make a collage on Android. While Google Photos is the easiest way to make a collage without downloading any app, it does not offer any creative control to the user. You can find a ton of apps on the Play Store, apart from the ones listed above, that have their own unique features which make the process of collage-making fun and exciting. If you have a favourite app to make collages, let us know in the comments!
For the latest gadget and tech news, and gadget reviews, follow us on Twitter, Facebook and Instagram. For newest tech & gadget videos subscribe to our YouTube Channel. You can also stay up to date using the Gadget Bridge Android App. You can find the latest car and bike news here.
Layout from Instagram: Collage is an app developed by Instagram for users to make exciting collages. This intuitive app lets you select up to 9 images at once to make fun, personalised collages. Layout from Instagram saves the collages in your phone gallery. You do not need to sign in to use it.
Read Also: Instagram Tips & Tricks – Making an Account for Your Pet
These are the best ways to make a collage on Android. While Google Photos is the easiest way to make a collage without downloading any app, it does not offer any creative control to the user. You can find a ton of apps on the Play Store, apart from the ones listed above, that have their own unique features which make the process of collage-making fun and exciting. If you have a favourite app to make collages, let us know in the comments!
For the latest gadget and tech news, and gadget reviews, follow us on Twitter, Facebook and Instagram. For newest tech & gadget videos subscribe to our YouTube Channel. You can also stay up to date using the Gadget Bridge Android App. You can find the latest car and bike news here. Garena Free Fire Redeem Codes Today 7 July 2022: Here is how to claim them

Garena Free Fire is a battle royale game with regular awards and tournaments to keep players interested. If you play Garena Free Fire, you should be aware of the redeem codes that are released on a daily basis. However, because the battle royale game is banned in India, players from other countries can use the Free Fire Redeem codes daily. If you’re unfamiliar with the Garena Free Fire redeem codes or don’t know how to get them, we’ve put together a step-by-step guide to help you redeem them. Check out Garena Free Fire Redeem Codes for July 7.
The Free Fire redeem codes are a great way to get free stuff. These are 12-digit codes that contain alphabets and numbers, as well as an expiration date and time. Because the Garena FF redeem codes cannot be used more than once, you should hurry to the redemption page to claim your free reward before someone else does. To get a free reward, all you have to do is go to reward.ff.garena.com/en, which is the official redemption page. Also, keep an eye on this space for daily updates on Garena Free Fire redemption codes and rewards.
In This Article
Garena Free Fire Redeem Codes Today 7 July 2022
- FQX1-FT2Q-S3WS
- AD2Q-FG8I-H3EI
- RGY1-TG4F-VBE4
- JI56-Y9HI-8UBJ
- FY87-HYBT-VGFC
- VXSB-EN4K-56I9
- Y8H7-B6V5-C4XS
- 3EAW-QSD2-CV3G
- TER5-F43E-SWAS
- WEYVGQC3CT8Q
- GCNVA2PDRGRZ
- J3ZKQ57Z2P2P
- B3G7A22TWDR7X
- 3IBBMSL7AK8G
- 8F3QZKNTLWBZ
- SARG886AV5GR
- X99TK56XDJ4X
- 4ST1ZTBE2RP9
- FF7MUY4ME6SC
- FJK8-SL6W-Q203
- 9ER8-FG7H-BYU4
- JVK9-DS2W-QJ2U
- Y54E-RF3G-BE4E
- F6C5-X4SA-3QWE
- 2DF3-GHRT-UG76
- 5FD4-SQED-2FV3
- B4J5-TIY8-H765
- DR8S-F2VB-N4J5
- KTIY-8H76-B8V5
- CDRS-F5EV-456I
- FH3R-NF1B-VD8S
- A52E-Q12Q-6E3D
- SCX4-VB21-HD85
- EY64-5RF3-GB7D
- GD8H-JEUI-84I7
- 6TRG-FBH4-NJCK
- IX8S-765Y-4QE2
- DCV3-BH4E-JRFI
- G6VT-5RSF-AV7W
- BG4N-EJ4K-5L6O
- Y9H8-7GY6-FT8D
- GEF8-B4N5-M6YK
- UOJ8-7B6F-5DRE
- F4G5-TYH9-KJU7
How to Get Free Fire Redeem Codes for Garena on July 7?
- Visit the Garena Free Fire game’s official website at reward.ff.garena.com.
- Use your Facebook, Google, VK, Apple ID, Huawei ID, or Twitter account to log in.
- You’ll be taken to a valid redemption code (s)
- Copy and paste the 12-digit redemption code into the text box.
- On the screen, a dialogue box will appear.
- ‘Ok’ should be selected.
Hisense 120L9G Laser TV with 120-inch ALR cinema screen launched in India

Popular television brand Hisense has announced the launch of a new laser TV in India. The company has launched Hisense 120L9G Laser TV with the industry-first largest ALR screen of 120 inches. The laser TV also offers 3000 lumens brightness and 4K UHD picture quality images. Moreover, there are Dolby Atmos-supported 40W speakers.

In This Article
Hisense 120L9G Laser TV price in India and availability
The Hisense 120L9G Laser TV is priced at Rs 4,99,999 in India. The new device is now available for purchase via Amazon. For a limited time, the Hisense 120L9G Laser TV will come with a 3-year full warranty and a 4K Fire TV Stick Max as part of an introductory launch promotion on Amazon. Special experience zones at select Croma stores in Delhi and Mumbai from July end.
Hisense 120L9G Laser TV features
Hisense 120L9G Laser TV comes with a 120-inch ALR cinema screen. The laser TV has wide viewing angles and superb colour fidelity are features of the ALR cinema screen. It offers 3000-lumen brightness. Dolby Atmos audio surrounds the listener’s senses in unmatched strength and clarity thanks to its 40-watt front-firing built-in speakers. The Hisense 120-inch Laser TV offers a Wide Color Gamut, Smooth Motion for Sports, Filmmaker Mode, and TUV-certified Blue Light Technology to Reduce Blue Light Emission to Protect the Eyes During Long Hours of Viewing. The L9G Laser TV casts a large 120-inch image in magnificent 4K resolution when placed even only 30 cm from the wall thanks to 4K Ultra-Short Throw Technology. The L9G achieves new levels of colour performance, achieving 107 percent of the BT.2020 colour gamut, using the world’s first triple colour laser technology, known as the TriChrom Laser Engine. As per the business the Digital Micromirror Device reacts to motion faster than LED or OLED and produces smoother motion than any other display technology. MEMC Technology also makes a contribution, enhancing how smoothly fast-action unfolds in games, movies, and sports. Texas Instruments-powered DLP technology is also included. Now available at home, the projection technology provides laser-focused detail in 90% of movie theatres worldwide. With X-Fusion laser light technology, you can have fun for up to 25,000 hours. The L9G has a proximity sensor that, when a moving object is within 50 cm of the laser light source, lowers its brightness to protect your eyes. With Alexa already embedded into the Hisense Laser TV, customers can easily connect to other IoT devices for the smart home and use the voice remote to immediately search for content. For the latest gadget and tech news, and gadget reviews, follow us on Twitter, Facebook and Instagram. For newest tech & gadget videos subscribe to our YouTube Channel. You can also stay up to date using the Gadget Bridge Android App. You can find the latest car and bike news here.7 July 2022 Amazon Quiz today answers: Answer to win Rs 1,000 Amazon Pay Balance

Get ready to participate in the 7 July Amazon Quiz, as it is live on its mobile platform. In today’s quiz participants have a chance to win Rs 1,000 Amazon Pay Balance by answering all the questions correctly. The quiz can be played every day from 12 AM to 11:59. Check Out Amazon Quiz Answers Today 7 July 2022.
The daily quiz conducted by the company brings an opportunity for the customers to win exciting prizes. Every day Amazon brings a fresh set of questions for its customers that contains five easy questions. The questionnaire consists of five questions related to general knowledge and current affairs.
The participants need to answer all the questions correctly and their names will be selected for a lucky draw. The winner will be announced at the end of the month. Amazon quiz brings an opportunity for its customers to win Amazon Pay Balance ranging from Rs 1,000 to Rs 50,000. Only app users are eligible to participate in the Quiz as it is not accessible on the web platform.
Amazon Quiz Today Prize – Rs 1,000 Amazon Pay Balance
Quiz Date – 7 July 2022
Daily Timing – 12 AM to 11:59 PM
Winner Announcement – Today 12 PM
In This Article
Amazon Quiz Answers Today 7 July 2022
Question 1: Which team did India defeat in the final to win the 2022 Thomas Cup in badminton? Answer: Indonesia Question 2: The Centre’s recent recruitment scheme for Indian youth to serve in the armed forces, shares its name with which movie? Answer: Agnipath Question 3: At the 2022 Skytrax World Airport Awards, an airport in which city bagged the best regional airport in India and South Asia award? Answer: Bengaluru Question 4: In which European country is this location located? Answer: Switzerland Question 5: What is the profession of this famous comic book character? Answer: ReporterHow To Play Amazon Quiz
Only app users are eligible to play the Amazon quiz every morning from 12 AM to 11:59 PM. The quiz is not available on the desktop. For those who are unaware of how to play the Amazon quiz below are the steps, you can follow to take the quiz.- Firstly download the Amazon app from Google Play Store or App Store
- Now fill in the required information through the Sign Up option.
- You need to log in to the Amazon app and scroll down on the home screen to find the Amazon Quiz banner.
- Tap on the Amazon Quiz banner and tap on the Start button to start the Quiz.
- Now you will get 5 questions and you need to answer them correctly. One wrong answer will eliminate you from the Quiz.
- After answering all the questions correctly you are now eligible for a Lucky Draw.
- The winner’s name will be announced today at 12 PM.
Top 5 easy ways: How to Fix Windows 10 Stuck on Shutting down Screen?

Sometimes Windows users come across a very weird issue where they aren’t able to shut down their laptop or PC. In such cases, the operating system gets stuck on the shutting down screen. It can get quite confusing since there isn’t a lot you can do other than wait. Luckily, there are a few workarounds to this issue. Today, we show you the top 5 easy ways to fix Windows 10 when it gets stuck on shutting down screen.
Read Also: What Does ‘Lock the Taskbar’ Mean in Windows?
Step 3: Install any available updates and restart your computer.
Step 3: Shut down your system.
Windows takes a long time to close background apps when you initiate a shutdown. If you close all apps before shutting down, Windows will not get stuck on the shutting down screen.
Step 3: Select ‘Change Settings that are Currently Unavailable’.
Step 4: Uncheck the box that says ‘Turn on fast startup’ and apply changes.
Read Also: Golden Era of Gaming and Nostalgia
Following these steps will help you fix Windows 10 when it gets stuck on the shutting down screen. You can also try troubleshooting by going to Settings and searching for ‘troubleshoot power’. If everything fails, you should take your device to a professional repair centre for further diagnosis.
For the latest gadget and tech news, and gadget reviews, follow us on Twitter, Facebook and Instagram. For newest tech & gadget videos subscribe to our YouTube Channel. You can also stay up to date using the Gadget Bridge Android App. You can find the latest car and bike news here.
In This Article
Update Windows OS
Step 1: Open Settings>Update and Security. Step 2: Click on ‘Check for Updates’. Step 3: Install any available updates and restart your computer.
Shut Down Background Apps and Processes
Step 1: Press Ctrl+Shift+Esc to open the Windows Task Manager. Step 2: Close any working apps. Step 3: Shut down your system.
Windows takes a long time to close background apps when you initiate a shutdown. If you close all apps before shutting down, Windows will not get stuck on the shutting down screen.
Step 3: Shut down your system.
Windows takes a long time to close background apps when you initiate a shutdown. If you close all apps before shutting down, Windows will not get stuck on the shutting down screen.
Force Shutdown
If you’re stuck on the shutdown screen and nothing seems to work, you can perform a force shutdown. Press the power button for a few seconds until the system shuts itself.Turn off Fast Startup
Fast startup puts your PC in advanced hibernation whenever you shut it down. This decreases the boot time whenever you turn it on again. Fast startup is known to have some compatibility issues and can be the cause of Windows getting stuck on shutting down screen. Step 1: Go to Control Panel>Power Options. Step 2: Select ‘What the Power Buttons do’. Step 3: Select ‘Change Settings that are Currently Unavailable’.
 Step 4: Uncheck the box that says ‘Turn on fast startup’ and apply changes.

Control Startup Apps
Your computer has a certain number of apps that start as soon as your turn on your PC. These apps may be preventing your computer from shutting down. Step 1: Open Windows Task Manager. Step 2: Go to the ‘Startup’ tab. Step 3: Disable any apps running in the background. Read Also: Golden Era of Gaming and Nostalgia
Following these steps will help you fix Windows 10 when it gets stuck on the shutting down screen. You can also try troubleshooting by going to Settings and searching for ‘troubleshoot power’. If everything fails, you should take your device to a professional repair centre for further diagnosis.
For the latest gadget and tech news, and gadget reviews, follow us on Twitter, Facebook and Instagram. For newest tech & gadget videos subscribe to our YouTube Channel. You can also stay up to date using the Gadget Bridge Android App. You can find the latest car and bike news here.
Read Also: Golden Era of Gaming and Nostalgia
Following these steps will help you fix Windows 10 when it gets stuck on the shutting down screen. You can also try troubleshooting by going to Settings and searching for ‘troubleshoot power’. If everything fails, you should take your device to a professional repair centre for further diagnosis.
For the latest gadget and tech news, and gadget reviews, follow us on Twitter, Facebook and Instagram. For newest tech & gadget videos subscribe to our YouTube Channel. You can also stay up to date using the Gadget Bridge Android App. You can find the latest car and bike news here. What Does ‘Lock the Taskbar’ Mean in Windows?

You may not know this but the taskbar at the bottom of your screen is highly customisable. You can use it for more than just selecting your apps and checking the time. It can be personalised in many ways – you can change the size and colour, pin your favourite apps, move it somewhere else on the screen, and rearrange or resize taskbar buttons. In this article, we will show you what ‘lock the taskbar’ means in Windows.
Read Also: 6 steps that help you access error-free Microsoft Store
If you wanna move the taskbar to somewhere else on the screen, go to Settings>Personalisation>Taskbar and select ‘Taskbar location on screen’. You will be given several options to choose from.
If you want to pin any app to the taskbar, simply search for it in the search bar, then right-click on the app icon and select ‘Pin to taskbar’.
After you’ve made all the changes, you can ‘lock the taskbar’. Locking the taskbar prevents any further changes from being made to your taskbar. You can still access all its functionalities, but you cannot add or remove anything to it. You also won’t be able to resize or change the position of the taskbar once it’s locked. You can lock the taskbar by simply right-clicking anywhere on the taskbar and selecting ‘lock the taskbar’.
Read Also: 5 Useful Gadgets under Rs 4000 for Work From Home
You can look for other customisation options in the Personalisation window of the taskbar. You can even hide the taskbar, making it invisible unless you hover your cursor over it. You can also lock the taskbar by going to Settings>Personalisation>Taskbar>Lock the taskbar.
For the latest gadget and tech news, and gadget reviews, follow us on Twitter, Facebook and Instagram. For newest tech & gadget videos subscribe to our YouTube Channel. You can also stay up to date using the Gadget Bridge Android App. You can find the latest car and bike news here.
What does ‘lock the taskbar’ do?
If you want to change the way your taskbar looks, you can personalise it according to your liking. If you feel like increasing the size, simply bring your cursor to the edge of the taskbar and drag it upwards until you find the right size. If you wanna move the taskbar to somewhere else on the screen, go to Settings>Personalisation>Taskbar and select ‘Taskbar location on screen’. You will be given several options to choose from.
If you want to pin any app to the taskbar, simply search for it in the search bar, then right-click on the app icon and select ‘Pin to taskbar’.
If you wanna move the taskbar to somewhere else on the screen, go to Settings>Personalisation>Taskbar and select ‘Taskbar location on screen’. You will be given several options to choose from.
If you want to pin any app to the taskbar, simply search for it in the search bar, then right-click on the app icon and select ‘Pin to taskbar’.
 After you’ve made all the changes, you can ‘lock the taskbar’. Locking the taskbar prevents any further changes from being made to your taskbar. You can still access all its functionalities, but you cannot add or remove anything to it. You also won’t be able to resize or change the position of the taskbar once it’s locked. You can lock the taskbar by simply right-clicking anywhere on the taskbar and selecting ‘lock the taskbar’.
Read Also: 5 Useful Gadgets under Rs 4000 for Work From Home
You can look for other customisation options in the Personalisation window of the taskbar. You can even hide the taskbar, making it invisible unless you hover your cursor over it. You can also lock the taskbar by going to Settings>Personalisation>Taskbar>Lock the taskbar.
For the latest gadget and tech news, and gadget reviews, follow us on Twitter, Facebook and Instagram. For newest tech & gadget videos subscribe to our YouTube Channel. You can also stay up to date using the Gadget Bridge Android App. You can find the latest car and bike news here.
After you’ve made all the changes, you can ‘lock the taskbar’. Locking the taskbar prevents any further changes from being made to your taskbar. You can still access all its functionalities, but you cannot add or remove anything to it. You also won’t be able to resize or change the position of the taskbar once it’s locked. You can lock the taskbar by simply right-clicking anywhere on the taskbar and selecting ‘lock the taskbar’.
Read Also: 5 Useful Gadgets under Rs 4000 for Work From Home
You can look for other customisation options in the Personalisation window of the taskbar. You can even hide the taskbar, making it invisible unless you hover your cursor over it. You can also lock the taskbar by going to Settings>Personalisation>Taskbar>Lock the taskbar.
For the latest gadget and tech news, and gadget reviews, follow us on Twitter, Facebook and Instagram. For newest tech & gadget videos subscribe to our YouTube Channel. You can also stay up to date using the Gadget Bridge Android App. You can find the latest car and bike news here.