In This Article
On Smartphone
Tinder supports both Android and iOS devices and has the same steps to be followed by the users to create an account. The user interface of both platforms is pretty much the same and is easy for users to understand. Here is how you can make your account. Step 1 – Search for Tinder on Google Play Store or Apple App Store. Step 2 – Tap on install and wait for the process to complete. Step 3 – Open the application.
Step 4 – Select the login option according to your preference.
Step 3 – Open the application.
Step 4 – Select the login option according to your preference.
 Read Also: Now add a video to your Tinder profile and find matches
Step 5 – Logging in with social accounts is hassle-free but logging in with a phone number will ask you for an OTP.
Step 6 – Enter the OTP if you logged in with your phone number.
Read Also: Now add a video to your Tinder profile and find matches
Step 5 – Logging in with social accounts is hassle-free but logging in with a phone number will ask you for an OTP.
Step 6 – Enter the OTP if you logged in with your phone number.
 Step 7 – Now you would need to upload your image and add your Bio. You can set up your profile accordingly.
On Web Browser
The Tinder application allows you to access your profile anywhere, without the hassle of carrying your smartphone with you. All you need is a device with an internet connection and start swiping. Here is how you can set up your profile using the web browser. Step 1 – Visit Tinder.com Step 2 – Click login if you already have a profile or tap on Create account for new. Read Also: Tinder adds a new Explore section, giving more control to users
Step 3 – Select the login option according to your preference.
Read Also: Tinder adds a new Explore section, giving more control to users
Step 3 – Select the login option according to your preference.
 Step 4 – Login with socials will redirect you to your social logins but logging in with a phone number will send an OTP to your entered phone number
Step 5 – Enter the OTP, if you chose to login with a phone number.
Step 4 – Login with socials will redirect you to your social logins but logging in with a phone number will send an OTP to your entered phone number
Step 5 – Enter the OTP, if you chose to login with a phone number.
 Step 6 – The next step will be creating your profile and you are good to go. You would need to upload your image and add your Bio.
These steps will help one easily create a Tinder profile on the desired platform. After successfully creating the profile the users can start swiping and meet new people who match with them or they want to match with. Happy swiping!
For the latest gadget and tech news, and gadget reviews, follow us on Twitter, Facebook and Instagram. For newest tech & gadget videos subscribe to our YouTube Channel. You can also stay up to date using the Gadget Bridge Android App. You can find the latest car and bike news here.
Step 6 – The next step will be creating your profile and you are good to go. You would need to upload your image and add your Bio.
These steps will help one easily create a Tinder profile on the desired platform. After successfully creating the profile the users can start swiping and meet new people who match with them or they want to match with. Happy swiping!
For the latest gadget and tech news, and gadget reviews, follow us on Twitter, Facebook and Instagram. For newest tech & gadget videos subscribe to our YouTube Channel. You can also stay up to date using the Gadget Bridge Android App. You can find the latest car and bike news here. 


")


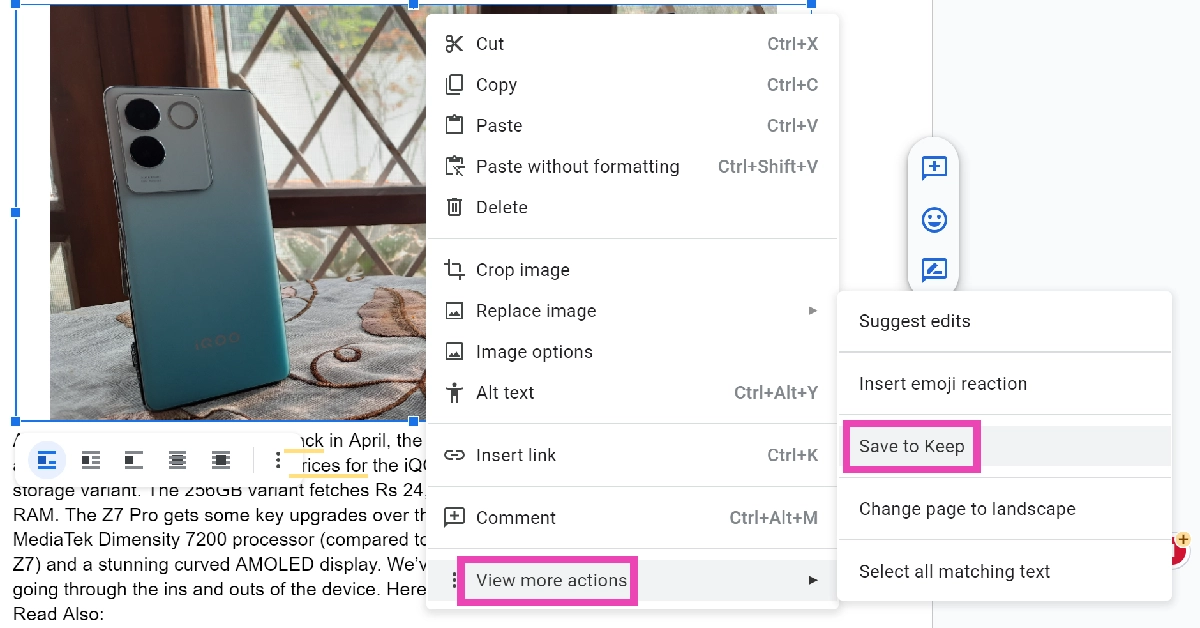 Step 4: Google Keep will open in the sidebar. You can add a note along with the image.
Step 5: Right-click on the image and select Save image as.
Step 4: Google Keep will open in the sidebar. You can add a note along with the image.
Step 5: Right-click on the image and select Save image as.
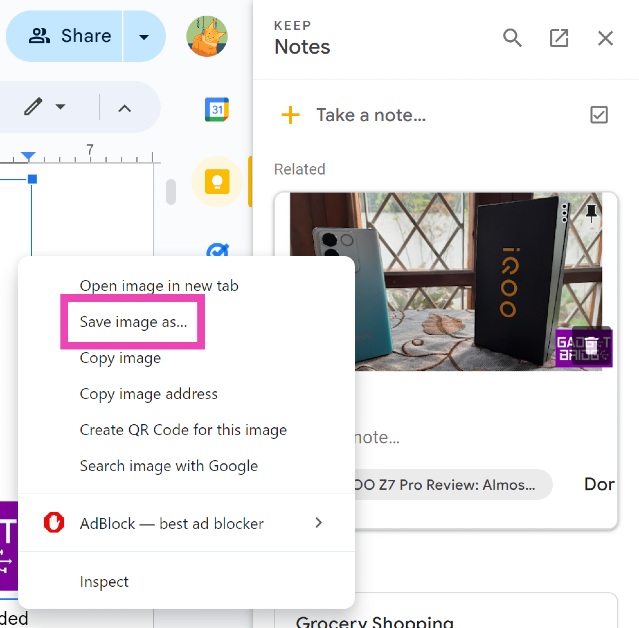 Step 6: Select the destination folder on your PC and hit Save.
 Step 4: With the other hand, browse to the new note you just created while still keeping the image selected.
Step 5: Drop the image in the note.
Step 4: With the other hand, browse to the new note you just created while still keeping the image selected.
Step 5: Drop the image in the note.
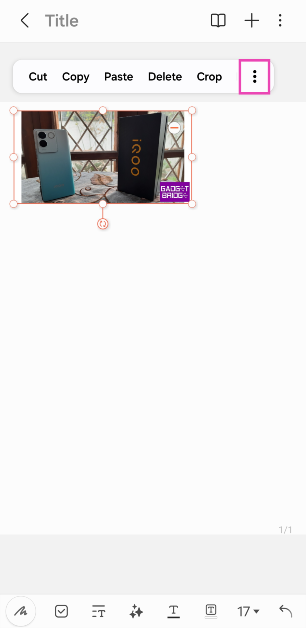
 Step 6: Hit the ellipses on the image menu.
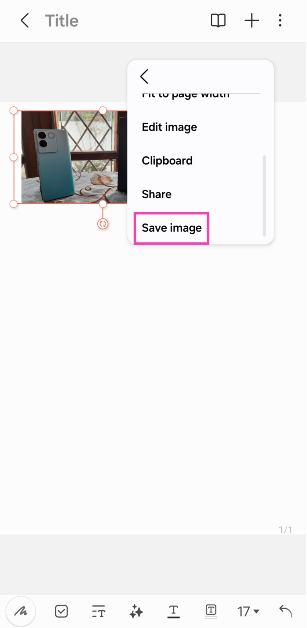
 Step 7: Scroll down and select Save image.

 Users only get two extra silicone tips (large and small) and a quick start guide in the box, other than the Oppo Enco Buds and its charging case. To keep the costs low and also lessen the carbon footprint there is no charging cable or charger in the box.
Both the Oppo Enco Buds are also dressed in pearly white and get magnetically fixed within the charging case. Pull them out and you will find them to be really light. Each weighs about 4 grams and the case weighs 37 grams. The Oppo Enco Buds fit nicely in the ear and create a vacuum so that they do not fall off, even when you are running.
The exterior of the Oppo Enco Buds also has feather touch controls on them. You can tap to pause/play songs, double-tap to go to the next song or triple tap to turn the game mode on/off. Both the earbuds have microphones on them and connect to the device/smartphone simultaneously using binaural BT transmission.
Users only get two extra silicone tips (large and small) and a quick start guide in the box, other than the Oppo Enco Buds and its charging case. To keep the costs low and also lessen the carbon footprint there is no charging cable or charger in the box.
Both the Oppo Enco Buds are also dressed in pearly white and get magnetically fixed within the charging case. Pull them out and you will find them to be really light. Each weighs about 4 grams and the case weighs 37 grams. The Oppo Enco Buds fit nicely in the ear and create a vacuum so that they do not fall off, even when you are running.
The exterior of the Oppo Enco Buds also has feather touch controls on them. You can tap to pause/play songs, double-tap to go to the next song or triple tap to turn the game mode on/off. Both the earbuds have microphones on them and connect to the device/smartphone simultaneously using binaural BT transmission.
 There are 8MM dynamic audio drivers in each of the Oppo Enco Buds and as said they are good for music, voice calls and even gaming. Bluetooth 5.2 is supported, and they have a range of 10M. We tested it out and the sound was good up to 8 meters without walls, but with walls or doors in between the range reduces to about 4.5 meters.
Both the Oppo Enco Buds have a 40mAh battery inside, which the company claims to last for 6 hours. This is just about right. We got about 5.5 hours of playtime from them, after which we had to put them back in the case. The case with its additional 400 mAh battery can provide between 17-19 hours of added playback time. In case you are in a hurry, just put them to charge for 15 minutes in the charging case and you will end up getting 60 minutes of playback time.
There are 8MM dynamic audio drivers in each of the Oppo Enco Buds and as said they are good for music, voice calls and even gaming. Bluetooth 5.2 is supported, and they have a range of 10M. We tested it out and the sound was good up to 8 meters without walls, but with walls or doors in between the range reduces to about 4.5 meters.
Both the Oppo Enco Buds have a 40mAh battery inside, which the company claims to last for 6 hours. This is just about right. We got about 5.5 hours of playtime from them, after which we had to put them back in the case. The case with its additional 400 mAh battery can provide between 17-19 hours of added playback time. In case you are in a hurry, just put them to charge for 15 minutes in the charging case and you will end up getting 60 minutes of playback time.

 Huawei Watch GT 2 Pro Moon Phase Collection specifications